
Making removable masks is a tall order when the head in question is roughly an inch. Probably the biggest debate is that of "Durability versus Aesthetics". Toy manufacturers usually opt for the former and the results are often very lacking. Mego masks and even the recent Hasbro Batman suffers from "huge mask syndrome". The masks are often 25-30% larger than the head to accommodate the sculpted hair and facilitate removal. In addition, the masks are often 1.5-2mm thick. This, while not aesthetically pleasing scale-wise, is understandable since the toys are designed to accommodate the rugged and often unforgiving play of kids. Some customizers opt for the latter option and use thin casting materials such as liquid latex or rubber to make tighter fitting mask. However, one must remember that latex (and even rubber) tend to degrade with time and humidity. A prized creation can turn into a puddle of latex a couple of months or years down the road.
Making the head
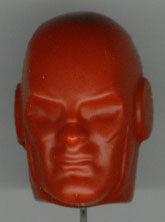
The first thing you need is a head ... duhhhh :-P. Mine happens to be a bald John Wesley Shipp, the actor who portrayed the Flash in the short-lived TV series. Make a mold of the head and cast a couple of copies in polyurethane or your resin of choice.
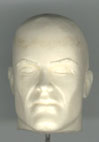
Sculpt the mask directly over your casting. I used Magic sculpt for the task since it's very durable and easy to smooth (just add water). The sculpted mask should be at least 1-2 mm thick.
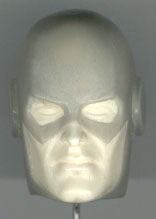
I know sounds wrong, but you need to do this to accommodate any shrinkage that could occur during the molding or casting phases. Make a mold of "masked" head.
�
Mask casting 101
There are many ways to make/ cast a removable mask. Below are 2 techniques that I use:
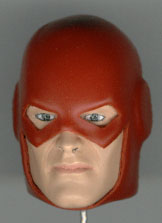
1) Plasti-Dip:
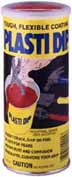
Yes, the same stuff that's use to coat metal handle on you pliers and tools can be used to make masks. Plasti-Dip or Tool Dip can be found at hardware store and Wal-Mart for around $7.00 a can. They're available in a variety of colors.
Cast your "masked" head in polyurethane resin and insert a screw, nail or needle into the bottom of the head. This will serve as your handle for dipping. Dipped the masked head into the Plasti-Dip. When dipping, go in slowly to prevent air bubbles from getting trapped between your head sculpt and the Plasti-Dip solvent. Do the same when removing and make sure that back of the head (occipital region) comes out last. Plasti-Dip is very viscous and leaves a little "tail" of plastic when the dipped object is removed. The tail will shrink as the Plasti-Dip dries, but that portion of the mask will be slightly thicker due to the excess material.
Allow the Plasti-Dip to dry for 3-4 hours and trim off the exposed areas of the mask. You don't have to do this step, but if you add another coat of Plasti-Dip, it will blur the sculpting lines and undercuts around the eyes. I usually add 1-2 more coats (depending on how thick my original coat is) for a total of 2-3 coats of Plasti-Dip. One coat isn't durable enough to withstand the stress of multiple mask removals. In addition, there isn't enough structural integrity with just one coat to hold the shape of the mask over its lifetime. Conversely, 4-5 coats make the mask too rigid and lose some of the flexibility which is needed when you continually put on and remove the mask. Besides with 4 coats, the mask becomes too thick and not very realistic looking especially at the 1:8 scale size. In addition, the more coats you apply, the more details you lose. You also increase the risk of getting uneven thickness, deformities or formation of air bubbles .... been there, done all of that. After the Plasti-Dip has thoroughly dry, trim off the excess and peel off the mask. Please note that you can't use the same head cast to make multiple masks. Urethane head has a thin releasing agent on the outside, which prevents the Plasti-Dip from permanently sticking to it. This is leached out after Plasti-Dip is added and removed. If you want to use the same cast to make multiple masks, you need to spray the head with a coat of Smooth-On sealer or paint a thin layer of acrylic over it. I don't like the painting method because you have to remove the paint from the inside of the mask afterwards.
2) Silicon casting:
Casting is often the preferred choice of modelers and manufacturers. The results are clean (once you work out the kinks), replicable and can be scale for large production run. Mixed a batch of Dow Corning silicon mold material and used that as the casting material. This stuff is incredibly durable. In fact, it's used to line underground and underwater phone lines. Since nothing sticks very well to silicon, you have to use a dye to color the mask. I mixed the new Smooth-on So-Strong dye to get the color I wanted. Once the dye was thoroughly mixed, I added a cure accelerator to cut the cure time from 12 hrs down to 4 hrs. This also cuts down the pot lifetime which translates to less rotocasting time. The cast can be removed after 4 hrs and the process can be repeated for production purposes.
3) Plasti-Dip casting:
diluted the Plasti-dip with Xylene (2:1 ratio). You need to dilute the Plasti-Dip since it's so viscous and wouldn't cover very well in a mold. Take about 2 cc of diluted mixture and inject it into the mold for rotocasting I recommend leaving the mask in the mold for 3-4hrs and adding another 3-4 coats since the dip was thinned with Xylene. You can also use this method to make multiple masks since Plasti-Dip doesn't stick to silicon.
Overall, there are pros and cons to all the methods above. The direct Plasti-Dip was the easiest, but you tend to lose a lot of structural details .... especially with more coats/ layers. In addition, if you're just making 1 mask, you don't even need to make a mold.... you can dip the prototype. The casting method is more work and there's the guessing game factor with how much silicon to use and how fast to rotate to achieve uniform thickness. However, all of the superficial details are well preserved. There is a problem if you need to paint the mask since acrylics don't stick to silicon. I had to paint the yellow part of the ear using an airbrush and enamel. I'm still not certain how enamel will react with corning silicon so I can't fully endorse this method .... give me 5 or so years :-). In addition, for a simple mask like the Flash, I'm not sure if superficial details warrant the labor intensive rotocasting protocol.
�
Hair plug for men
The final piece of the puzzle is the hair. You don't want to remove the mask and find a bald superhero do you? Maybe you do, but if you don't, make him a detachable hairpiece.
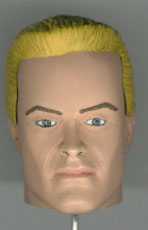
The detachable hairpiece was also made out of polyurethane and attached in a similar manner as my Black Canary wig system using snaps.