This is an article I've been meaning to write for quite sometime now. I'm still a novice and my skill pale in comparison to many out there like Jim Stelling so the information might not be that helpful. However, I felt compelled to write this article because head sculpting has helped me to grow as a customizer. No longer was I limited to repainting heads or slight modifications over existing ones. I was free to create anything I wanted and at any size. This is a joy I hope to share with you guys.
�
Reference Material
You can't construct a building without a floor plans and the same holds true for sculpting. Control art and reference materials are your floor plans so make sure you have plenty of them. I usually print out 5-6 pictures of the person in question preferably from different angles. Remember that pictures are 2 dimensional while sculpts are 3-D. Unless you have a mind that can process light shades into depth and dimension, you will need a frontal shot, side profile and possibly 1/4 turnshots. Next, you have to decide on the look/ expression of the character. There are numerous muscles in the face that can alter or change its appearance dramatically. When you smile, your cheek muscles contract and elevate creating new lines and ridges. Your eyes also tend to narrow thus changing the overall look of you face. Pick an expression that you like and go with it. In addition, you'll want to pick a time reference. By this I mean pick an age for the actor/ actresses. Faces tend change with age (except Dick Clark and Bob Costas who own some sort of fountain of youth). As people gain or lose weight, the dynamics of their faces change as well. Distinguishing/ character building lines may form or disappear.
�
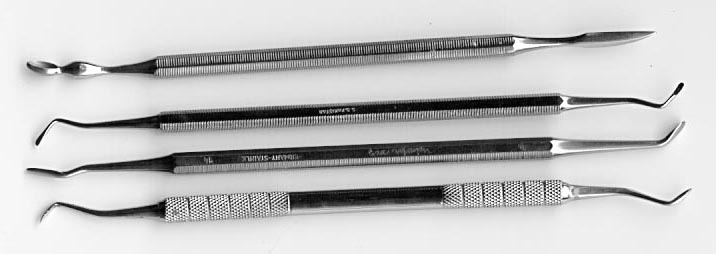
Tools
Your hands are your most important tools but they can only take you so
far. Sculpting tools are pretty much required if you want quality sculpts
with good details. The tools you use is up to you. Some people have 20 tools
designed for each specific situation. I use 2-3 dental picks and an artist
brush for smoothing fine details because I find it distracting to switch
back and forth between numerous tools. Pictured below are the tools I use.
You'll notice that I really don't use a loop. Why??? Well, I mainly subscribe
to the "build-up" approach to sculpting and rarely ever carve
out chunks of clay.
The top tool the most. The icecream scooper head is often used to smooth out curved details. I the knife edge is used to etch in large details or even smooth out details on a flat surface.
The second tool is probably my most useful tool in sculpting. The small curve head allows me to shape and smooth out small details such as eyelids, lips and ears. It can also be used to scoop out excess clays from areas like the nostril and ears. What I like most about this tool is that the heads are polar opposite. This mean I can work on one side of the face with one head and then flip the tool around t work on the other side. I don't have to turn the head upside down or put my tools in weirds positions to achieve certain effects.
I rarely use the third tool. It's designed for smoothing out details and features, but my hands and #1 usually take care of that.
You can't tell from the picture, but the fourth tool has a very sharp tiny edge. The tip on the right side is only 10 micron thick. I use this for micro-detailing like ridges on the lips, eyebrow lines, and wrinkles around the eyes.
�
Material
Different artist work with different materials. What you ultimately choose depends on your personal preference. By far, the most popular sculpting medium is Super Sculpey. It's soft and holds shape very well. It's easy to etch in details and the clay doesn't shift or slide. I work with Premo because I'm comfortable with it's properties and consistency .... I also like the fact that I can sand the sculpt prior to curing to create certain effects like 6'oclock shadows or rocky surfaces.
�
Scale
Before you start sculpting, you should have a sample of the body you plan to use. It would be a shame to spend hours on a head sculpt only to find out that it doesn't look proportionate or fit on the body. If you're just starting out sculpting, a tip I can offer is to shave down all the features on an existing head and sculpt over it. This should take some of the worries away from the scale problem. As you become more proficient, you definitely want to go away this method. It has very definitive limits such as constraint on facial proportions and features.
�
Sculpting
Sculpting is a free flowing dynamic art form with no hard rules ..... only a few guidelines. Many artists have different techniques and even a single artist can employ numerous different techniques in a single project. Below are some of the guidelines I follow. As you complete more projects, you'll develop your own style which will best serve you.
I start out by roughing out a ball in similar proportions to the head in question. Try to estimate the width and length proportion of the head in question. You can use calipers and scale conversion systems to get exact measurements, but I normally just eye it out :-).
I work from the periphery and move inward. I usually work on is the jaw line, chin and forehead first. It's important to use your reference material at this point. Examine your sculpts from different angle to see if it matches that of the pictures. Remember, pictures have shadows and highlights instead of depth and dimension. You're going to have to create mental 3-D image in your head. This is called "developing an eye". This takes time and experience to build so be patient.
The inner features. As an artist you tend to have your own mental preferences and biases. For me, it's the eyes and cheeks. I tend to focus on these more than any other feature and constantly have to remind myself that nose, chins and foreheads are just as important. There 2 approaches you can take when sculpting the inner features. You can sculpt them individually or do it all together as a composite. My style is somewhere in between those two. I usually rough out the eyes, do a complete nose, move down to the lips and then alternate between the eyes (which include the cheeks) and mouth/ chin section. I usually end by giving the eyes a final clean up.
Some minor feature tips:
Eyes: it's important remember that the eye is a ball. In some people is more pronounced than others, but everyone has curves in their eyes. Some people even insert BB pellets into their sculpt for the eyeballs. Don't forget the eyelids. They often play a crucial role in the "look" of a person. It's also important to scale the eyes accurately. I see a lots of great sculpts that are ruined because the eyes are too large and as a result, looks more comic or anime like rather life-like.
Nose: this is were your reference material comes in very handy. The side profile shots can tell you if the nose is straight curves or have any distinct features to them. It also shows you how the bridge of the nose connects to the forehead. I do carve in nostrils for most of my sculpts but remember that they can create undercuts and negative zone when it comes to molding.
Mouth: I prefer a straight look without any extreme features. People often mistakenly assume that sculpting a smile or grimace is harder thean a close mouth look but the opposite hold true. When you have extreme features like smiles, frowns, etc., more distinguishing lines form on your head through facial muscle contractions. These lines make it easier to capture a person's likeness since our mind tends to zoom in on extreme features. When we see a person without pronounced features, we carefully examine the entire head as a whole rather than focus in on certain features. Seriously, who's face would stand out more in a crowded room, Mike Myers (Austin Powers) or Rob Lowe (#2 from Austin Powers)? I knew plenty of guys that have similar features to Rob Lowe but have yet to meet someone with Mike Myers' features. But I digress, pay attention not only to the lips, but curves and that form between it and the chin, cheek and nose. These lines/ features do play an important role in the likeness of an individual.
Ears: I usually do this second to last. Unless you're sculpting Will Smith, odds are that your ears will look like everyone else. In addition, our mind rarely focuses on this feature .... well unless you have an ear fetish :-). It's just important to see how it come out of the head especially from the frontal plane. I'll admit that I'm very lazy when it comes to this part and will often glue on casts from previous ear projects ..... yeah, the ear is not my thing.
Hair: leave this for last. A common mistake that many beginner sculptor make is to sculpt the hair early on in the process. Doing this can limit your ability to see fine lines and features as your mind becomes distracted with the hair. It also gives you the false impression that the sculpt is done before it actually is. Besides, leaving the hair for last give you certain areas to hold on to when you're sculpting other features like eyes and nose.
�
The clean up
Sculpts are rarely ever finished by hands and picks alone. Most artists spend quite a bit of time smoothing out their sculpts afterwards. Since I use sculpey (Premo), I clean up with 70% Isopropyl alcohol (rubbing alcohol). Alcohol can dissolve your clay so you don't want to over do it. I usually dip a Q-Tip or bush into the alcohol, dab off the excess, and run it gently over an area multiple times to smooth it out. You can eliminate clay debris and rough edges (hair, eyelids). Like everything else, don't over do this step or else you end up simplifying your sculpt. You can also use Turpenoid instead of alcohol. I'm comfortable with alcohol and the fact that it's only $0.70 a bottle really helps my decision :-).
�
Post cleaning
Thought you were done huh??? Often time you'll see flaws after you've cured the piece. In these case, nothing beats wet sandpaper. I start out with 300 grit and finish with 600. To be honest, unless it's a female sculpt that needs to be incredibly smooth, I usually stop at 300 grits use multiple coats of paint to cover the flaws .... call me lazy :-).
Well, that's it from me. I hope some of this is will of use to you. Here
are some final advices (whether you want it or not
Best wishes,
Tung
�