![]()
I'm not going to give a kind of "Guide to Observing the Sky" here,
there are many books written by experienced amateurs that cover this subject in
details. Do yourself a favor and buy those books.
What you're about to read here is simply my personal experience after some years
of observing and spending my time in the dark of my backyard. From those
experiences I learn what will make my life more comfortable during observation.
Well, at least they made mine more comfortable.
But I want to emphasize something here. I'm not an experienced amateur
astronomer. Yes, I have several years of observing experiences, but I'm
not experienced. I still consider myself a beginner.
There are times when I just take my telescope outside and look through the eyepiece without even care to log my observation or try to locate a certain objects. But most of the time I plan ahead. I usually plan my observation while waiting for the scope to cool down (after the scope is set up in the backyard). And while planning, I put my sunglasses on to slowly dark-adapt my eyes.
First thing I do is check the planisphere to see what will be visible in the sky this evening. For me it's an important step, because due to my observing site condition, I can only see a part of the sky which is higher than 50 degree above the horizon, in all directions. So I always consult my planisphere to see what constellations are visible from my backyard tonight.
After I know what constellations are visible, I take out my Messier Objects list to see if there are M objects nearby. If thee's no M objects in or near the constellation, I consult Burnham's Celestial Handbook to see if there's any other interesting object, like double stars, or other non-Messier NGC objects.
I then write down a list of the objects on a piece of paper and take out my Sky Atlas to check for the objects position. Now, I'm ready. Usually the whole process takes about 15 to 45 minutes. By the time I'm ready, usually the scope has cooled down.
 Once I went out of town for a weekend with my family to a place called
Puncak. It's on the mountain area South of Jakarta. I brought my
telescope (then it was a Meade 8" SCT) with me. I didn't want to miss
the opportunity to spend the night observing because from this site the sky
is darker and much, much better than from my backyard.
Once I went out of town for a weekend with my family to a place called
Puncak. It's on the mountain area South of Jakarta. I brought my
telescope (then it was a Meade 8" SCT) with me. I didn't want to miss
the opportunity to spend the night observing because from this site the sky
is darker and much, much better than from my backyard.
When we got there I unpacked the scope from the cardboard case. Well, it's
not really a case. It's only a cardboard filled with foam to keep the tube
whenever I had a chance to take my scope out of town (I hadn't bought the
hard case then). Then I realized that something was missing, one of the
knobs was not there. It was the knob used to attach the wedge to the tripod!
I searched every where but couldn't find it. Turned out I left it home.
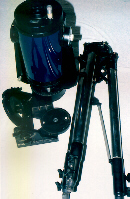
Ever since , whenever I take my scope to an observing site other than my backyard, like the backyard of my parents' house, I always check twice to make sure that I bring all parts of the telescope. The picture above shows you how the telescope looks like when it's broken down into three major pieces, the tripod, OTA and the wedge. They look small, but they're not. Fully retracted, the tripod leg is about 1 m long and the OTA itself is at least 50 cm long.
It's a good idea to store everything in one place. I always put
everything related to the telescope in one place. The tripod next to the
scope case (well, I don't put it there right now because I'm using the
tripod as Foucault tester stand:-) The wedge, the eyepiece case and the
Telrad case on the telescope case.
That way when I have a chance to go out of town (which unfortunately I never
do for the past few months) I can be sure that I bring everything.
 It's also a good idea to keep your eyepieces and other accessories in a
case. I keep mine in a case that I made myself. It is made of an old
school-kid's briefcase.
It's also a good idea to keep your eyepieces and other accessories in a
case. I keep mine in a case that I made myself. It is made of an old
school-kid's briefcase.
The case is really easy to make.
First, you must have a briefcase. Any kind of briefcase will do but I think
the best one is the "hard case" type not a leather briefcase. Hard
case can take rough handling and it will not be troubled by dew. Remember,
you'll take this case to the field where it will be exposed to cold
temperature. If your kid has an old an no longer used briefcase, use it. Or
buy a cheap briefcase.
You will also need a foam. The length and width of the foam depends on your
briefcase's size and your eyepieces collection. As for its height
(thickness) I suggest you get one which thickness is at least the size of
your eyepieces barrel diameter. And you will also need a sharp razor blade
and a marker.
Modify the briefcase by taking off all compartments (the ones attached
inside the briefcase to keep ballpoints or documents). Cut two pieces of
foam the size of the briefcase's inside dimension and place them in the
briefcase. They must tightly fit.
Now trace the eyepiece's shape on the foam. This is done by putting the
eyepiece on the foam and tracing its shape using the marker. Repeat this
procedure with other eyepieces and/or your accessories. You can do it with
the eyepiece either in vertical position (stands on its barrel end), or in
horizontal position (it lies on the barrel side).
The next step is to make the holes. This is where you put the eyepiece in. Trace the eyepiece shape you've drawn on the foam with razor blade. Don't do it in one pass, several passes will result in better and cleaner cut. Keep tracing until the depth is about half of the eyepiece's diameter. Repeat the procedures to the last eyepiece. When you're done with the last hole, you have a good and reliable eyepiece case.
Amateur Astronomers love darkness:-) We always wish for a dark sky, we do our observation in the dark and when observing most of us hate lights. We only want star light, other kind of light has to be eliminated.
The reason is because the objects that we're looking at through our
telescopes are faint objects. Those objects are so far away from us that it
takes many years for the light from these objects to travel the distance.
We will not be able to see these faint source of light if the observing site
is not dark, there's a bright light nearby (like streetlights) or if our
eyes are not yet dark adapted.
Before you start your observing session, you have to dark adapt your
eyes. The way I do it at home is by wearing sunglasses while waiting for the
telescope to cool down, and use this waiting period to plan my observation.
But when I observe from other site, while the telesscope is cooling down I
just sit nearby.
To be completely dark adapted, some say that your eyes need 60 minutes or
more. But I seldom wait that long. As soon as the telescope is cooled down I
start observing right away because I believe that my eyes will be fully dark
adapted anyway and I don't want to waste any time.
You have to preserve your night vision through out the observing session.
What if I have to go inside the house for something? Well, I cover my eye
with an eye patch that I made.
You see, while observing I always cover my left eye with an eye patch and
use my right eye to look into the eyepiece. So when I have to go inside the
house during observing session, or when I have to use a flashlight to find
something I simply cover my right eye with the eye patch and use my left eye
to see.
If at any time during observation we need light, to check the star map or
to write down observing notes, we use a low intensity light. Some
people (I'm one of them) use red light and other people use green or white
light.
You can buy a red flashlight, but just like everything else, it's cheaper if
you make it yourself. I bought a small flashlight and cover the bulbs with
red paper and then paint the paper with my wife's red nail polish. Make it
as dim as possible
Some experienced observers say that dim white light or dim green light is
better in preserving night vision than red light. I will follow this advise
and I plan to use green light to replace my red flashlight.
So if possible, I suggest you use green light. "How can I make
it?" , you might ask. If you want to make a green flashlight, you can
find a plan on how to do it in David
Bevel's home page. Click it to go there. In his page he gives a detail
and easy to follow instruction on how to modify a Hubblelite flashlight. The
detailed plan is on his "Plans for Green LED Light". I will make
one, as soon as I know what Hubblelite is and how it looks like:-)
I use a home made dew shield. If you don't want to
make it yourself, you can buy it from almost every telescope dealer. But why
buy something you can make easily?
Find a cardboard, then cut the cardboard the size of your telescope tube.
Paint both sides of the cardborad with water-resistance black paint. After
the paint is dry, cover the edges/or sides of the cardboard with masking
tape. Bend the cardboard and connect the two sides of the cardboard. Glue
these sides to form a tube. To reinforce the glue, I stappled it and cover
the connection with masking tape, inside and outside.
Now you have a dew shield.
That's the preparation you need to make your observing session more comfortable. Now we can go to the field and start observing.
![]()
© 2005 [email protected]