CinC as Sp(S), 12 x Sp(S), 3 x Kn(F), 1 x Ps(S), 4 x Ps(O) - 18.5 EE
Sub as Cv(O), 9 x Ax(S), 8 x Pk(O), 2 x Ps(S) - 19 EE
Sub as Cv(O), 3 x Kn(F), 3 x Cv(O), 6 x LH(O), 4 x Pk(O, 4 x Ps(S) - 19 EE
In the first instance, I wanted to use my nice Macedonian figures without any interlopers to spoil the look. This placed some restrictions on army choice even within the Macedonian sphere. As the army was originally built as Alexandrian Macedonian, I thought Id look at that as a starting point.
I wanted to be able to cover frontage as cheaply as possible with troops who couldnt easily be beaten. Single ranked Sp(S) seemed to fit the bill at 7 AP per element. They are cheaper than two ranks of Irr Sp(I) with Ps support although maybe a little more vulnerable to Knights. If I went for a river as the invader that left 4 feet of frontage. I reckoned that it was likely that the end 2 feet would have terrain leaving the middle 2 feet (or 16 elements frontage) to hold with the Sp. I reckoned I could use Pk(O) in 2 ranks for the extra just as effective against cavalry and Id risk it against infantry with a factor 4. Bw would be a problem to them but Id just have to live with that.
To contest terrain in the flank sector, I wanted a batch of decent cheap Ax and Thracians fit the bill. Id take maximum Kn(F) for punch and this left the remainder of the army to be made up from LH, Ps and the compulsory Cv(O). Usefully, the Generals dont have to be Kn so I had 2 Cv(O) and 1 Sp(S).
Since I had a deployment idea in mind already, I let this dictate the composition of the commands. The Sp(S) were all in one command in order to move them more quickly and to improve this, I made it the CinC command. I wanted to split the Kn between two commands so 3 of them. The idea being that he wouldnt need many PIPs to move the Sp in the later part of the game and could move the Kn to wherever was needed. The addition of a few Ps aimed to take the command up to 18.5 and provide a small second line.
I thought it unlikely that the flank sector would be entirely filled with terrain so decided that the Thracians would need some support. On the basis that the flank might well contain enemy cavalry but would be unlikely to have scary infantry, I thought that 8 Pk could do that job. A couple of Ps would take that command up to 19.
This left the rest of the stuff in the third command basically most of my cavalry and the remaining Pikes with some Psiloi. Potentially, it would be on the river side of the Sp line. If my opponent wanted to skirmish with my Sp then I could move forward plenty of cavalry to threaten. If he wanted to come at me on that side then I could use the Pike to extend the Sp line and use my cavalry as a reserve.
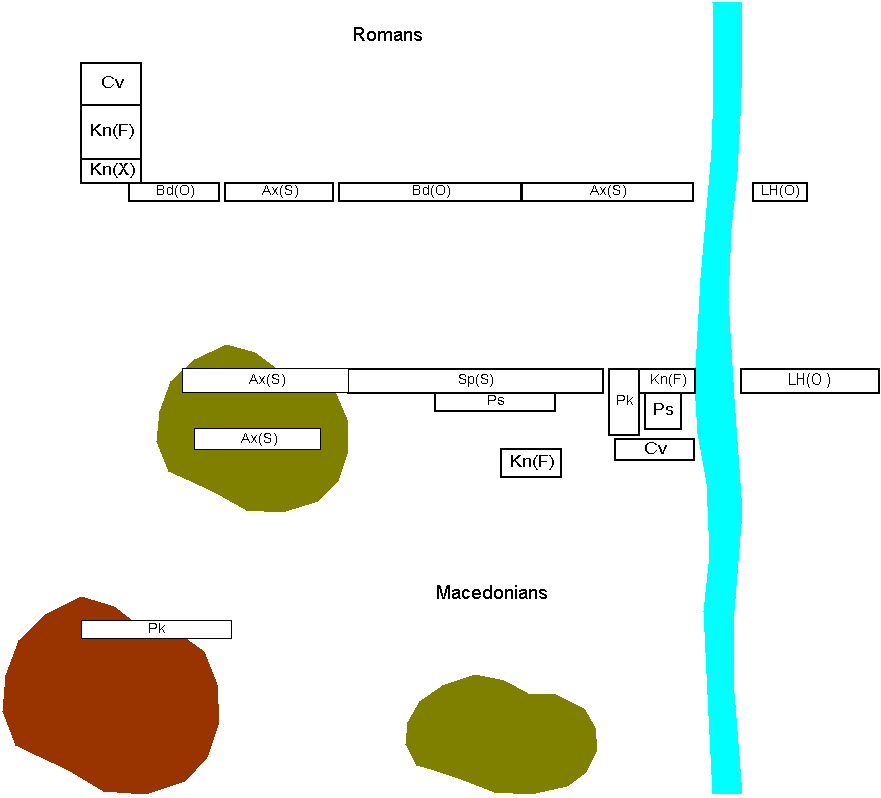
Unsurprisingly since I had the Alexandrians, I was the invader. There was no weather. My plan was to beat John's left most command with a combination of Sp(S), Pk and Kn(F) against Ax(S). With some reservations, I also chose to put the 6 LH(O) over the river to eliminate John's 2 LH over there and hopefully to threaten the flank of the Ax and perhaps even the baggage. On my left, I planned to defend and delay John's cavalry wing. I held the Rgo with Thracians in two lines and to put the Pk in a single rank on the hill. My idea was that John would find it difficult to get round my left flank without taking them on.
My initial advance was slow (first three die rolls were 4, 7 and 6!). I moved the LH aggressively against John's 2 while slowly moving the main line forward. John's right hand group of Auxilia moved forward against the Thracians in the Rgo. His aim was to create space to move his right hand group of Bd into the centre. His cavalry wing wheeled left and marched across his rear aiming to get to his left to support his Ax.
John's Ax opposing the Thracians were a little exposed and I decided to come out of the Rgo to engage him. I reckoned I could probably kill a few elements and constrict the movement of the Bd behind. If necessary I could pull back into the Rgo, although I could afford to lose a few Thracians if it came to it. As it happened, I killed two and the rest of the game on this flank was fairly indecisive as John couldn't get the Bd around his own troops and the Thracians eventually pulled back when threatened.
Meanwhile the centres clashed as John moved his line into contact. The initial combat round saw three Sp(S) in a row eliminated by Bd! This left a fairly big hole although a couple of Ps behind could prevent any initial moves into the flanks on John's next bound. Otherwise there were only recoils on both sides.
Fortunately, reasonable dice on my bound allowed me to move my reserve Kn across to close the gap. My LH caught their opponents and killed one. Otherwise John's Ax were pushed back generally, though only one died. In his bound he moved Ps across the river to flank my LH. Catching it on the flank with two overlaps, he killed it and the element behind. The fight between the Bd and Sp remained pretty static in both bounds.
Next bound, my Kn and Pk from my right command finally charged in and killed one supported Ax. The Sp finally started to get the upper hand, killing 2 more Ax. John chose not to push through the gap in Sp line being worried about the Kn behind. Instead he moved up Ps support for the Bd. Unfortunately, by this point the Ax were suffering from double overlaps and two more died in the combat round demoralising the command. They had just failed to hold out as John's (7th?) cavalry had finally arrived behind them and were lined up to charge in.
This demoralisation was decisive because John couldn't charge in with the cavalry until the remnants of the CinCs command had fled past. By that time the Sp line was solid with Kn and Pk on their right. The cataphracts on the right of his line had been outflanked by my centre knights who bravely rode down the demoralised and overlapped Bd in front of them and wheeled on to the flank. Three elements of John's Kn did charge in beside the river and immediately killed a Companion Kn who were supporting the left of the Pk block. They then pushed back the Kn on the other flank of the Pk, leaving a 3 vs 5 against the 4 deep Pk. A bad die roll would have been nasty but fortunately the Pk rolled well and killed the Kn.
The final bound saw my Kn kill two cataphracts. A flanked Bd from John's right command was killed by the Thracians and this took him over 50% of the army.
At least some LH on the flank with the Thracians. These could have delayed any advance or forced John to leave some stuff behind instead of being able to move his entire cavalry wing. 3 would have done, although I probably needed more than three against Johns 2 on the other side of the river. I could have used 2 Cv as well (they didnt do much in the middle) but this would have slowed my advance.
My pike would have been better behind the rough going. That would have given them the option to move into the centre if (as happened) there was no threat on that flank. Deployed as they were they had no opportunity to do that.
The mixed command was a bit of a problem as it was difficult to move aggressively with the LH and have the Pk keep up with the Sp. The Pk would probably have been better in the Sp command for that reason.
More Ps with the centre command would have been useful. The ones in the mixed command had little impact.
Given these thoughts my next list might look like :
CinC as Reg Kn(F), 12 x Sp(S), 4 x Pk(O), 2 x Ps(S), 4 x Ps(O) = 20/7
Sub as Reg Cv(O), 8 x Pk(O), 3 x LH(O), 8 x Ax(S) = 19/7
Sub as Reg Cv(O), 6 x Kn(F), 3 x Cv(O), 6 x LH(O) = 16/6