![]()
![]()
![]()
![]()
![]()
![]()
![]()
![]()
![]()
![]()
![]()
|
|
|
|
DO-IT-YOURSELF SNORKEL
This article is about installing a snorkel on an '81 Toyota pickup, but with a few modifications, it should work for almost any vehicle.
1. BEFORE YOU START:
The goal with installing a snorkel is to keep water out of the air intake during deep water crossings. There are also other air intake sources to consider when installing a snorkel besides the air cleaner though, so you will have to take a good look at your truck before you start work on the snorkel. If the snorkel is made right, you will be able to drive through water as deep as the top of your snorkel, so you have to think about other things that will be affected by deep water. Here are a few things to check, but your vehicle may be different, so look it over carefully.
Axle, tranny, and transfer case vents- Toyota , Suzuki, and many other makes use a cap which is supposed to keep water out of the vents, but they don't work very well. You should remove the caps and install hoses from the vents to a point high on the truck. The method I prefer is to run long hoses from the vents then at some convenient point connect all the hoses together with tees, then run one common hose from the tee to a high point such as the top of a roll bar or up the back of the cab. I have heard of other methods, like running the common vent hose up to and into the snorkel. I don't like this method because it causes negative pressure inside the vented components, which would help draw water in through seams and seals. Another method is to hook the common vent hose to a nipple welded to an exhaust tube, the theory being that the pressure from the exhaust will try to gently put pressure on the inside of seals, helping them stay sealed and push water out. I haven't tried this yet, so I don't know if it works.
Engine vents- Most modern engines vent directly to the air cleaner, and I feel this is the best method.
Vacuum hoses- These are often missed. Make sure all hoses are in good condition and there are no vacuum leaks. Dried out hoses can let water by, not to mention make the engine run a little rough.
Electronics- I am only going to mention engine electronics, because they are the most important. You can look at your electrical system and decide what needs to be sealed. Electronics can be tricky to seal. Older trucks have simple engine electrical systems, and can be sealed easily at the few connections they have. Newer computer controlled engines have a lot of electrical connections, and every one of them must be water proof. Late model General Motors trucks use good connectors which have a rubber seal, and unless they are old and dried out, should stay waterproof. Most other makes just use simple plastic connectors, and every connection should be unplugged and sealed. Some people just use dielectric grease or silicon spray, but I like to use a tube of silicon sealer, similar to gasket sealer. Do all connections, including ignition, all sensors, and spark plug wires.
Interior- Take it from me, with a snorkel, you will be playing in deep places just to impress your friends, or because they dared you. The deep water won't help a stock interior any. You might want to remove the carpets or replace them with vinyl, and fiberglass bucket seats are a great idea. At the very least, vinyl covered seats are nice. I learned the hard way that cloth seats tend to stay wet for days after, and even after a week or more, you will get wet from sitting on them because of water trapped in the foam. If you get really serious about deep water, you may want aftermarket gages. I found water can get into stock gages and they take a LONG time to dry out!
2. PREP:
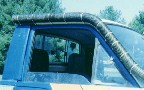
O.K., now everything else is sealed and ready to get wet. Well, you have to decide where the snorkel will come out of the truck. I chose the rear of the passenger side fender. The reasons for this are that I can change the fender if I don't like the snorkel, and it was out of the way and would not block my vision. You also have to decide how high you want the snorkel. I ran mine up the front pillar and along the drip rail, and it ends (actually starts) at the rear corner of the cab.
3. GETTING STARTED:
Now it gets a little tricky. You have to figure out how to hook to the air cleaner. I used my factory air cleaner because it is easy to seal. The problem I did have was that the intake was on the driver side front corner, and my snorkel was on the passenger side. I tried running a hose from the inlet to the passenger side, but I just couldn't find a good route for it. I tried turning the air cleaner, but that didn't work because of the shape of the carb. (most of
you can just rotate the air cleaner to make this easier.) I decided to eliminate the original air intake and create a new one on the passenger side. I cut off the intake tube and mig welded a patch in its place. Not pretty, but functional. Next I created a new tube out of exhaust tubing, cutting, bending, and welding it into an oval. I made it fit the Suzuki Sidekick rubber intake tube I was using to connect the air cleaner to the snorkel tube.
4. BUTCHER WORK:
Now the real fun begins. You have to cut a hole in your fender where the snorkel will enter the engine compartment. I cut mine at the top to keep the tube out of harm's way. This is the primary reason I don't like the aftermarket snorkels out there- most enter on the side of the fender and would get torn off in less than a week of hard trail use.
You have to choose what you are going to use for tubing. I chose a Sears Craftsman shop-vac hose. It was almost as large as the original air intake, so it should flow enough air. I have also seen some strong dryer vent hose which is much larger, and would be a better choice for larger engines. I suppose you could paint your hose, but I left mine black.
I cut the hole in the fender in an oval shape since that would allow the hose to enter at an angle. If you want to get fancy, you can cut a piece of door weatherstrip to fit the inside of the hole for a more finished look and a better seal. You also have to cut a hole in the inner fender to line up with the outer hole.
Now run the snorkel hose into the hole and attach it to the air cleaner intake, or whatever you are using to adapt it. Now you have to attach the hose to the outside of your body. You could look for large strap clamps, some kind of exhaust clamp which looks good, hose clamps screwed to the body, or any other way to attach it firmly. I got lucky and had a drip rail, so I drilled a series of small holes and attached the hose with zip ties.
5. USE:
The first time I used my snorkel, it performed flawlessly. I drove in water higher than my hood, and I checked my air cleaner right after and found it dry. The deepest I have been is up to the windshield wipers, and the only problem I had was with a little moisture in the distributor. I found the offending leak and now I'm not afraid of any water. I hope you crave attention, because when you drive down the street you get looks from everyone. Most people assume it is just for a tough look, but I assure them it gets used on a regular basis.