![]()
![]()
![]()
![]()
![]()
![]()
![]()
![]()
![]()
![]()
![]()
|
|
|
|
3/4 ton Grand Wagoneer
Vehicle: 1986 Grand Wagoneer, 360 V-8, 727 auto tranny, Dana 44 front axle, AMC Model 20 rear with 3.07 gears.
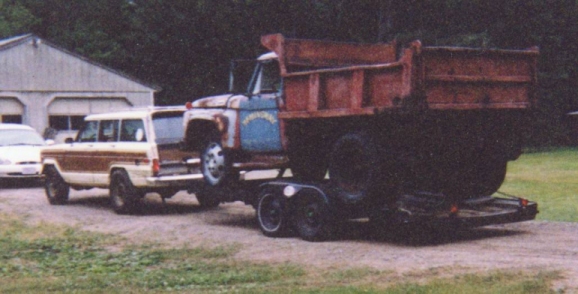
Reason for Project: I use this vehicle as a heavy duty tow vehicle. In my business this truck is called upon to tow trailered loads in excess of 10,000 lbs. and carry weights over 1,000 lbs. in the rear cargo area. It didn't take long to figure out the stock brakes weren't up to these demands, but by using caution I managed to get by. Eventually the rear spider gears gave way, and had to be replaced. The next problem was a slightly bent rear axle housing. I managed to continue working the truck with the bent housing, but now the springs are getting weak and the whole truck leans down on the passenger side. On top of all this, the 3.07 gears made starting off with heavy loads an abusive experience to say the least. To go along with all this, I'm on my third 727 tranny which is again giving me trouble. I decided the simplest solution would be to go to full 3/4 ton drivetrain, including a T-18 4-speed tranny and 3/4 ton springs.
Researching the Project: I managed to find a J-20 with the T-18, NP 208 transfer case (I would have chosen a Dana 20, but this is what was available.), Dana 44 front end and Dana 60 full floater rear with 3.73 gears. I brought the truck home and stripped it to the frame. I'll go into this more later. After disassembly I got out the tape measure to get some comparison figures. To start with, the axles are wider than the stock Wagoneer axles. Luckily, the front axle is a direct bolt in, with the same spring mount spacing. The brake lines even bolt up, since the 3/4 ton brake calipers are the same as the stock Wagoneer's (Keep this in mind if you have new calipers and/or pads on your Wagoneer.) Next was the rear axle. Unfortunately the springs for the pickup are mounted further apart than the Wagoneer, so the spring pads will have to be cut off and relocated. As far as the transmission goes, this is an entire project in itself. I have to remove all of the auto tranny parts and replace them with a 4 speed, new pedals, clutch linkage, and driveshafts. Read about the tranny swap here.
Disassembling the Pickup: This was the easy part. I have an extensive set of tools, including air chisels, saws, torches, air ratchets, and many other handy disassembly tools, so things went quickly. I simply cut everything apart until I had left what I needed. These are the things you will need to save for an axle swap:
Front and rear axles, springs, driveshafts, steering linkage, and brake master cylinder.
Disassembling the Wagoneer: I came up with a plan that looked like it would work. I would do the project in steps, starting with the front axle, then the rear.
Front Axle: I started Friday night by removing the front axle of the Wagoneer. I decided to do the front axle first so that after the swap I could use the truck before I remove the rear axle in case I needed any parts. (This was my daily driver and only transportation.) To remove the axle I unbolted the drive shaft, shocks, brake lines, sway bar links, drag link and track bar. For now I won't be reusing the track bar, but I'll keep it in case I decide to install it in the future. It will need the bracket cut off the old front axle housing and welded onto the new one. I then unbolted the spring mounts and rolled the front axle out from under the truck.
Installing the Front Axle: When I had jacked the Wagoneer up I raised it high enough for the tires to roll under the front fenders. This allowed me to simply roll the new front axle into place, then raise it to the frame. I had kept all of the steering parts and springs assembled so the installation would be easier. I raised the axle and installed the rear spring bolts. I then jacked up the axle and installed the front spring bolts. The drag link was next, followed by shocks and brake lines. There is one thing to note here: Due to the extra width of the axle, you will need longer brake lines. Just purchase J-20 brake lines which are a direct bolt-in. Bleed the brakes and you are ready to go. I still had to remove the transmission and transfer case for my 4-speed swap, so I didn't install the driveshaft. If you are just changing the axles, install the front driveshaft from the truck as long as it had the same transmission/transfer case combo you have, or use your original.
Rear Axle: You will need to decide how stiff you want the rear suspension. Do you want more weight capacity? Then use the J-20 springs. Stock ride? Use your stock springs. I do heavy towing, but I also wanted a decent ride and articulation, so I chose to remove two leafs from the J-20 spring packs and use those. Removing the rear axle and springs seemed pretty straightforward, but that turned out to be a wrong assumption. I unbolted the rear track bar, rear shocks, then started on the spring eye bolts. I removed the shackle bolts then moved forward to the front eye bolts. The passenger side was simple enough, but the driver's side proved to be a problem. The design of the Wagoneer spring mounts places a nut on the inside of the framerail. The driver's side nut was hidden behind the gas tank, totally unreachable without removal of the tank. The Jeep engineers tried to overcome this problem by attaching the nut to the frame with a tab spotwelded to the nut and clipping it to the frame. This may work with new hardware, but after a few years in rust country this tab doesn't work as well. I had to remove the fuel tank to get to the nut. This wasn't as large of a project as it seemed, with just a few bolts to remove, which came out easily. Lower the tank some, detach the various hoses, then finish removing it. After that remove the nut and bolt and you should be able to lower the rear axle and slide it out of the way.
Dana 60 Prep: Due to the difference in spring mounting width, the springs and shock mounts need to be moved closer together. I removed the spring pads by using a large electric grinder to remove most of the weld attaching them to the axle. I then switched to an air cut-off grinder to grind deeper into the corners of the spring pads. Important to remember: be very careful to cut into the spring pad, NOT the axle tube!! After you have a 1/16-1/8" deep groove cut into the spring pad where the weld was you should be able to take a large hammer and strike the end of the pad to finish breaking the weld. Do this to both pads and use the same technique for the shock mounts. Now use the grinder to smooth any leftover weld on the axle housing.
Installing the Rear Axle: The first step is to install both springs and shackles. Put new bushings in the springs and shackles then raise them into position and slide the bolts into position. Start the nuts on the bolts but don't tighten them yet. Now roll the axle under the springs with the tires still on the axle. Place the spring pads on the axle approximately where they need to be. Now slowly lower the Jeep until the springs are just touching the spring pads. Align the pads to line up with the spring center pins, then measure from the brake backing plate to the spring pad on each side to make sure the axle is centered side to side. Adjust as necessary. Lower the Jeep until the weight is starting to be placed onto the axle and measure everything again. Finish lowering the Jeep until all the weight is on the axle. You can now set the pinion angle by placing the floor jack under the pinion and raising until you are at the proper angle. Now you can tack weld the spring pads in place and also the shock mounts. Raise the Jeep, remove the axle, and finish welding the pads and shock mounts. Use a good welder for this! Now you can put the axle back in place and install the U-bolts. Install the shocks, brake lines, parking brake cable, and driveshaft, then bleed the brakes, and you are done. I wasn't able to weld anything yet as I wasn't sure of my pinion angle until my transmission was in place.
Master Cylinder: To compliment those larger brakes, you can also change the master cylinder and power brake booster. This is a direct swap with only one change to be made- the lines have to be switched where they attach to the booster. The front line gets moved to the rear hole, and the rear line to the front hole. This may not be the case for all years of trucks however. I used a 1980 truck and a 1986 Wagoneer, and the master cylinders were different.
Fenders: Now you are at the final step. You will need to clearance the fenders to fit the larger tires and wider axles. The easiest solution is to use J-20 front fenders, which are cut slightly larger and have a flare built in. In the rear, I chose to just trim the fenderwells. You may wish to add flares to match the front.
Comments after driving this setup for a few months: I really like the feeling of knowing that my drivetrain will hold up to anything I put my truck through. The ride is good, and I don't see the need to install the track bars. I decided that due to my frequent trailer towing and heavy loads, I will try installing another leaf in each rear spring pack. This is still lighter than the stock J-20 packs. I haven't had any problems with the axles and would highly recommend this swap to anyone who uses their Wagoneer for heavy off roading or medium to heavy towing. For what it would have cost me to rebuild my stock rear axle, I bought a whole parts J-20 with good drivetrain.