 The
first step is striping enough of the interior off the car to allow the wiring to
be run to the
The
first step is striping enough of the interior off the car to allow the wiring to
be run to theFitting Floor Illumination To BA/BF Falcon and SX/SY Territory.
This How-To will guide you through the process of fitting front and rear interior lamp floor illumination on your low series
BA/BF Falcon. The procedure for Territory is almost identical however there is not an option for rear floor illumination and
there are a few slight trim differences on the centre console.
Low series vehicles fitted with a colour screen ICC from the factory will have the wiring and globe holders already in place for front floor lamps, but not the rears. You could add rear illumination to such vehicles by following the rear installation instructions, and simply joining into the wiring loom at one of the front globe holders.
Note that the nor I, or the fordmods administrators are responsible for any damage caused by undertaking this modification.
Tools/Materials Required
#2 Phillips Screwdriver
Medium Length Flat Screwdriver
3/8” Drive Ratchet and Extensions
¼” Drive 8mm Socket and Ratchet/Handle (Alternatively 3/8” drive will be ok)
10mm 3/8” Socket
T50 3/8” Torx Socket
10mm Spanner
Soldering Iron and Solder or Crimp terminals and Crimping Pliers
Electrical Tape
Side Cutters for trimming wire to correct lengths
Twin Core Electrical Wiring (3 amp should be acceptable)
2 Globe holders for front. (These can be obtained by visiting a wrecking yard and removing them from wrecks. Auto trans illumiation and also centre mount stop light globes use the same holders.)
Lens for rear lamp in console, and additional globe holder as above.
The
first step is striping enough of the interior off the car to allow the wiring to
be run to the
appropriate locations. Although it seems fairly complicated none of it is hard. We added these lamps to 2 cars in the space of an afternoon however I'm a ford mechanic who regularly has BA’s
pulled apart. Plan on spending half a day doing it to be safe.
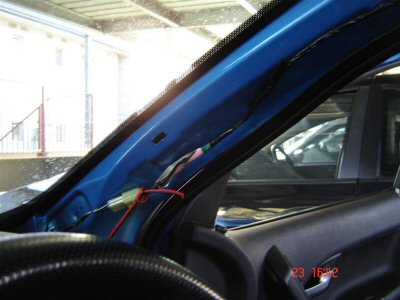
The factory wiring to the interior dome lamp runs up the RHF “A” pillar and I feel this is the best
place to tap into the factory interior lighting circuit as it is easy to access. To remove the A pillar trim
simply grab it at the top and pull towards the centre of the car. It is held on by a couple of clips.
Also remove the end cap on the dash on the Drivers side by pulling it outwards. It may be necessary to twist it a little to clear the pillar as it comes off and removing the fuse cover panel will
make this easier too.
The next step is to remove drivers seat and centre console from the car. Although this sounds difficult it is a pain free process which shouldn’t
take more then 10-20 minutes to do.
First, lower the seat to its lowest position to aid clearance of the seat when you remove it. Next, disconnect the battery negative terminal to
disable the seatbelt pretensioners. Remove the trims that cover the seat bolts by pulling them level away from the seat. Take your time with
these as they sometimes are brittle and break especially the inboard front one.
Now, unplug the 3 plugs on the wiring loom from the seat, remove the headrest and move the backrest to its full forward position. Loosen
and remove the 4 T50 bolts holding the seat in the car and
lift the seat from the vehicle and place it somewhere safe.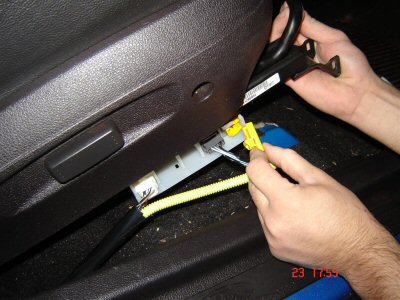
Note that the grey wiring plug has the release for the clip on the inboard side of the plug.
Now that you have the seat out you will be able to remove the centre console from the vehicle.
Start by removing the handbrake handle. Release the handbrake and undo the 3 10mm headed bolts holding it to the floorpan, lift upwards slightly and it will come away from the car. Unclip the single wire that connects to the handbrake switch and sit the handle on the floor somewhere leaving the cable connected to it.
Remove the T bar handle (1 screw) and lift off the t bar surround trim. Under the trim you will find 2 screws which hold the “banana” pieces of trim which run from the console up beside the ICC. Remove the screws and these trims. Next, the tissue box holder/accessory socket piece comes out. Some cars were built with screws holding this in, in others there were no screws and it just sits in a groove. As it comes out unclip the wiring plug to the accessory socket. Just below the tissue box holder there are 2 screws which screw into the lower edge of the dash. Remove both of these. Also remove the 4 8mm headed bolts and the 2 screws from around the selector quadrant and the 2 8mm bolts located on the rear end on the console on either side
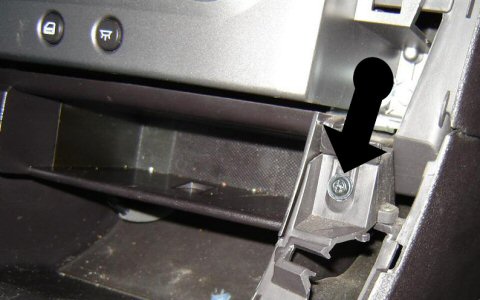
All that’s left to remove the console now is 2 clips which can be accessed through the floor of the console bin. Lift upwards on the console and unlatch the 2
clips by pushing them towards the left hand side of the car with a long screwdriver. See above right for locations.
Lift the console up at the back to about a 45 degree angle and then lift rearward to remove from vehicle.
You have now sufficiently disassembled your car enough to allow for running the wiring. Run wiring from the A pillar down behind the fuse box to the spot for the
globe holder in the fuse box. Here u can either crimp or solder the globe holder wiring into place and then join the additional wires to run to the Left front and rear (if
fitting rear globe) and join the globe holders onto the required places. Note that using crimp plugs or similar about 15cm back along the wiring from the rear globe
holder allows fitting the globe to the console and just plugging it in as you reinstall the console.
Once you have soldered/crimped all the wiring, install the globe holders by inserting them and then twisting so the tabs lock into place (for the rear see below), and
globes, and refit all the pieces you took off. Connect the positive wire to the green/yellow wire in the A pillar loom, and connect the negative wire to the black/blue
wire.
Rear Console Lamp
![]()
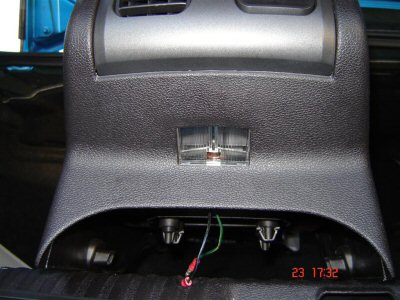
Once you have removed the console from the vehicle, you will most likely find the blanking plug has already fallen out. Fit the new lens with the globe/holder
already installed with a bit of spare length in the wiring by pressing it into the rear of the console. It does take a fair amount of force to fit the lens however it
does go in.
Once you have done that. Reassemble the car, reconnect the battery and you now have front and rear floor illumination.
Feel free to email or pm me and I’ll do my best to help you out with any issues you may have.