Ornatrix: Intro to Hairstyling Tutorial
Okay, get ready because we’re in for some major headache! Lol… Just kidding…
But before we continue, I must warn you that this tutorial assumes that you have basic knowledge of the 3dsmax working environment, manipulating objects, lights, using modifiers, and atmospheric and post effect rendering.
Having said that, let's move on…
There's been a good amount of people in the forums asking me for help with Ornatrix. Some just need guidance while some have indescribable problems. So I finally decided to make this tutorial.
This tutorial shows the workflow that I use to create hairstyles for my characters using Ornatrix. While this tutorial doesn’t cover every feature and aspect of Ornatrix in detail, it provides a good understanding of the hair creation workflow that Ornatrix provides. If you are familiar with Shag:hair, using Ornatrix should be easier than you would expect. I would also like to recommend reading the two Ornatrix tutorials that are available in the tutorials section of the site and to watch the Ornatrix workout video. It should give you some good starting point on how to use Ornatrix.
Now let's get started already!
Growing Hair
Open your head model in 3ds max.
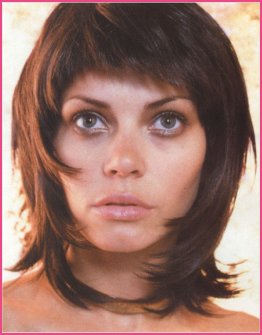
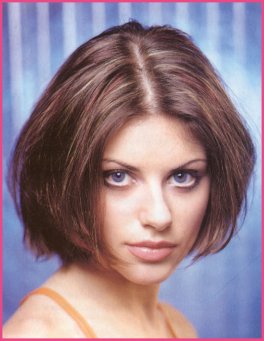
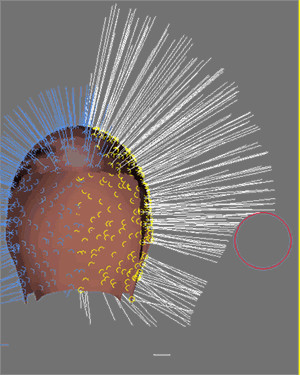
 Now, before growing the hair, it is important that you should determine first whether the hairstyle that you're going to create has folds or not. The difference is pictured below.
It is important to determine whether your hairstyle has folds or not, so as to avoid problems of stray hair strands later when dealing with interpolation.
Now, let's detach a copy of the scalp area from your head model. This will serve as the emitter object from which we will grow our hair.
 If the hairstyle that you're going to make has folds, you have to detach a copy of the scalp area for each fold. In my case here, I had to detach two scalp meshes. One for the left fold and one for the right fold as shown below.
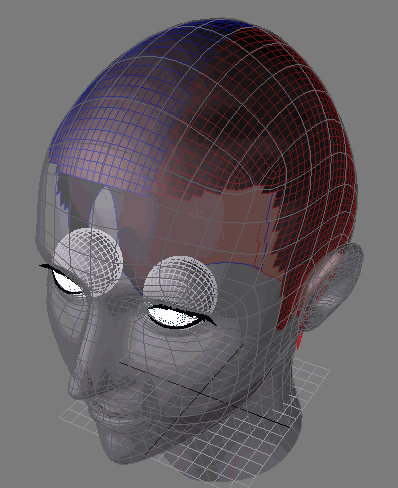 Having a scalp for each hair fold is very helpful to avoid stray hair strands, which you will get when you have two folds sharing the same scalp object.
Note: If you're head model doesn't have mapping coordinates, the detached scalp objects will also have no mapping coordinates. Just apply Spherical mapping on your scalp objects to avoid problems later when using maps.
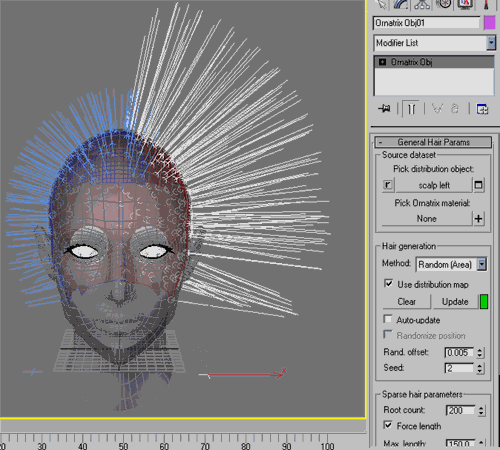
Now that you have your scalp object, it's time to grow some hair on it. From the Command Panel>Create tab>Helpers>EPHERE Ornatrix, click on Ornatrix Obj button and click anywhere in your scene to create an Ornatrix object.
Now go to the modify panel while the ornatrix object is still selected and click the Pick distribution object button under the General Hair Params rollout, then select your scalp object. In my case, I had to create two Ornatrix objects. One for each scalp object.
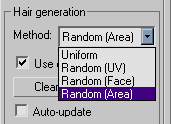
Under Hair Generation Method select Random (Area) from the drop-down list. Random (Area) is the best method since it distributes the roots randomly across the faces of the emitter regardless of it's mapping coordinates or face density.
 Now change the Root count and Max. Length parameters to your liking. If you wanna have precise control over the shape of your hair, a root count of more than 200 is recommended. In my case where I have two Ornatrix objects, I gave each a Root count value of 200.
Now click on the Update button. Roots should now appear on your scalp objects. Notice that before you clicked on the Update button, the color swatch next to it was colored yellow-green. This indicates that the Update button needs to be clicked to update the hair with whatever parameters there is that have been recently changed. After clicking the Update button, the color swatch changes to green. To avoid having to click the Update button every changes you make, you can just enable the Auto Update checkbox right under the Update button.
Now change the Root count and Max. Length parameters to your liking. If you wanna have precise control over the shape of your hair, a root count of more than 200 is recommended. In my case where I have two Ornatrix objects, I gave each a Root count value of 200.
Now click on the Update button. Roots should now appear on your scalp objects. Notice that before you clicked on the Update button, the color swatch next to it was colored yellow-green. This indicates that the Update button needs to be clicked to update the hair with whatever parameters there is that have been recently changed. After clicking the Update button, the color swatch changes to green. To avoid having to click the Update button every changes you make, you can just enable the Auto Update checkbox right under the Update button.
Under Dense Hair Params rollout, uncheck Partial coverage. Total Count value is the total amount of hair strands that will be generated during rendertime. It will be wise to set this to a very low value for test renders.
Under Hair Interpolation rollout, enable both Perform interpolation and No polar interpolation checkboxes and set Num. guides to 3. This will blend the dense strands between three nearby hair guides, preventing ugly locks of hair. This is why those who are creating hairstyles that have folds, must have a separate scalp object for each fold. It is because, Ornatrix's current interpolation algorithm generates ugly looking stray hair strands when you have folds in one emitter and you set Num. guides value to 3. Although the problem, will be eliminated by setting the Num. guides value to 1, the hair looks like a set of ugly locks.
Hairstyling!
Hairstyling is the most enjoyable part of using Ornatrix. As you know, Ornatrix offers tools that let you comb, cut, grow, shrink and paint hair in real-time. This cuts the time to model your hair significantly. What usually took days to model using splines can now be created in just minutes by combing!
Now let's style our hair!
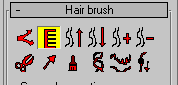
- To style your hair, you have to go to Strand sub-object mode. You will find all the brush tools that you need to style your hair under the Hair Brush rollout. Always remember that when using a brush, you derease/increase it's size by dragging the mouse in a viewport while holding the Alt key. And you can increase/decrease it's strength by dragging the mouse while holding the Ctrl key.
- At this point, it is advisable to start cutting using the cut tool since it is easy to spot which strands should be shorter, and which ones should be taller.
If you make a mistake, just click the Undo button and it will return the hair to it's previous state. When you are cutting or combing, review your work in other views. During combing, the only way you can perfect your hairstyle is to use the perspective view.
- After you're done cutting. Proceed to combing your hair. Combing takes time, but it’s fun while you're at it! I advise to start combing at the front view, then side, top and then perspective. As I've said before, you will have to do most of your combing in the perspective view to precisely model your hair. When you are combing, use low strength values for your brush to get smoothly curved strands. Comb first those strands that lye in the lower parts of the head. That way, the lower strands stays under those that are at the top when they are combed down.
Before: 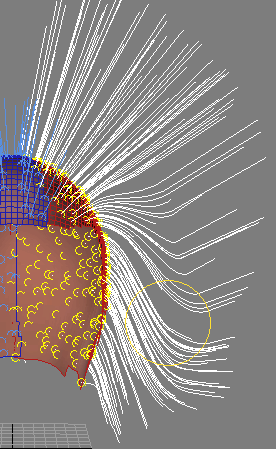 After:
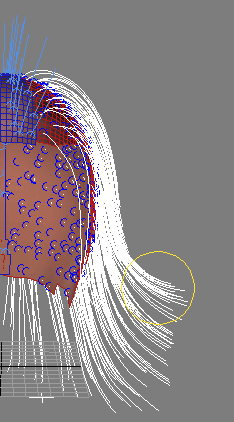
- If you want to make some strands taller/shorter, just use the grow/shrink tool and brush away! For precise control, you can select the strands that you want to manipulate and enable Affect selected only in the Influence rollout.

So, just cut and comb until you are satisfied with the form of your hair.
Basic Rendering
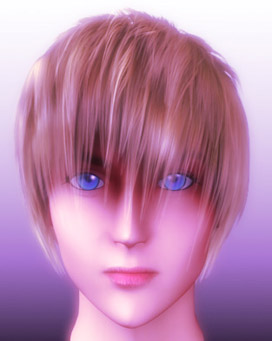
Now that you have modelled your hairstyle, let's do a test render to see how it looks.
- First you must create lights to illuminate your hair. Currently, the only compatible light with Ornatrix is the spotlight. So, create spotlights to illuminate your hair. A three-point lighting setup would be good.
- Now, turn on shadows and change the shadow type to Ornatrix Shadow.
- Scroll down to the Ornatrix Shadow Params rollout and change the settings like below:
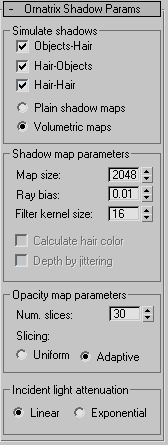
This is for the key light. You can reduce the values for the fill lights. Higher Map size values and lower Ray bias values creates good shadows. But don't push down the Ray bias value too far, it will create banding artifacts.
- Now that you have lights in your scene, let's set-up the renderer. Ornatrix gives you the option of rendering hair as a volumetric effect or as a post-rendering effect. Volumetric is more accurate than Post effect but it consumes a lot of memory, especially when your dense hair count exceeds 20,000 strands. Post effect on the other hand renders almost any amount of hair you throw at it, but gives some anti-aliasing artifacts which are sometimes, unnoticeable. You can choose whichever method you want, but for now, I'd recommend the post effect.
- Open the Environment and Effects window and click on the Effects tab. Click on the Add button and select Ornatrix Cheap. Most of the time I prefer the cheap solution since it diffuses the light more than the expensive solution. So with a few lights, your hair already looks well lit.
- Scroll down. Under Basic Rendering Params, click Add and select your Ornatrix hair object. If you have two hair objects because your hairstyle has two hair folds, Add the second hair object to the list. Don't make another Ornatrix Cheap entry for the second hair object since it will make Max crash when rendering!
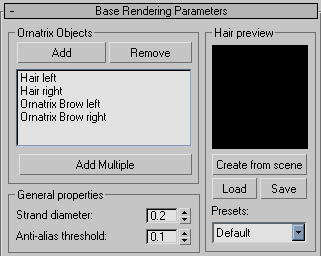
- For Strand diameter, I used a value of 0.2. This usually depends on the type of effect that you want to achieve. Manga characters have thicker hair strands than realistic characters, for instance. Also, one thing I've noticed that's worth mentioning is that thicker strands capture more light and has better specular highlights than thinner strands.
- Under Ornatrix Cheap Parameters rollout, turn on Inherit material settings. This will ensure that the look of your hair will be controlled entirely by it's material.
- Now, go to Material Editor and change one empty slot into an Ornatrix Material.
- Select your Ornatrix hair object and click on the Pick Ornatrix material button under General Hair Params rollout and choose your Ornatrix Material from the Material/map browser window. Viola! Your material is applied!
- Always remember to Save your work before pressing the Render button. You never know what might go wrong.
Clustering
There are two ways to control clustering in your hair. A simple parametric control is available in the Clustering rollout of your Ornatrix hair object. But you can also control clustering in a more precise way, in the Ornatrix Material.
- When clustering my hairstyles, I usually just use the controls available in the Clustering rollout. First, turn on the Cluster Hair checkbox.

- Then I would set the Num. of clusters to a value two times the number of your roots/sparse strands. Then play around with the Ease in, Ease out and Tip values to get what you want.
Now that your hairs are clustered, you frown because the clusters look too neat. This is because your hair strands doesn't have varying lengths. This is remedied using the length map in your Ornatrix Material!
Materials and Maps
A great Ornatrix Material tutorial by Rablo can be found here: http://www.kopfwerk.com/OX/1.htm
I highly recommend reading it!
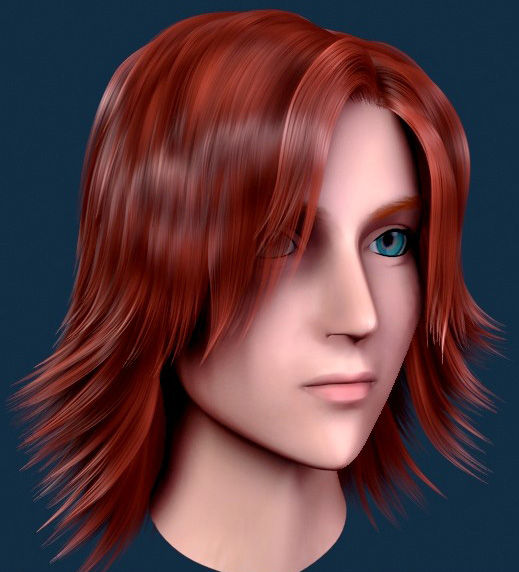
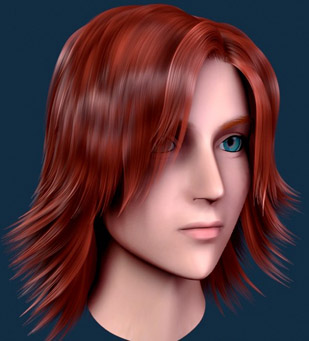
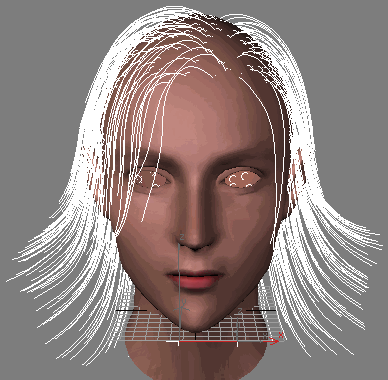
So, after some material tweaking, you should have a pretty decent looking hair now.
The final render: