Octaboat Tutorial
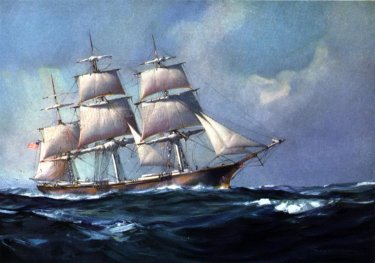
For this tutorial, you will need this picture, or one of your own, and PSP. That's it! Let's get started!
This tutorial will give you a
working knowledge of the preshape tool located at the bottom of
your toolbar.
1.) Open a 400 x 400 (pixel) white canvas.
2.) Click on the Preset Shapes Tool on the Tool Bar (2nd from
last). (Color of octagon will not matter.)
3.) Click on the Tool Options Box. Settings:
Shape Type: Octagon
Style: Stroked (The other options will give you different looks.
"Filled" will fill your octagon with the foreground
color. "Stroked" will give you the outline of a octagon
in the foreground color. "Stroked & Filled" will
give you an octagon of two colors, the outline being the
foreground color, the inside will be the background color. The
kicker? This is using the left click key. Try all this using the
right click... everything reverses! Sounds weird but once you try
it, you'll see what I mean...
Line Width: 12
Antialias: Checked
Create as Vector: Unchecked
Click on the Preset Shapes Options Tab on the Tool Options Box (middle
tab that has the 3 corners on it). Click on the Round Line Join (which
is the middle one, box will pop up and say which is which if you
let your cursor run over it). The Round Line Join will 'round
off' your corners. If you prefer a sharper look, try the Miter
Line Join. If you like the corners beveled, use the Bevel Line
Join.
On the 3rd tab which is the
Cursor and Tablet Options, "Show Brush Outlines" should
be the only thing checked, that way you can see your octagon as
you are drawing it.
Also, make sure that the foreground is a different color from
your canvas. If you use a white foreground and use the left mouse
button to draw a shape on a white background, you cannot see the
shape.
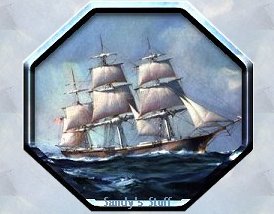
4.) Drawing the octagon:
Click on the Preset Tool. By watching the numbers in the bottom
left corner of your PSP screen, you can see your mouse
coordinates. Move your mouse until you find: (65,65). Hold downt
he left mouse button and drag the octagon until it shows: (65,65)->(358,324)
= (293x259) [1,131].
Let go of your left mouse button. This should give you a better
size for your frame and boat. The (293x259 is the area size of
the inside of your octagon frame. If you go back to your ship and
make it active (by clicking on the top bar of it to make it blue),
let your mouse just sit on the picture. On the bottom right side
of the PSP screen, youwill see the size of your ship picture. You
want to make sure that the inside of your frame is smaller than
the picture you are flood filling.
5.) Select the inside of your octagon using the Magic Wand Tool
on the Tool Bar. We want to make sure we got *all* of the inside
of the octagon so go to Selections/Modify/Expand. This will bring
up another box. Enter "2" for 2 pixels in it and click
Ok. Your marching ants should have expanded out to touch the
octagon.
6.) Lets add something to that plain octagon. Open another
picture in PSP by going to File/Open. Browse for your picture,
click ok. You can use the picture I sent or use one of your own,
your choice. To make it easier, I'll just talk about the one I
used. Go back to your octagon and click on the bar to make it
blue/active. Click on your Flood Fill Tool on the Tool Bar (the
paint can that is dripping... LOL).
Settings for the Flood Fill on the Tool Options Box:
Fill Style: Pattern
Blend Mode: Normal
Paper Texture: None
Match Mode: None
Tolerance: 20 (Should be greyed out anyway)
Opacity: 100
Sample Merged: Unchecked
Now click on the middle tab on the Tool Options Box (the grid tab).
Click on the drop down box under New Pattern Source. Find your
boat picture and click on the name. Go back to the inside of your
marching ants and click. This will flood fill your octagon with
the boat picture. Something really neat to try is changing the
Blend Mode and/or the Paper Texture and then clicking inside of
the marching ants. It will give it a different look.
7.) To give this one a "drop shadow" look, we're going
to do it backwards. Go to Images/Effects/Cut-Out. This will bring
up a box for the Cutout. Settings to try:
Fill Interior with color: Unchecked
The shadow color should be: black
Opacity: 71
Blur: 12
Offset Vertical: 6
Offset Horizontal: 1
Click on Ok.
This will give it a shadow on the inside from the top. Go to
Selections/Select None to get rid of your ants for a moment...
8.) Use your Magic Wand again to select the octagon itself. You
will need to expand your selection again so go to Selections/Modify/Expand.
Enter "2", click Ok.
9.) Click on your Flood Fill Tool again. Use the same settings as
above, including the same pattern. Click on the octagon, between
the 2 lines of marching ants. It flood fills your octagon frame
with the same picture.
10.) Give it a rounded look! Without losing your ants, go to
Images/Effects/Inner Bevel. This brings up another box.
Suggested settings:
a. For the "Bevel" setting: 2nd from the right on the
top line. Experiment with the different styles and find one that
suits you best...
b. Width: 8
c. Smoothness: 44
d. Depth: 88
e. Ambience: 0
f. Shininess: 0
g. Color: White
h. Angle: 0 (you may want your light coming in at the same angle
as your shadow...)
i. Intensity: 55
j. Elevation: 42
Click on Ok....
11.) Lets get rid of the ants. Go to Selections/Select None.
We're going to resize it a bit before we save it. Go to Image/Resize.
Another box, of course... Select "Percentage of Original".
Enter "75" for the Width and Height. Make sure of these
settings at the bottom:
Resize Type: Smart Size
Resize all Layers: Checked
Maintain Aspect Ratio of: 1 to 1 (and is checked)
Click Ok...
12.) It doesn't look quite as clear now so go to Images/Sharpen/Sharpen.
Now Save your picture!
Happy PSP'ing!

This tutorial is owned by Sandy's Stuff. Please respect the work that went into it and do not blatently copy my tutorial as your own. Too much of that going on and we are losing talented people who make learning PSP a pleasure!
Respectfully, Sandy