Truechoice Suspension
Truechoice (TC) is a Hilliard Ohio company that specializes in suspension solutions. They are an authorized dealer for putting together Koni struts and Eibach springs. TC has suspension solutions ranging from the simple non-adjustable single spring street suspension to the complex double-adjustable two spring suspension. If you want to read more about the different TC suspensions then go here http://www.truechoice.com/products/suspension.html
Phase IV General Features
The suspension that I chose was a phase IV suspension. You will have to send the stock front struts to TC for building this suspension. At the time it was the most advanced that TC had and is considered to be a competition only suspension. This suspension is a coil over system and comes with a double adjustable (rebound and compression) Koni strut, an ERS Eibach main spring and an Eibach tender spring. The tender springs do the following: They help prevent doglegging of the rear wheel in corners. Most FWD cars have a tendency to do this due to the fact that over 60% of the weight is on the front wheels. They help reduce wheel spin of the inside front tire when coming out of a corner, and they reduce the noise associated with most coil over suspension systems.
The above is the general description of the suspension. My suspension was custom made for the 200SX SE-R. The person who is responsible for designing the proto-type of this suspension is Mike Kojima. He has the first such suspension on his 1995 200SX SE-R. I have the second such suspension.
Phase IV Specific Features
The 200SX SE-R (and most Nissan cars) has very limited suspension travel. When lowered the suspension travel becomes extremely limited. When I lowered my SE-R with the AGXs and the Pro-Kits rear travel was reduced to 0.25-0.5 inches. The front travel was about an inch. Bottoming out was a constant threat. If you are into road racing bottoming out will upset the suspension and leads to a very unstable car. The only solution for this problem is to shorten the struts. Shortening the struts allows you to lower the car and keep the same suspension travel. It is an ideal solution for the bottoming out problem.
The most important thing to do when ordering your TC suspension is to communicate clearly about what you want from the person designing the suspension. The person that built the suspension for Mike Kojima was not the same person that built my suspension. That made the whole process harder than it needs be. Do your best to avoid the following pitfalls:
When you tell the suspension builder to shorten the suspension use the following terms: "please shorten my front STRUT BODY by 1.5 inches." That means that the builder will shorten the front strut body by 1.5 inches and the strut shaft by another 1.5 inches, a total shortening of 3 inches. I made the mistake of telling TC to "shorten the front STRUT by 1.5 inches." The strut builder understood that to mean a 0.75 inch shorter body and a 0.75 inch shorter shaft. Or you can tell the strut bulider to "please shorten the STRUT by 3 inches." This means that the strut BODY will be shortened by 1.75 inches and the strut SHAFT will be shortened by 1.75 inches. I made the mistake so learn from it. I had to ship my struts back to TC due to this simple mistake in communication. This caused unwarranted delays.
The second mistake was with the rear struts. TC built the shaft of the rear strut with too short of a thread. I could not possibly mount the rear strut with enough rubber separators between the strut hat and the motivational mounting plate (more on that later). So I sent the rear struts back with the following exact instructions:
As per our telephone conversation I am sending you the rear struts for further modification. As I told you over the phone the thread on the strut shaft is too short and does not allow proper mounting on the rear mounting plate. Please increase the thread on top of the shaft an additional 1-inch. Currently it is 1.25 inches. Please make it a total of 2.25 inches.
Do not order your suspension during race season. This is the busiest season for suspension shops. Wait until the winter months to order your suspension.
If you avoid these pitfalls, there is no reason to encounter delays and constantly ship your suspension back and forth to TC.
I decided to go with the same spring rate that Mike Kojima has on his suspension: 350 lb/in Eibach Racing ERS springs up front and 250 lb/in in the rear. Use 2.5 inch diameter springs. This will avoid rattling. I also used 250 lb/in tender springs in the front and 150 lb/in tender springs in the rear.
The above spring rates will make your car both streetable and for track use. If you want to make the car as a track only car you can increase the main ERS spring to 450-500 lb/in in the front and 350-400 lb/in in the rear. I talked to Ground Control and they recommend 500 lb/in in the front and 550 lb/in in the rear for the 200SX on the track. In my opinion that is way high and might cause snap oversteer.
Installation
Installing the TC suspension is not as hard as it first appears to be.
There are many parts, but if you install the parts in the 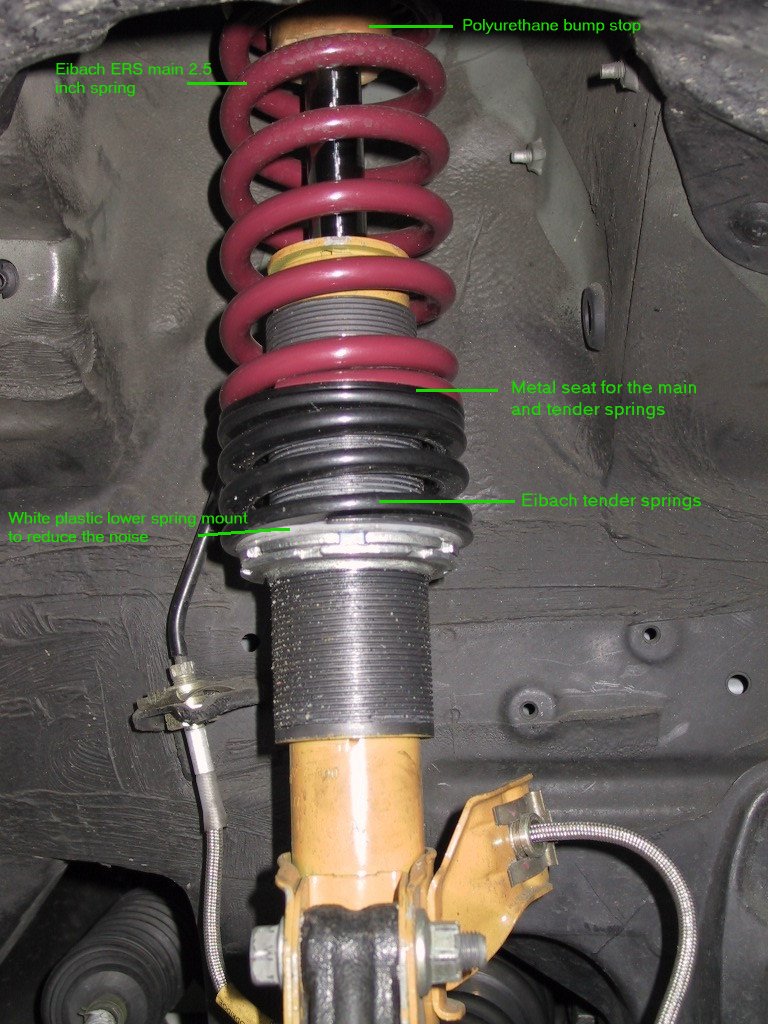 order
labeled in the image to your left then you cannot make a mistake. The front installed
suspension should look like the image to the left. You can install the tender springs on
top of the main springs or on the bottom of these springs as shown in the picture. At
first I installed the tenders under the main spring. Later on I switched the tenders to
the top of the main spring. When you install the suspension make sure that you do not
lower the car too much. I made the mistake of lowering the car too much and was riding on
the bump stops. It was Mike Kojima who told me that I was riding on the bump stops. I did
not even notice!!! So what is the proper height for the front? If you are into performance
and not into show, then the best height is to keep 1.75 inch of laden shaft travel on the
front suspension. It involves a lot of measuring and trial and error but you can do it. To
make this easy, place a marker on the collar that you turn to lift the car. Every two full
turns of the collar lifts your car by an average of a 1/4 inch. That will make it easier
for you to get the right height.
order
labeled in the image to your left then you cannot make a mistake. The front installed
suspension should look like the image to the left. You can install the tender springs on
top of the main springs or on the bottom of these springs as shown in the picture. At
first I installed the tenders under the main spring. Later on I switched the tenders to
the top of the main spring. When you install the suspension make sure that you do not
lower the car too much. I made the mistake of lowering the car too much and was riding on
the bump stops. It was Mike Kojima who told me that I was riding on the bump stops. I did
not even notice!!! So what is the proper height for the front? If you are into performance
and not into show, then the best height is to keep 1.75 inch of laden shaft travel on the
front suspension. It involves a lot of measuring and trial and error but you can do it. To
make this easy, place a marker on the collar that you turn to lift the car. Every two full
turns of the collar lifts your car by an average of a 1/4 inch. That will make it easier
for you to get the right height.
It is advisable to use camber plate with this suspension. Not only do
camber plates allow you to adjust camber, they also remove the stock mounting plates that
are filled with rubber that flexes under load. I chose the Stillen (Cusco) camber plates.
You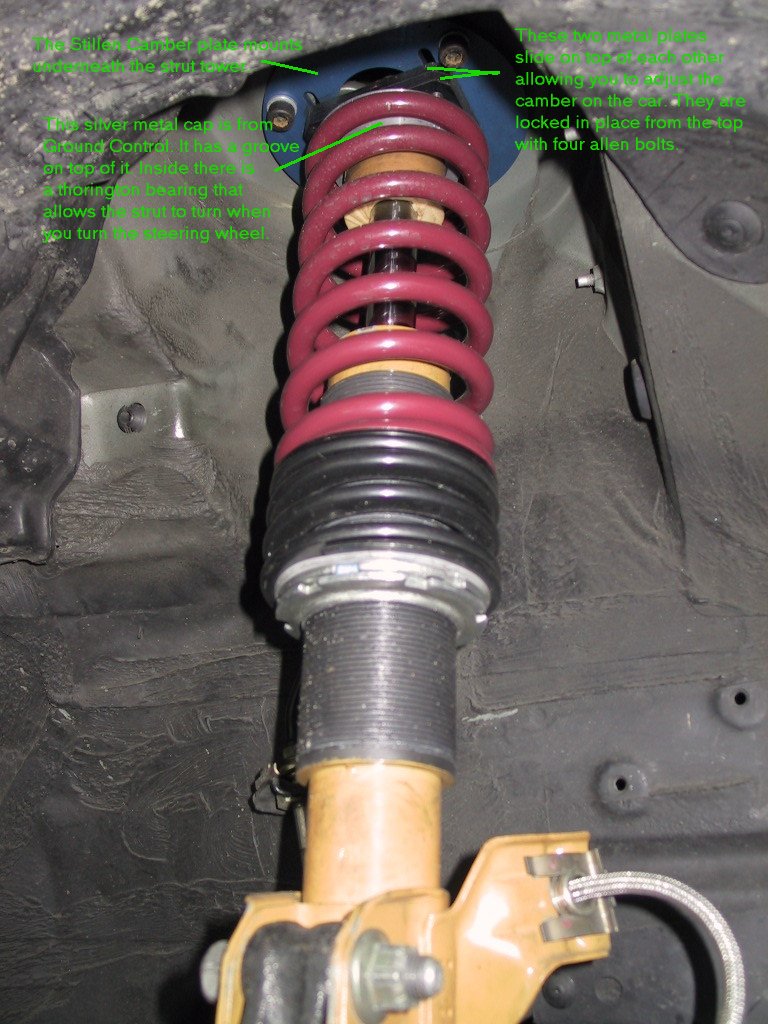 can also get the
Ground Control (GC) camber plates. The GC plates are better since the mount on top of the
strut tower. This gives you about 1/2 inch of extra suspension travel up front. The
Stillen plate on the other hand is mounted under the strut tower as you can see in the
picture to your right. The top suspension hat on the front is not from TC. It is from
Ground Control. It is grooved on top to allow you to seat a thorington bearing
can also get the
Ground Control (GC) camber plates. The GC plates are better since the mount on top of the
strut tower. This gives you about 1/2 inch of extra suspension travel up front. The
Stillen plate on the other hand is mounted under the strut tower as you can see in the
picture to your right. The top suspension hat on the front is not from TC. It is from
Ground Control. It is grooved on top to allow you to seat a thorington bearing 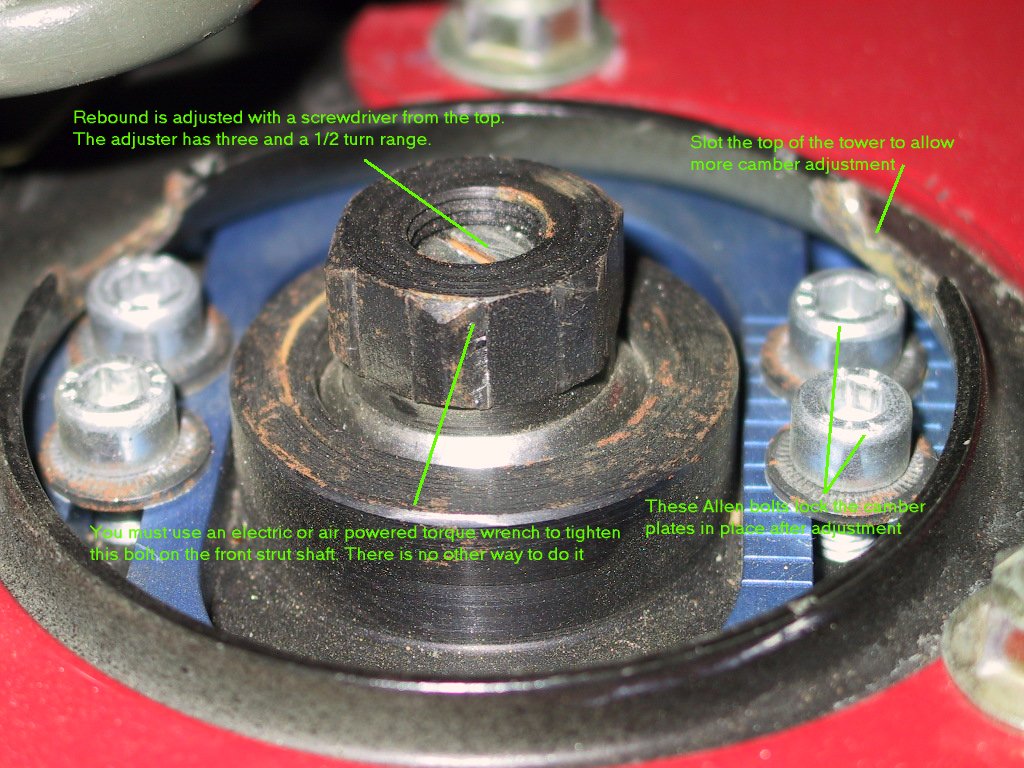 in it. The bearing
allows movement of the strut when you turn the steering wheel. The image to your left
shows the camber plates from inside the engine bay. You can see the Allen bolts that lock
the plates in place after camber adjustment. I was able to get a 2.6 degree negative
camber with these plates. I have a couple of tricks to get the 2.75 degrees negative that
I want. The large bolt that locks the strut in place is a bitch to tighten. TC does not
recommend the use of an air or electric impact wrench. But there is no other way to
tighten it. I tried holding the shaft in place with rubber tipped pliers and tightening
form the top. It did not work. If you do not tighten the bolt with an air or electric
wrench you will get a lot of suspension noise and the car feels loose.
in it. The bearing
allows movement of the strut when you turn the steering wheel. The image to your left
shows the camber plates from inside the engine bay. You can see the Allen bolts that lock
the plates in place after camber adjustment. I was able to get a 2.6 degree negative
camber with these plates. I have a couple of tricks to get the 2.75 degrees negative that
I want. The large bolt that locks the strut in place is a bitch to tighten. TC does not
recommend the use of an air or electric impact wrench. But there is no other way to
tighten it. I tried holding the shaft in place with rubber tipped pliers and tightening
form the top. It did not work. If you do not tighten the bolt with an air or electric
wrench you will get a lot of suspension noise and the car feels loose.
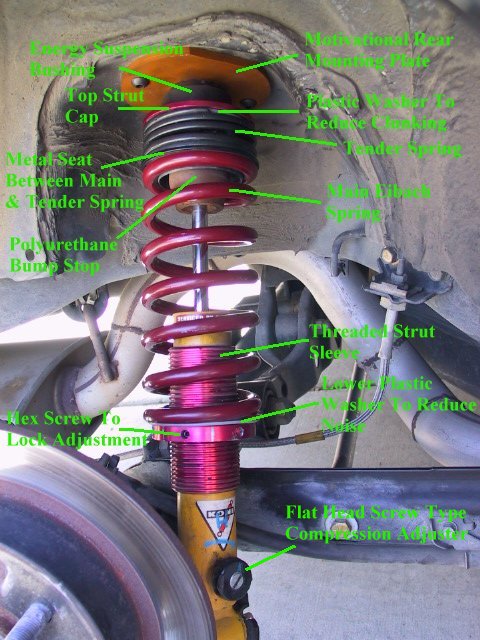 The first image to your
left shows the rear strut installed. You can either use the stock mounting hardware with
The first image to your
left shows the rear strut installed. You can either use the stock mounting hardware with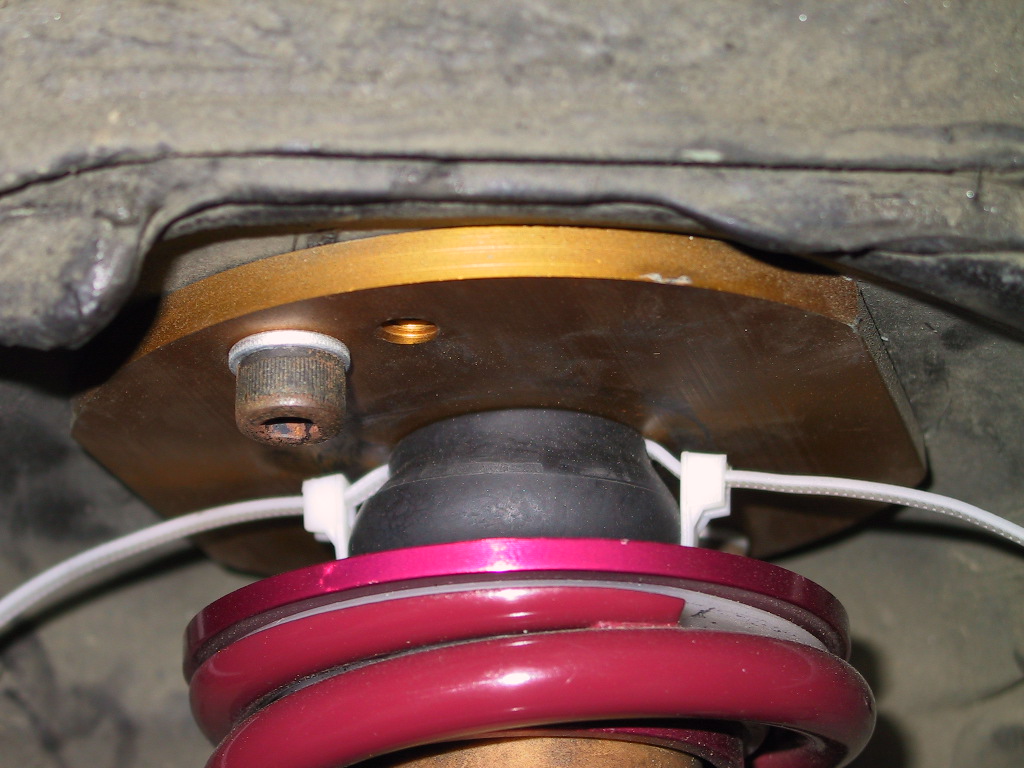 the rear TC strut or you can use the Motivational rear
mounting plate. Motivational designed this plate to work with a coilover suspension. It is
also available for a regular suspension set up. This plate increases rear suspension
travel by about a 1-1.5 inches. Its use is essential for those who lower their cars w/o
shortening the struts. If you want to get one go to www.motivational.net.
You will need some rubber bushings to separate the top suspension hat from the
motivational mounting plate. The ideal size for this bushing would be 0.5 inches in
internal diameter (ID), 1.5-2 inches in outside diameter (OD) and 1-1.5 inches in height.
At first, I could not find anything in that size. So I used some Energy Suspension (ES)
end
the rear TC strut or you can use the Motivational rear
mounting plate. Motivational designed this plate to work with a coilover suspension. It is
also available for a regular suspension set up. This plate increases rear suspension
travel by about a 1-1.5 inches. Its use is essential for those who lower their cars w/o
shortening the struts. If you want to get one go to www.motivational.net.
You will need some rubber bushings to separate the top suspension hat from the
motivational mounting plate. The ideal size for this bushing would be 0.5 inches in
internal diameter (ID), 1.5-2 inches in outside diameter (OD) and 1-1.5 inches in height.
At first, I could not find anything in that size. So I used some Energy Suspension (ES)
end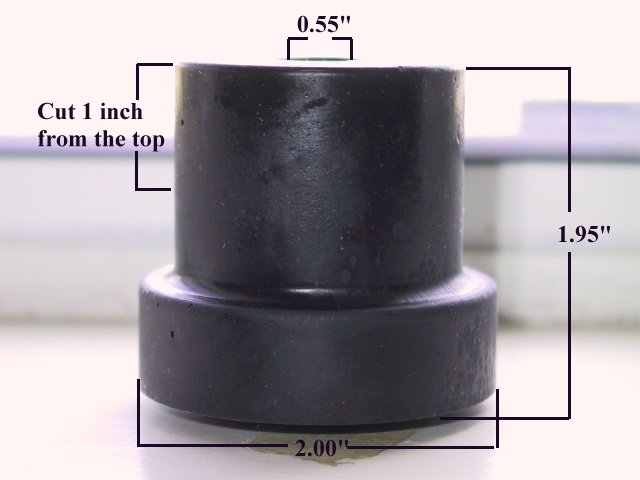 link grommets to
separate the TC top suspension hat from the motivational mounting plate (First image to
your right). You will need to enlarge the internal diameter of the grommets, glue and zip
link grommets to
separate the TC top suspension hat from the motivational mounting plate (First image to
your right). You will need to enlarge the internal diameter of the grommets, glue and zip 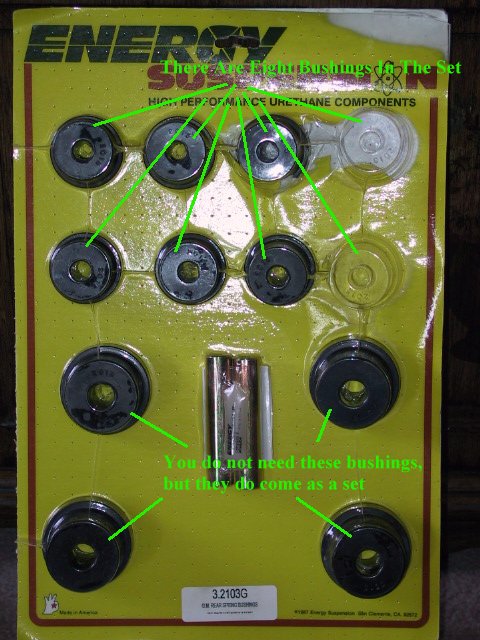 tie two grommets together,
and use them. It is not an ideal solution. At the track the grommets could not handle the
loads and the flexing. After two track events they would burst. Then I had to do the same
process all over again. So I visited Team C in Bellflower CA, a shop that has a large
inventory of ES bushings. I finally found what I needed. To the left is the ES set that
you will need. It is for a chevy truck. It has 12 bushings. You will only
tie two grommets together,
and use them. It is not an ideal solution. At the track the grommets could not handle the
loads and the flexing. After two track events they would burst. Then I had to do the same
process all over again. So I visited Team C in Bellflower CA, a shop that has a large
inventory of ES bushings. I finally found what I needed. To the left is the ES set that
you will need. It is for a chevy truck. It has 12 bushings. You will only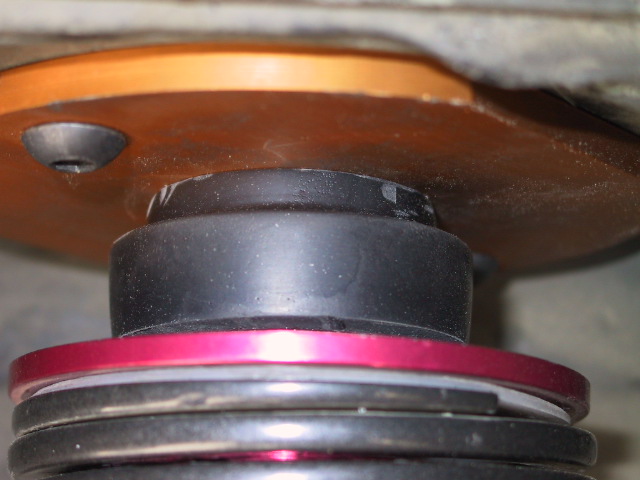 use the top eight
bushings. Of course you will use them one at a time ;-) The lower 4 bushings you will have
to discard. The dimension of each of each bushing is highlighted in the second image to
the right. You will need to cut 1 inch from the top of the bushing. Aside from that this
bushing is ideal. It has a 2 inch diameter base and a 1.6 inch diameter top. It can handle
the heavy side loads of track driving. It also has an ideal 0.55 inch internal diameter.
It is just perfect. When installed the bushing would look like the third image to the
right.
use the top eight
bushings. Of course you will use them one at a time ;-) The lower 4 bushings you will have
to discard. The dimension of each of each bushing is highlighted in the second image to
the right. You will need to cut 1 inch from the top of the bushing. Aside from that this
bushing is ideal. It has a 2 inch diameter base and a 1.6 inch diameter top. It can handle
the heavy side loads of track driving. It also has an ideal 0.55 inch internal diameter.
It is just perfect. When installed the bushing would look like the third image to the
right.
 The top
part of the rear suspension should look like the image to your left. You need to mount a
rubber bushing, a washer and then the tighten the bolt. Their is no set torque. Do not
tighten it all the way through. I tightened mine until 5 threads were showing from the
other side of the nut. The TC suspension comes with the white knob adjuster that you see
in the picture. This knob is removable. You use it to adjust the rebound from the trunk of
the car. Compression is adjusted from the lower end of the strut. You will need a flat
head screw driver to adjust it.
The top
part of the rear suspension should look like the image to your left. You need to mount a
rubber bushing, a washer and then the tighten the bolt. Their is no set torque. Do not
tighten it all the way through. I tightened mine until 5 threads were showing from the
other side of the nut. The TC suspension comes with the white knob adjuster that you see
in the picture. This knob is removable. You use it to adjust the rebound from the trunk of
the car. Compression is adjusted from the lower end of the strut. You will need a flat
head screw driver to adjust it.
Impressions
I have had this suspension for some time now. It took a lot of patience on my part to work out all the fitment problems with this suspension. I hope that some of the tips that I gave you on communicating with TC will help you avoid those problems. Is this suspension worth it?
- If you plan on racing your car in the future the suspension is definitely worth it. It is not cheap. My cost was $2,800.00. But the suspension is rebuildable and rebuilding it is not as expensive as the initial purchase. Unfortunately in all the SR20DE family of cars you need to shorten the struts in order to lower the car and improve the handling. Truechoice, Shocktek, and motivational are the only suspension builders that I know of who will do this for you.
- The suspension also allows you the flexibility of using different ERS spring rates. For example, I felt that my car was not as neutral as I wanted it to be. So I purchased a 300 lb/in spring for the rear and installed it. At the track I felt that the car turned in crisply and was almost at the edge of oversteer.
- The suspension also allows you to adjust the rebound and compression separately. You can set up your car to whatever you want and whatever track that you are at.
- On the street the car handles like a dream. The ride is not harsh. Infact it has a better ride than my G20 equipped with AGXs and G20t springs. Simply set the front to 4 clicks compression and 1/2 a turn rebound toward the heavy side. Set the rears to 2 clicks compression and a 1/4 turn rebound towards the heavy side. That is the optimal street setting that I use.
- For the track the best setting so far has been 6-8 clicks compression and 1 and 1/2 turn rebound towards the heavy side up front. For the rears I use 4-5 clicks compression and one full turn rebound towards the stiff side. While all FWD cars tend to understeer at the limit, with this suspension understeering is minimal. The car is as neutral as could be.
- Most importantly bottoming out is almost non-existent (provided you have the correct ride height). And if for some reason you bottom out, the polyurethane progressive bump stops cushion the bottoming out process causing less suspension instability.