Made with PSP 7
Page 1
What you will need:
PSP 7 or higher
My .sel zip file (unzip to your selections folder, this will place a folder called
REUsel into your selections folder)
My pattern zip files
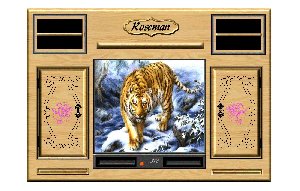
Start by opening an image 1100 / 700, then add a new layer. Rename this layer bkwall. Go to Selections / Load from Disk / bkwall.sel.
Open up the wood fill pattern pinefill or use one of your own. If you use the same wood pattern as I did, set the scale % to 250 / angle 90 and flood fill the area,
Bevel = top row 3rd from the left Angle = 0
Width = 7 Intensity = 24
Smoothness = 35 Elevation =51
Depth = 11 Color = white
Ambience = ( - 4 )
Shininess = 60
Deselect image go to Selections / Load from Disk / tvscrn.sel. Next hit the delete key, while still selected go to the color palette and select Black Foreground / White Background, then Effect / Chisel, and use these settings:
Size = 13 Background color checked
Deselect
Now you can either insert a picture and crop to the beginning edge of the grey color, of you can use a metallic gradient to flood fill the selected area. Style = top box checked / Angle = 311
Go to Layers / add new / and name this layer base, then Selections / Load from Disk / base.sel and flood fill with black. While still selected go to Effects / Outer Bevel and use these settings:
Bevel = top row 1st one Ambience = ( - 100 ) Elevation = 47
Width = 15 Shininess = 47
Smoothness = 38 Angle = 322
Depth = 22 Intensity = 65
Bevel = 2nd row second from the left Shininess = 56
Width = 10 Angle = 329
Smoothness = 23 Intensity = 24
Depth = 22 Elevation = 51
Ambience = ( - 100 )
While still selected Copy / Paste as new selection, then deselect. Go to Selections / Load from Disk/ rmtsr.sel and flood fill with red. Now deselect and go to the text button on your toolbar. Left click on the base and type JVC in the text entry box using size 14 / Lynda Cursive / bold and italic / light grey.
Then deselect.
Next go to Selections / Load from Disk / shelf.sel and name this layer shelf 1. Flood fill with your wood pattern. Use the following settings:
Bevel = 1st row 2nd from the left Shininess = 56
Width = 12 Angle = 0
Smoothness =54 Intensity = 24
Depth = 11 Elevation = 51
Ambience = ( - 25 )
Deselect image and go to Selections / Load from Disk / shelf2.sel, name this layer shelf 2.
Flood fill with black and deselect, then go to Selections / Load from Disk / shelf3.sel, / Black Foreground White Background. Go to Effects / Chisel / size 10. Then deselect.