
DRAFT
PVC Groundhouse
Scott Carlton, © 1999
Using a frame built of cpvc pipe, according to the following plans, it is possible to construct a highly useable grow-house for early spring or late fall plantings.
This design is based upon the use of inexpensive materials readily available at nearly any local hardware store or home improvement center.
While some of the "connectors" may be available in some market areas, I have elected to utilize connectors which should be available in ALL market areas. If you can find others to do the job (and they should be available), feel free.
The following plans will provide for a framework approximately 10 feet long by 5 feet wide.
The basic procedure is very simple, a series of plumbing "T's" is used to provide a set of sockets which face straight up off the ground. To do this, a rectangular frame is constructed which will maintain these sockets in both an upright (that is third dimensional) position as well as an horizontal position along the ground. Since 4-way cpvc connectors are quite rare, I recommend using two "normal" T's coupled with a short section of pipe and cemented into place. One of these two T's is offset 90° from the other in order to construct a method by which the crossbars can be attached to the 'rails' while at the same time allowing for installation of the rib.
Once the siderails are constucted using sections of pipe (two 10' lengths) each cut into 3' sections and cemented into the appropriate set of T's, one is next prepared to tie the rails together using two more lengths of pipe cut into 5 foot lengths. This will provide for a total of four 'crossbars' which will maintain the alignment of the rails as well as divide the interior of the greenhouse into three more or less equal sections.
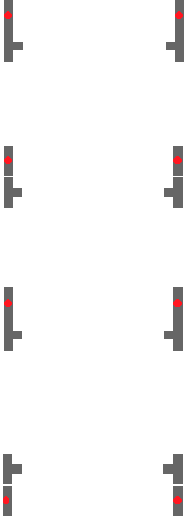
The following illustration depicts the "T-assembly" you will need to construct before gluing up the side rails.
At the right is a t lying on the benchtop the openings facing up, right, and to the left. On the left, is the second "T" with its openings facing left, right, and toward the viewer (red dot). A short piece of pipe is cemented between the two to form the assembly itself. You will need to make a total of eight of these pairings for your frame.
The next illustration shows the basic layout for these sets of pairs:
This diagram shows a basic frame assembly which will allow longer side rails by interspersing a regular "T" between the double "T" assemblies. This provides the ability for additional length as well as additional ribs.
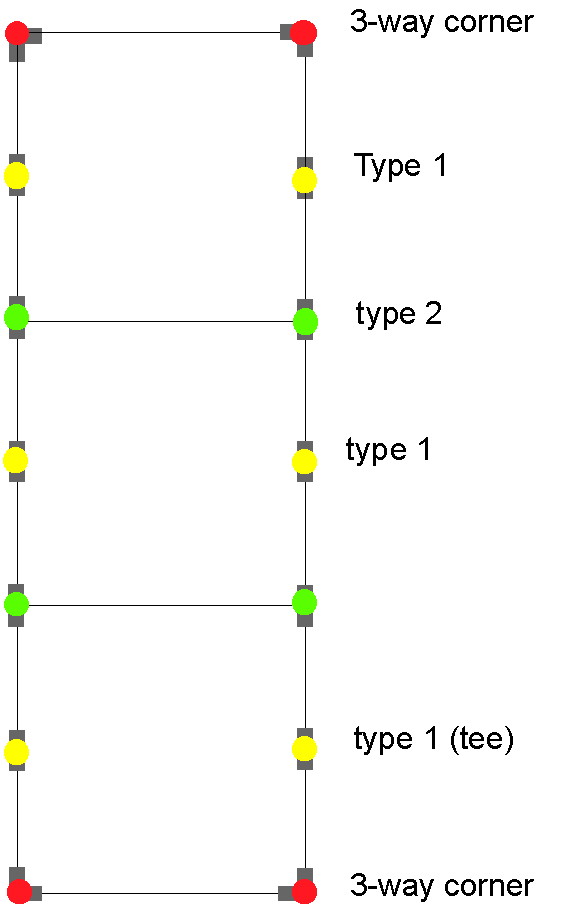
Each of the nodes along the side rail is an insertion point for a rib. The ribs are, very simply, entire 10' lengths of cpvc pipe which are pressed into the upward facing receptacle on one rail and then bent to press the other end into the corresponding socket on the opposite rail.
Once all of the ribs have been placed, a ridge of pipe is laid along the underside of the ribs at their highest point and each rib is fastened to this ridge. While any number of items may be used for this, I recommend electrical wire-ties... those nifty little nylon straps with the one-way fastener. Just snug them up, being careful to keep the long ends and locks facing downward. Obviously, it is important that each of the ribs be spaced the same distance apart on the ridge pole as on each of the siderail bases.
Your growhouse frame is now complete. All that remains is to stretch a layer of plastic across the outside and you are set! The house may be set directly on the ground over your flats or planted beds, or, if you tend to do raised-bed gardening, you can construct a base frame of wood upon which you can place your growhouse. This method actually, has two major advantages. You gain a bit more height and second, you can staple your growhouse along one side loosely and lift it up to work on your plants beneath.
Materials List
Item |
Number Required |
Cost Each |
Total Cost |
CPVC 1/2 " T |
22 |
.39 |
$8.58 |
CPVC 1/2" pipe |
11* |
$1.29 |
$28.38 |
Cement |
1 can |
$2.98 |
$2.98 |
Plastic covering |
12' X 25' 6 mil** |
~ $12.00 *** |
$12.00 |
* an additional length may be needed in order to cut small pieces for building the "T assemblies" (although, in most instances the material left from cutting the side rails should provide adequate material) ... in this case add the cost of one more 'stick.'
** 6 mil is recommended but much less expensive 4 mil can be used. You may also be able to locate "Paint Dropcloths" which are sufficiently long and wide for much less money as well. But... having gone to the trouble and expense of doing such a nice job on your frame, why try to cut corners on the real "Working Parts?"
*** Cost here is quite variable, you may find buying a 40' X 100' roll of construction grade 6 mil plastic will be quite a bit less per unit if you intend to make several.
As you will note from the above estimated costs, a unit should
fall within the $50 +/- range. Further economies of scale might
well be realized if you construct several at the same time.
Plastic sheathing, for example, is one item particularly prone to
significant differences based upon size of unit purchased.
A can of cement will certainly be able to stretch far beyond the one unit for which it was purchased.
The only thing which has not yet been addressed is the method by which to attach the plastic TO the ribs/rails. Several options might be considered, but the two which make most sense to me are a hot/melt glue applied to the rib and the plastic smoothed onto it (careful! It's hot and will not only melt the plastic but burn your fingers if you are too quick!) or clear silicone sealer applied similarly. The advantage of the silicone is that it allows quite a bit of smoothing and stretching and positioning before it hardens ("cures")... this just might be a good thing!
end of draft version
Thank you for visiting Naturalphotos. I hope you have enjoyed your visit and, should you wish to comment on this site please click here or on the thumbnail below.

This page hosted by
Get your own Free Home Page
|
|
