Here are three different sets of CW paddles that I built
myself. These paddles are not as high-quality as a new set of Benchers or
some really nice machined homebrew paddles out there, but they were made from
scrap and cost virtually nothing. They also show how easy it is to make a
decent set of CW paddles.
______________________________
NB6M Paddle
This is a simple
CW paddle built from double-sided PC board. It is very simple to
construct and should only take an hour or two to complete. These are known
as the NB6M paddles and several kits were handed
out at one of the meetings of the Four State QRP
Group.
The materials you'll need to construct
the paddle are some double-sided PC board, four brass nuts, two screws to fit
the nuts, and some wire. You'll also need a soldering iron and some way to
hold the pieces of PC boad together. A pair of "extra hands," a heavy base
with two alligator clips, comes in handy.
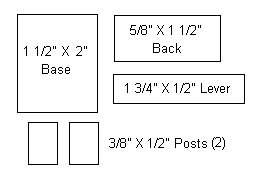
Shine the PC board with steel
wool and cut it into the following pieces:
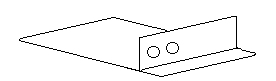
Drill two holes into the back piece
on one end. This is for the cable to connect the paddle to the
keyer. Solder it to the base about 1/2" from the back edge of the base
like so:
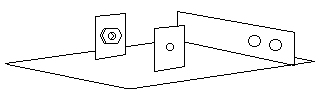
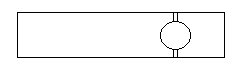
Next, drill a hole in the middle of each post. Put
one brass nut on each screw and stick it through the hole of the post.
Screw the other nut on the other side so that the screw is firmly attached to
the post. Solder one of the nuts to the post. Make sure you solder
only one of the nuts to each post.
Next, solder the posts to
the base making sure to put the nut side on the inside. Spacing isn't
critical, but make sure to place them equal distance from each other. Make
sure they aren't too far apart so that the screws won't touch the paddle
arm.
Drill a hole
in one end of the paddle lever. This hole will allow the lever to move
back & forth with ease. Be sure not to make the hole too large or else
the paddle will lose its springiness. You can adjust the tension by
enlarging the hole after it's attached to the base. Be sure to enlarge the
hole a little at a time. Once you have made the hole, cut the copper trace
on either side of the hole with a hacksaw blade or Dremel tool. This will
provide isolation for each side of the paddle from the base.
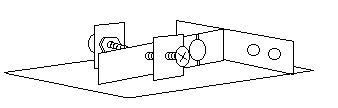
Thread the screws through the nuts
on the posts and insert the paddle lever between them. Put the end with
the hole touching the back and tighten the screws so that it holds the lever
firmly. Be sure to center the lever and make sure it doesn't touch the
base. Solder the lever to the back. The construction will then be
complete.
Once the lever has
been soldered to the back, unscrew the screws to provide a gap between them and
the lever. Once a comfortable gap has been found, screw the two nuts
that aren't soldered to the posts down to lock the screws in place.
Next, wind the cable through the two holes to secure it to the
paddle. The cable can be made from any kind of cord that has at least
three conductors. I have used stereo headphone cable for paddles in the
past. On this one, I used an old computer mouse cord. Solder one
wire to the base of the paddle, one wire to one side of the paddle lever
(forward of the hole) and the third wire to the other side of the lever. A
stereo jack on the cable will provide the three wire connection to a
keyer. A pair of rubber feet can be attached to each side of the
paddle. I've also seen other things used, such as guitar picks.
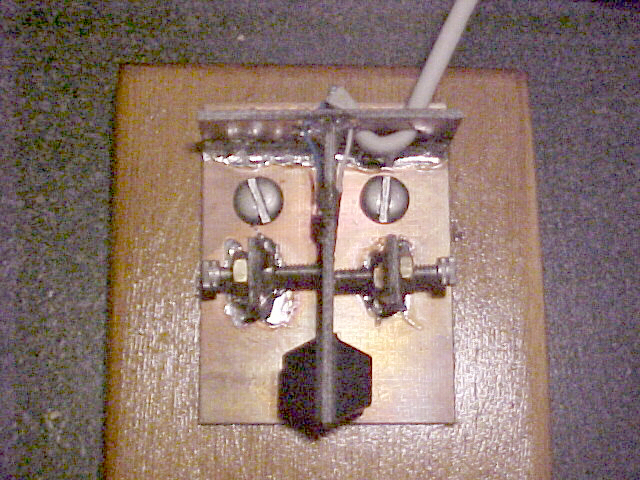
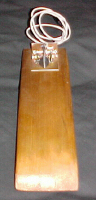
As
a finishing touch, I attached the paddle to a wooden board that I tapered on one
end. This allows my hand to hold the paddle down while using
it.
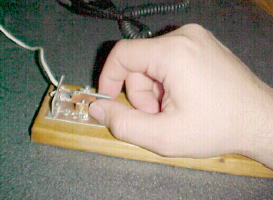
As you can see, the paddle is dwarfed by my hand. However, as
small as it is, it is still comfortable to use.
One final thing to
note is that the copper on the PC board will dull with time. After
initially shining the PC board with steel wool, the parts can be sprayed with
clear spray paint to keep the board shiny. Most paints will allow you to
solder though them. If this method is used, you must leave a small patch
of solder where the screw touches the paddle lever in order to make
contact.
An Iambic version of the paddle can be built by using two paddle
levers and one post between them. The screws would be attached to the
levers and the wires soldered to the inside
edge.
______________________________
Paperclip Paddle
This is a set of iambic paddles designed from a large paperclip of the
type used to hold numerous sheets of paper together. Gene, N0MQ, had
gotten a bunch of these paperclips and had brought them to one of our QRP
builder's club meetings so that we could build paddles from
them.
It's a simple matter to turn this kind of paperclip
into a set of CW paddles. The first thing that will need to be done is to
remove the two wire finger pieces from the springy clip. If you
look at the open side of the clip, the side that slips over the paper, it will
look like this:
What needs to be done to turn this paperclip into
a CW paddle is to very carefully grind the tabs that hold the finger pieces with
a Dremel or bench grinder so that they look like this:
I say "carefully" because
it is very easy to ruin the clip by grinding the angle wrong. When we
built these paddles at our builder's meeting I think we ruined several of them
before getting them right. Once the clip is like in the second
picture, it will provide the necessary springiness to allow the paddles to
open again after being squeezed. Where the tabs held the finger
pieces tightly to the side of the clip, they will now keep them away. Now,
after having done the modification the spacing for the contacts will be horribly
wide to use as a CW paddle. This is counteracted by using part of a
regular wire paperclip on the inside of the clip and folded back over to hold
the finger pieces closer to the body of the clip. This can be seen as the
two pieces of wire coming out the top of the paddle & folded downward.
The wire pieces can be adjusted to provide the spacing desired.
To
provide the contacts for the paddle, I used some extremely thin PC board.
I simply cut out a couple of small strips which I glued to each side of the
clip, allowing the metal parts of the finger pieces to contact them when
squeezed. If no thin PC board can be found, small strips of metal can be
used by they must be insulated from the main body of the clip. Mylar or
similar material could be used. Once the strips are in place, wires can be
soldered to them. A wire must also be soldered to the main body of the
clip. I chose to solder inside the clip for aesthetic reasons. The
enamel will need to be sanded or ground away. Once all wires were
connected, the paper clip can be mounted on a small upright piece. We used
small pieces of wood. I attached the upright piece to a flat horizontal
piece using glue and the metal part from a push pin. The horizontal piece
of wood was attached with screws & nuts to the lid of a
mini Altoids tin which was filled with lead birdshot &
epoxy. Non-skid material was glued to the bottom of
the tin.
Before the wooden piece was attached to the
tin, I made a shallow channel in the bottom in which to run the cord which was
salvaged from an old computer mouse. I then stained & laquered the
wood before attaching the paddles.
I was really suprised by how well
these paddles work and at how nice they feel when operating. They are not
quite as smooth as a set of Benchers, but are smooth nonetheless. They are
a pleasure to operate.
______________________________
Single-Lever Paddle
This is a simple single-lever
paddle I built based on the "hacksaw blade" single-lever paddle design. I
didn't really need another set of paddles, but hought it'd be fun to build
another one. However, instead of using a hacksaw blade like I had seen
others do, I used a blank from a PC card slot. This is
similar to the 1-Cent CW key I built using the same principle.
Construction was fairly straghtforward on this paddle. I cut the
wooden pieces from some scrap boards and a scrap PC slot blank was used as the
lever. I had orignally planned to build an iambic paddle with two
levers, but I didn't have two slot blanks that were identical. Since I
don't use iambic keying, I wouldn't miss anything by having a single-lever
paddle. So instead of using two levers and a single post, I used a single
lever and two posts.
The wooden pieces were all cut out &
sanded down using a Dremel and electric sander. The paddle handle is
something I'm particularly proud of, as I designed it to be ergonomically
comfortable. I made the thumb side horizontally concave and the finger
side vertically concave. The result is a very comfortable paddle which
just feels right between your thumb & finger. I carved it out this way
by using my Dremel and a round sanding drum. Once all the wooden pieces
were finished, I stained & varnished them.
The two posts are
PC board standoffs with screw threads at one end and threaded holes in the
other. I drilled holes near the hole ends to run the contact
screws through, and the threaded ends were attached to the wooden base. I
drilled holes in the base and countersunk the bottom in order to get the nuts on
the screw threads. I also attached the wires underneath the nuts. As
a special touch, and to hide the screw holes, I epoxied a couple of rhinestones
to the top of the posts.
I
didn't want a bunch of wires showing, so instead of attaching the lever to the
side of the upright wooden part, I carefully made a slit in one side of it in
which to insert the lever. Once this was done, I drilled a hole in the
bottom of the upright part in which to run a wire for the lever. I also
drilled a couple of starter holes for the screws which would hold the upright to
the base. After drilling corresponding holes in the base, I inserted a
wire in the bottom of the base to make contact with the lever. I used a
bit of glue to hold it in place and to keep it from coming out. I then
attached the upright to the base and inserted the contact screws into the
posts. I epoxied the nut closest to the lever on each the posts to hold
them in place, while leaving the other nut free to act as a locking nut.
This makes it fairly easy to adjust the contact spacing.
Finally,
I had hollowed out most of the base before staining & varnishing in order to
add some weight. I drilled a hole in the rear of the base to run a cable
through, and the appropriate connections were made. Weight was
added by birdshot mixed with epoxy, which was added after the wiring was
completed.
After completing & using this paddle a while, I soon
learned that I probably should have gone with the iambic two-lever design.
The single lever works fine, but I have to make sure the contact spacing is a
little wide. If it's not, I get a lot of "bounceback" when I let off the
paddle, and it swings back and touches the other contact. The result is
adding an extra dit or dah to a CW character. The only way to solve this
is keeping the contacts spaced just far enough apart and making sure I don't
"flip" the paddle when I let off with my thumb or finger. This paddle
takes a little getting used to because of this, but it is nice to use with easy,
smooth keying.