

:: Converting an image into OLD LOOKING
- AN INTERESTING APPROACH ::
1. Open an image. I opened below image (fig-1).
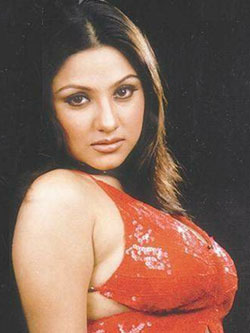
fig-1
2. Make the image ZOOM by using "Navigator". Select Lasso Tool (or) Pen Tool to select the areas of an image. But, i prefer to use Pen Tool. Switch to "Paths" tab of the Layers Pallette. Click on "Create New Path" to create a work-path of the "Paths" tab of the Layers Pallette. So, select Pen Tool and begin to make work-path certain areas on the image. a) After completing the work-path as shown below figure (fig-2), right-click on that path and choose "Make Selection". In the dialog box, keep these values;
Feather Radius=1 px
Anti-aliased=Checked and
Operation=New selection.
Click Ok. b) Again right-click on the work-path, and choose "Turn
Off Path".
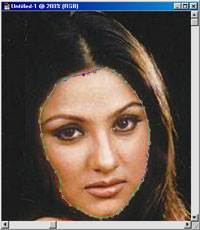
fig-2
3. Similary, we have to select other areas of an image. So, let's make
it. Click on "Create New Path" to create a work-path of the
"Paths" tab of the Layers Pallette. Follow (a) and (b) to make
selection's and making turn-off the path. After making paths, we can name
it. To name it or save it, double-click on that each work-path of Paths
TAB of the Layers Pallette. See below figure (fig-3).
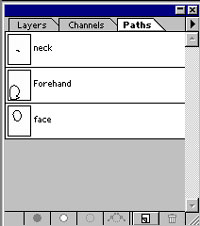
fig-3
4. Select "face" work-path from the Paths TAB of Layers Pallette.
Follow the figure (fig-4).
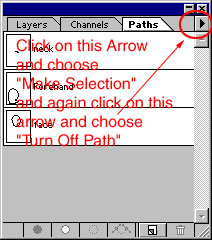
fig-4
5. Now switch to Layers Pallette. Press Ctrl+J. (to copy and paste that portion of an image).
6. Similary follow the steps (4) and (5) in the case of neck and forehand.
7. After completing these steps, Layers Pallette looks like below (fig-5).
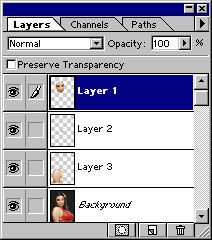
fig-5
8. Merge those Layer's, i.e., Layer 1, Layer 2 and Layer 3. After merging, make a Duplicate Copy of merged areas of an image. After making a Duplicate Copy, Press Ctrl+Click to select the Transparency of the "Duplicated Copy".
9. Goto Filter >> Texture >> Craquelure.
Change the values as below:
Crack Spacing=4
Crack Depth=1
Crack Brightness=9.
Click on Ok.
|
Additional & Important Note: During this process of retouching an image, the Contrast/Brightness of an image may increase/decrease. To avoid such variations, it is better to change it's contrast/brightness. Also, in the case Levels, make some changes. For effective and better look, add some noise during the process by selecting Filter >> Noise >> Add Noise. Also select Filter >> Blur >> Gaussian Blur (give the values as per your experiment). |
10. Goto Filter >> Other >> High Pass. Change the Radius=85.0
px (for this example, it may change for
your experiment). Click Ok. Figure shown below (fig-6).
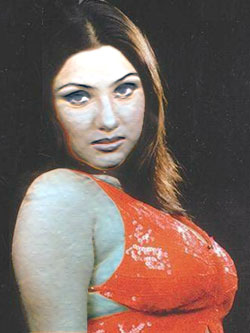
fig-6
11. Still you selected "Duplicate Copy". Let's change it's Blending Mode to "Lighten".
12. Now, select Merged areas (Original Layer) of an image. Repeat step (9). Now merge all Layer by pressing Ctrl+E.
See the output:
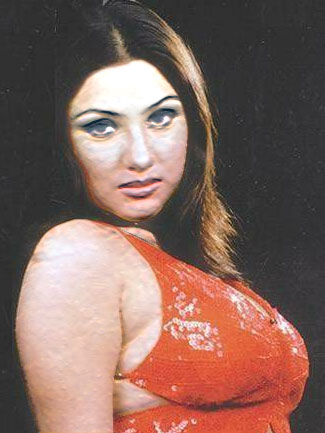
fig-7
Additional & Important Note: During this process of retouching an image, the Contrast/Brightness of an image may increase/decrease. To avoid such variations, it is better to change it's contrast/brightness. Also, in the case Levels, make some changes.
For effective and better look, add some noise during
the process by selecting Filter >> Noise >> Add Noise. Also
select
Filter >> Blur >> Gaussian Blur (give the values as per your
experiment).
That's all my dear friends. Hope You Enjoyed It!!!
Send mail to me (from your mail-id, in the Compose, write "About
Tutorial" in the "Subject" Column).
"Fundamentals are the Route
to the Destination" - BHMK
Go Home