

:: Rounded-Edged Text - A nice effect
::
1. Open a new document by hitting Ctrl+N. Document dimensions as follows:
Width=400 px
Height=150 px
Mode=RGB Color
Contents=Background Color.
Click Ok.
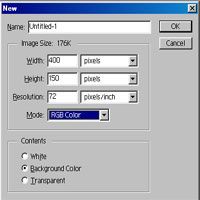
fig-1
2. Create a New Layer by hitting Ctrl+Shift+N. Fill with black color.
3. Choose the Foreground color="#E2850D". Choose Type Tool (T)
and click on Layer 1.
Type Tool dialog box appears. Type some text. I typed "BHMK"
& Size=90 and click Ok.
If the text displays some where at the document. Move ( Hit "V"
and drag it) it to center.
Now, you have to select the transparency of the text. To do so, follow
the fig-2 as shown below.
Right-Click on the Text Layer (named as text you typed) and choose "Select
Layer Transparency" or
(Ctrl + Mouse Left Button Click to select Transparency).
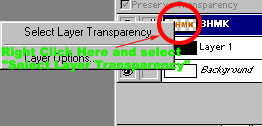
fig-2
4. Now, hit "Q" to change to Quick Mask. Select Filter >>
Blur >> Gaussian Blur.
Enter Radius=2.5 and click Ok.
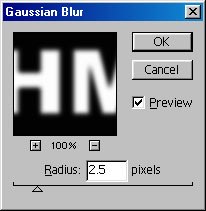
fig-3
5. Goto Image >> Adjust >> Brightness/Contrast. Change Brightness=+31
and Contrast=+35 and hit Ok.
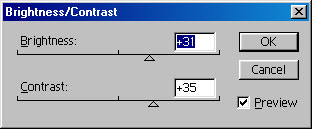
fig-4
6. Return to Standard Mode by hitting "Q" again (fig-5). Create
a new Layer. Press "Alt + Backspace" to fill new
with foreground. Remove the original text Layer as shown in the figure
(fig-6). De-select it (still transparency was
selected).

fig-5 (this is in Mask Mode, press Q to return to Standard Mode)
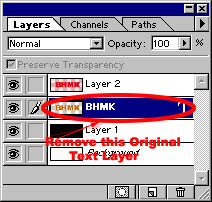
fig-6

fig-7
That's it! "Rounded Text" effect is in-front of you.
That's all my dear friends. Hope You Enjoyed It!!!
Send mail to me (in the Compose, write "About Tutorial" in "Subject"
Column).
"Fundamentals are the Route
to the Destination" - BHMK
Go Home