|
V6 SPRING BELT TENSIONER |
|
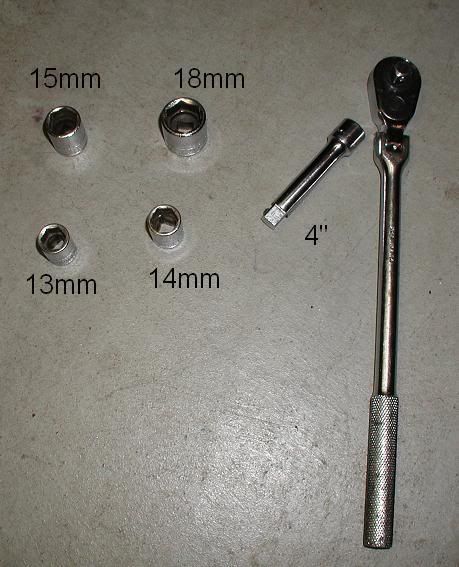
TOOLS Required 3/8 Ratchet 4in. 3/8 extension 13mm Socket 14mm Socket 15mm Socket 18mm Socket Click on any picture to see hi-res images. Download a PDF version from here. (kindly provided by Fierohobby) |
|
Installation |
|
- Clean and Prep the area. - Clean the areas around the two motor mount bolts and front of alternator bracket of any grease, oil and dirt. - The surfaces must be clean so the bracket will seat flat and tight. - Verify the bottom motor mount bolt is tight to prevent any movement of motor when the top bolt is removed. This will retain the alignment of the holes and simplify installation. Gently supporting the motor as mentioned above greatly helps. Removing one Dog Bone bolt to let the engine settle sometimes helps keep holes aligned. Note: NEVER REMOVE BOTH BOLTS AT THE SAME TIME. They will be removed and replaced one at a time. |
|
- Remember to work safely while installing the bracket. - Have the car on a level firm surface. - Block the wheels so car will not roll. - Raise the right corner of the car. - Remove the right rear wheel. - Remove inner slash shield. (WD40 or PB-blaster on the plastic fasteners and a needle nose to lever the center of the plug out works well.) - For added safely place a jack under the motor oil pan with a block of wood and gently support the motor to prevent any possibility of shifting. Click any picture to see a high res. version. |
|
- Remove and retain the lower alternator bolt currently used to adjust the belt tension. (13mm socket.) - Remove and retain the top motor mount bolt that also goes through the alternator bracket. (18mm socket.) - Remove the attached L leg and bolt of the new tensioner bracket and set aside. - Install the large part of the bracket re-using the long top motor mount bolt. Move the alternator as needed and install the lower alternator bolt through the hole in the 1/8 bracket arm leaving it just finger tight. Torque the mount bolt to 70-92 Ft/Lbs. |
|
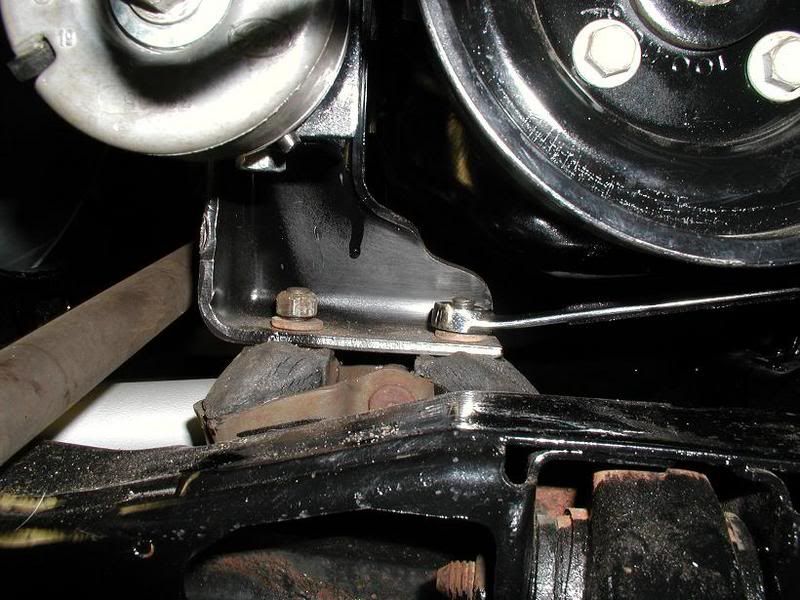
- Remove the lower motor mount bolt by holding the 18mm socket behind the mount plate and inserting a 4in. socket extension or longer through the large hole in the plate. - Re-install the lower motor mount bolt and remaining L bracket. Do not completely tighten yet. |
|
- Install remaining small bolt supplied with bracket through the hole in the L bracket and into the threaded hole. Tighten until the lock washer is half compressed but not completely tightened. |
|
- Tighten the lower motor mount bolt to 70-92 Ft/Lbs. - Tighten small bracket bolt. (14mm) - Tighten the lower alternator bolt. |
|
- Mount the spring tensioner using it's bolt (13mm socket) to the middle threaded hole with the small stud of the tensioner inserted into the bottom hole located near the edge of the bracket. |
|
- Insert 3/8 drive ratchet into the square hole of the tensioner and move tensioner to the left. Tension from the top for some tensioners - Install Gates K050450 belt or equivalent 45" belt. Note: If your running non-standard pulleys you will have to pick your belt size as needed. |
|
Re-install splash guard and wheel. NOTE: If you have trouble getting one of the motor mount bolts threaded back into it's hole the motor may have shifted mis-aligning the holes. To correct this loosen the two rubber motor mount bolts a couple turns. Using you support jack and block of wood raise the motor until you see the mount move on the rubber mount studs. You should be able to realign the motor mount holes to the engine holes while starting the bolt. Tapping the motor mount left or right with a hammer works also. Use caution that the motor does not shift causing injury. Re-tighten the mount nuts loosened above. |