|
|
|
|
|
|
|
|
|
|
|
|
|
|
|
|
|
|
|
|
|
|
|
|
|
|
|
MAZDA MIATA SEATS
|
|
|
|
|
|
|
|
|
|
|
|
Page 1
|
|
|
|
|
|
|

|
|
|
|
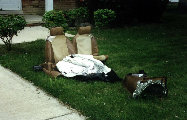
Here are the old seats out on the lawn. They were in pretty rough shape. Torn,
worn, broken down foam. My search for the Miata seats took me to numerous
salvage yards and took many weeks. I finally found seats from an unfortunate
1995 Mazda Miata. They were fabric, and though I had hoped to find black
leather,
they were in perfect shape and had the headrest speakers!
|
|
|
|
|
|
|
|
I installed the passenger seat first which gave me more room to work and experiment. The first thing to be done is
to remove the seat belt receptacle and
the side slide rail. Throw them away, sell them on eBay, or donate them to
a Miata owner for spare parts. Next, remove the seat back. Save all the hardware for
later. It is much easier to work
with just the seat bottom. CAUTION must be exercised when fitting the seat bottom so as to leave clearance for
the recline
mechanism at the side of the seat back. More on that later.
|
|
|
|
|
|
|
|
|
|
|
|
|
|
|
|
|
|
|
|
|
|
|
|
|
Remove the linkage that connects the slide mechanisms between the seat rails.
This will give you 2 separate rails to work with.
The good news is that the front mount holes align with the floor mount on the
passenger side. The bad news is that the right mount needs to be modified to
align properly on the driver's side. More on that as we progress.
Remove the seat rails from the seat bottom (2 bolts each rail).
|
|
|
|
|
|
|
|
|
|
|
|
|
PREVIOUS PAGE
|
|
|
|

|
|
|

|
NEXT PAGE
|
|

|
|

|
BACK TO TECH
TIPS
|
|
|
|
HOME
|
|
|
|
|
|
|
|
� Copyright 2000, Geoffry L. Bush
|
|
|
|
|
|
|