Mica Shift Ghost Print Perfume Pen
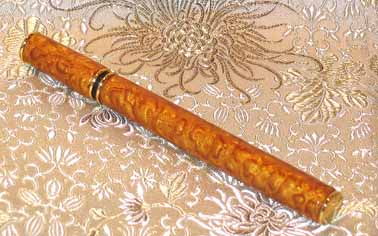 This perfume pen has been covered with gold polymer clay that has been decorated using a mica shift technique called "ghost printing." Some polymer clays are manufactured using mica to give the clay a metallic look. When the clay is conditioned (rolled multiple times thorugh a pasta machine), the mica particles align in a single direction. When the aligned particles are disturbed in some manner (e.g. stamped, sliced and placed in a different direction) the particles will move. The effect can be akin to impressing with and against the nap of some fabrics like velvet. However, with polymer clay, the shifted particles are removed, and the remaining impression is like a ghost of the impressed image. It's quite an impressive technique, and people who are not familiar with the technique will be mystefied at the result!
Materials
- Perfume Pen kit (generally used for wood turning projects)
- Gold mica polymer clay (Premo or Kato Polyclay are best brands)
- Rubber stamp w/ deep impression (I used a Judi*Kins cherry blossom background stamp)
- Acrylic rod roller
- Acrylic sheet/work surface
- Clay cutting blade
- Polymer-clay dedicated pasta maker
- Automotive tire protectant spray (Armor All)
- Oven
- White glue (I like Sobo glue)
- Wire, skewer, knitting needle or other instrument
- 2 wooden blocks to suspend wire/skewer
- 600 grit wet/dry sandpaper
- Flecto Verathane Diamond Finish Interior Gloss Polyurathane finish
- Small paintbrush
How To
- Condition your clay with your pasta machine by folding it and rolling it through the largest setting on the pasta machine until it is soft, pliable and does not crack when folded. It is important to fold the clay in the same direction each time you pass it through the machine, and to run the folded edge through the machine first for each pass. This reduces the amount of air that is trapped between the layers of clay and reduces bubbling. The conditioning process also aligns the mica particles in the polymer clay--a very important requirement for the "mica shift" technique.
- Estimate the thickness of clay required for the finished piece by loosely fitting the end cap into the barrel of the pen and measuring the space between the barrel and the edge of the end cap.
- Place your stamp, image side up, onto your work surface. Spray your conditioned clay with automotive protectant spray and rub to coat the surface of your clay. Place your clay on top of the stamp with the sprayed side of hte clay down on the stamp. Spray the other surface of the clay with the protectant, and roll the acrylic roller across the clay-covered stamp. Press firmly to ensure a deep impression.
- Lightly rub the top of the clay with a paper towel to remove the excess protectant. Gently peel the clay off of the stamp and place it on your work surface, stamped side up. Dab the clay with a paper towel to remove the protectant.
- Using your cutting blade, shave off the raised parts of the stamped clay so you have a relatively smooth surface. Be patient and don't cut under the surface of your clay.
- Lightly spray your clay with automotive protectant. Roll the clay to smooth any irregularities with the acrylic roller.
- Change your pasta machine to a thickness appropriate for your pen kit (from the measurement taken in step 2). Roll your clay through the pasta machine to provide a smooth, even surface. You will find that even though you've shaved and smoothed the impressed image, the mica will have "shifted" in the areas where the image was pressed into the clay, and that image will still be present even though you've rolled the clay. It is a "ghost" of the actual impressed image, thus the name of the technique.
- The pen kit will have two brass tubes that serve as the top and the body of the pen. Take one of the tubes and place it on the clay. Cut a piece of clay that will fit around the tube. Brush the tube lightly with white glue and adehere the clay to the tube. Lightly rub your finger across the seams to blend them together, but try not to distort the ghost images.
- String tubes with stiff wire (e.g. wire hanger), a chopstick, a skewer, etc. and suspend the skewered tubes across two blocks. I actually used pieces of wood from a Jenga game and used scrap clay to hold the wire in place while baking. This created a set of wire suspension blocks for my bead and tube baking. Place the assembly in a pre-heated oven and bake according to the clay manufacturer's instructions. Remove from the oven and let the clay cool.
- Dip your sandpaper into water and lightly sand the baked clay to smooth out any edges and rough spots. You do not have to sand until perfectly smooth. The polyurathane will give your piece a glossy finish.
- Coat pieces with two coats of Flecto Verathane, allowing the finish to dry between coats. Put the perfume pen together according to manufacturer's instructions. Enjoy!
Sign Guestbook
View Current Guestbook
View Archived Guestbook
© 1999-2004 by Margaret Donnelly