Polaroid Emulsion Lift Transfers
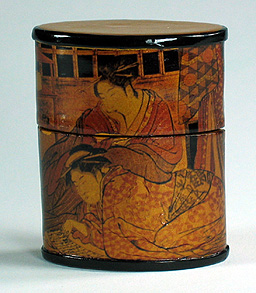 This technique is also known as an �Emulsion Lift.� You must have access to either a slide printer or a Polaroid camera that uses 669 film in order to complete this project. The technique utilizes Polaroid instant �peel-apart� film (in this case, Polaroid type 669 film). This film has both the negative and the print media in a single unit. You take the picture, pull the print unit out of the camera or slide printer, wait a minute, and then peel the negative off of the developed print. The negative is then discarded (or used for other creative processes). The print itself is comprised of the image emulsion and a paper backing. By �cooking� the print in hot water, you can separate the emulsion from the paper backing. The emulsion can then be placed on virtually any surface you desire. You can also cut, tear, twist and otherwise manipulate the image to provide a more artistic presentation. In this project, you use the emulsion to create a decorated Japanese Inro box made of gold and black polymer clay. Note that to be safe, you should not use the items that you�ve used for this process for food preparation after using them for the emulsion transfers.
This technique works on a variety of surfaces. If you use the direct method of transfer, your item must be waterproof or water resistant. If you use the acetate lift method, just make sure that water will not permanently mar your surface. You can get additional info on Polaroid's web site.
Materials
- Polymer clay piece or other item to decorate
- DayLab or Vivitar Slide Printer OR Polaroid Camera (using 669 film)
- Polaroid 669 or other peel-apart film (559 and 690 are examples)
- Color slides (if using slide printer)
- Contact brand adhesive paper
- Electric skillet
- Tongs
- Baking pan or deep tray
- Cooking thermometer
- Hair dryer (optional)
- Acetate/overhead transparency film (optional)
- Soft rubber brayer
- Water
- Flecto Verathane Gloss Varnish (indoor, water-based) or Future Floor Wax
- Soft bristle brush
How To
- Take your picture either using the camera or a color slide and the slide printer. Process the picture by removing it from the camera or slide printer (it�s an instant processing print) following the manufacturer�s directions.
- Dry the print either by leaving it for several hours OR drying it gently with a hair dryer (NOT a heat tool!!). The print must be dry in order to separate the emulsion from the paper.
- Adhere some Contact paper to the paper back of the print. This helps the paper print from disintegrating when you�re heating the emulsion in water.
- Cut the print to the edges of the image (or any shape or size you want). If you leave it whole, it will have a slightly sparkly, purplish edge to it and will have to be manipulated to fit the top of the tile. I generally cut it into a square or rectangular shape to match the contours of the item I'm decorating.
- Put at least an inch of water into your electric skillet and heat the water to around 160 degrees. Prepare a pan of clean, cool water and place it next to the skillet.
- Drop in your print into the skillet of hot water, image side up, and submerge with tongs. �Cook� the print in the hot water until you see �bubbles� or �wrinkles� forming in the print. This shows that the emulsion is separating from the paper backing.
- Remove the print with your tongs and place it in the cool water, image side up. Hold the print in both hands, and using your thumbs, GENTLY begin to roll the emulsion off the paper backing. If you find lumps of gelatin-like material under the emulsion, rub it off of the emulsion GENTLY. Keep rubbing off the emulsion until it is completely free of the paper backing. You will now have a thin, transparent film that wafts in the water. While the emulsion is fragile, it generally will not tear unless you puncture it or rub it too hard. However, the longer it stays in the water, the more elastic and fragile it becomes.
- You can apply the emulsion directly to the clay item or use a piece of acetate to form the image and then transfer it to the item. I prefer the direct method. Regardless, you shouldn�t lift the emulsion out of the water without first positioning it on a substrate--if you do, the image will immediately bunch up into a blob, and you�ll have to dip it in the water to flatten it out again.
- Direct method: Place the item to decorate into the water and move the emulsion over the piece, right side UP. You can then manipulate the emulsion into various shapes. As long as the emulsion remains wet, you can move it around. If you don�t like what you�ve done, dip it into the water again and rearrange it! When you�re satisfied with it, remove it from the water and gently dab with a towel. You can use your fingernails or any tools to cut away or distress the edges for an artistic touch.
- Acetate method: Instead of dipping your item into the water, use a piece of acetate. Arrange the image, right side DOWN, on the acetate. Remove it from the water and then immediately place the image onto the tile, right side UP. Rub gently and carefully peel the acetate away from the emulsion, leaving the emulsion on the item. Remove excess water by dabbing with a towel. Note that this is MUCH more difficult than the direct method on polymer clay. The polymer clay is very slick when wet, making it hard to apply the image to the clay in this manner.
- Very gently run the brayer from center to edge over the entire image to remove excess water and to flatten it. If your item is not flat, just GENTLY stretch the image and make sure there are no air bubbles trapped underneath. If you are stretching the emulsion over a seam, make sure the seam doesn't hit an area of the image that's critical. You'll be cutting this after the emulsion dries.
- Let dry completely. Carefully cut any seamed areas with a craft knife--use a cutting motion rather than dragging your knife across the image. If you drag, you have the chance of taking some of the emulsion with you.
- Seal with at least three light coats of varnish using a soft bristle brush. I used Flecto Verathane gloss on this piece. Some people have had problems with using Flecto with some brands of clay, but I found that thin coats are key. However, I haven't had this item long, so I don't know if it will flake later.
Sign Guestbook
View Current Guestbook
View Archived Guestbook
© 1999-2004 by Margaret Donnelly