"A Stamp In The Hand" Stamping Style
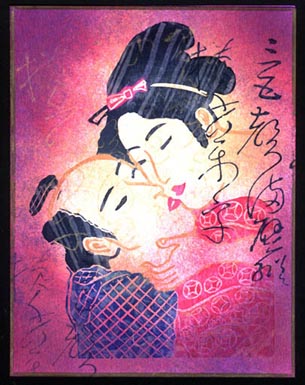
Many people admire the stamping style using the techniques and stamps by "A Stamp In The Hand." Their bold images, combined with image layering and ink stippling, result in spectacular designs. This page details the basic instructions on how to achieve the look, with one variable--using Brilliance ink to "pattern" the bold images. This technique takes just a little practice to master--the blending is the key! The instructions below are general instructions on how to color the images, blend the colors, stamp and stipple.
Materials
- Bold, Pattern and Background Stamps from A Stamp In The Hand
- Marvy Brush Art Markers in various colors (either basic brush or Duo brush markers)
- Marvy Ink Pads in various colors
- Stipple Brush
- White Glossy Cardstock
- Tsukineko Brilliance Ink Pad (I like Galaxy Gold)
How To
- Ink Your Stamp. Using a light colored brush art marker, color the "highlight" areas of your stamp. Using darker colors, color around the highlight areas either using brush art markers or a stipple brush and Marvy ink pads. Go back using the "highlight" color to blend the edge of the darker color into the highlight. Occasionally rub the light-colored marker onto a scrap piece of paper to remove any of the darker color picked up by the marker. This enables you to blend without muddying the colors. When blending is complete, clean your light colored marker by scribbling it on scrap paper until the true color emerges. Your pen tip might get stained, but your marker will still be usable for its true color.
- Optional: Add A Pattern. As an option, you can add a "ghost" pattern onto your bold image. To do so, pick a detailed pattern or background stamp and ink it up with Brilliance ink (I like Galaxy Gold). Stamp directly onto your inked bold stamp that you colored in the step above.
- Stamp and Stamp Off. After inking up your stamp as described above, huff on the stamp (like fogging up a mirror) to rejuvinate the ink and stamp onto glossy cardstock. Huff and stamp again and again on the cardstock in different areas--each stamping will be progressively lighter. You want to shift your image to go a different direction and stamp off the edges of the cardstock in a random fashion.
- Stamp With a Background Image. My favorite image to use as a background is the "handwriting" image from A Stamp In The Hand. Ink with a contrasting color and stamp randomly around the card. You really don't have to mask the images to do this.
- Stipple On Color. Now add some color to your artwork using stipple brushes and your ink pads. Starting with your lightest color, stipple and highlight your page. Add additional colors, ending with the darkest colors around the edges of your card.
You're done! While this seems pretty straightforward, the coloring/stippling is critical to bringing your card to life. Have fun!
Sign Guestbook
View Current Guestbook
View Archived Guestbook
© 1999-2004 by Margaret Donnelly