|
I saw number of 3rd party tools available to create reflections, but for those who just stepped in to the world of Photoshop or those who cannot afford those 3rd party plugins (like myself) this little guide will do the job.
Step 1
In this example I have a header of a site with size of 518x183. I write the text and give whatever effects I feel looking weird with background.

Step 2
Convert Text layer to Image (by Rasterize layer). Duplicate this layer (ctrl + J). Flip vertical (Edit � Transform � Flip Vertical) the duplicate layer. Drag this transformed layer down. Looks like we are done here�!

Step 3
Lock both layers with the text together.
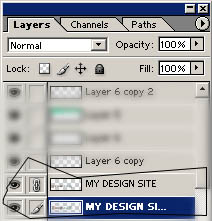
Step 4
Now again employee Free Transform (ctrl + T). From under right click find the �Skew� and tilt the Heading up.
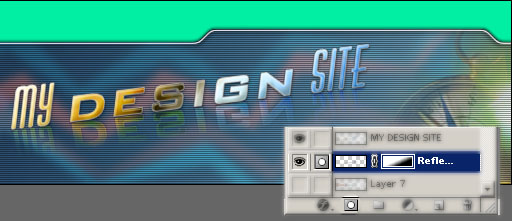
Active the Reflection Layer. Add Layer Mask. Black and White colors will automatically set to the foreground/background color box. Select Gradient Fill from the toolbar and fill as it suits best. To complete with Layer Mask, right click on Layer Mask and click �Apply Layer Mask�.
Step 6
Move the layer or change Opacity, Hue (ctrl + U) to finalize the reflection. You can transform the header more. It goes to images and frames as well.

|