|
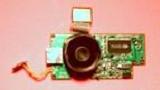
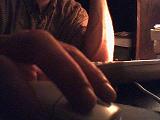
I like to buy a cheap thing, and then rework it in order to improve it in some way. That is why I took my cheap digital camera apart. I fashioned an adapter to attach it to my telescope. When I reassemble the unit, I will install some other improvements to it. Here are some shots with the stock 5mm f/2.8 lens in a sort of macro mode. |
 |
 |
 |
 |
 |
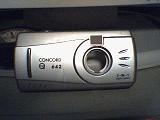
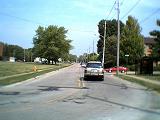
Compare those with pictures taken with the camera as it comes from the box:
 |
 |
 |
 |
 |
It is a nice little $35 (more like $20 now) camera. I liked it so much that I bought a $10 camera to take pictures of it. (The one of the modified camera above left.) These cameras are both very hackable, and all you really need to get started is a set of precision screwdrivers, and an X-Acto knife set, which are available at Radio Shack, or most hardware stores. The Concord 642 has a 5mm f/2.8 lens. It is the equivalent of a 46mm on a 35mm camera, according to Concord's documentation. Available shutter speeds are 1/15 - 1/1500 second.
The first trick is to find all the screws that hold the camera pieces together. Usually, there is at least one in the battery compartment. After you get all of them out, the camera should pull apart without too much fuss. You can carefully pry the seam apart with the backside of the X-Acto knife blade usually. Be careful because there is usually a ribbon cable, speaker wires, power wires, and sometimes the shutter switch that are in danger of being broken as you are separating the halves of the case. As long as you can solder, you should be okay even if you lose a wire or two. I clipped the battery wires on my Concord. I am going to put it in a project case as soon as I find an appropriate one. USB supplies the power when connected to the PC, so I am certain that I don't care anyway.
Next, the circuit board is usually attached to the rear half with some screws. Find and remove them. Once free of the rear shell, you can see the two screws that hold the lens and CCD cover to the board. Remove them. Once you have the lens assembly, look for a dab of hot glue holding the threaded lens in place. Carefully cut this with the knife, and unscrew the lens. Clean up the hot glue with Goo-Gone, or equivalent. You can use alcohol, but it dries plastic out sometimes.
Re-install the lens and shroud with the two screws, and you can now focus your fixed focus camera. Don't get too happy, however. There is a reason that the glue was there in the first place. You now need to see what the CCD sees in order to focus! (In other words, you need to capture live video while focusing.) No big deal, really. You can still set the focus, and put it back together and have a better camera. The trouble with most of these is that people do not respect the minimum distance, and they do not use enough light.
In addition to that, you have the option of leaving the lens off, and directing the image to the CCD through your own lens. The shroud that I put on my camera is lightproof, so I can remove the supplied lens, and stick the shroud into my telescope's eyepiece holder. Now I have a 350mm f/5.8 telephoto lens on a motorized mount for my cheap camera.
Coupled with a suitable copy stand, it also makes a nice animation camera. In fact, I am going to make one as soon as I get my workshop set up in my new place. I think I am going to have to take a little time to design something useful. Hmmm....