beecl1c.gif (250 bytes) Home beecl1c.gif (250 bytes) Galleries / beecl1c.gif (250 bytes) How to Join / beecl1c.gif (250 bytes) Links / beecl1c.gif (250 bytes)Printies / beecl1c.gif (250 bytes) Tips  /
beecl1c.gif (250 bytes) Patterns / beecl1c.gif (250 bytes) Our Members beecl1c.gif (250 bytes) Bear of the Month  beecl1c.gif (250 bytes) Contest

beecl1a.gif beecl1c.gif beecl1b.gif


1" Pattern

beecl1a.gif beecl1c.gif beecl1b.gif

beeln1b.gif (2931 bytes)
If you are having trouble locating your own bear making supplies, you may contact Pixie for bear kit availability.

HAVE FUN!

REMEMBER!   These copyrighted patterns are for your personal use ONLY.  They are NOT to be used for monetary gain of any kind.

oneinch.jpg (10296 bytes)


One Inch Bear Instructions
(designed with the advanced bear maker / experienced sewing individual in mind)
PATTERN

Supplies
Ultrasuede
Invisible thread
Small Quilting Needle
4mm Silk Ribbon
Poppyseed sized black beads for eyes
Silk thread for nose & mouth & claws
Polyester fiberfill

Instructions
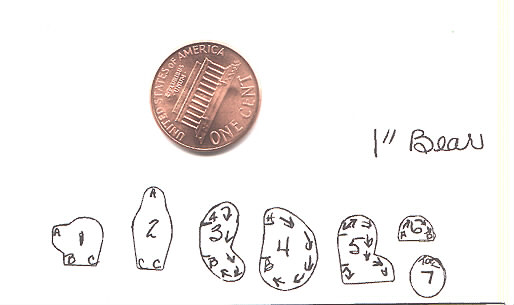
Draw pieces on ultrasuede - there's no nap to the ultrasuede so there is no need to worry about placement at this point.  Cut pieces out carefully with small sharp scissors.
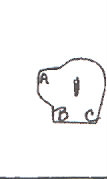
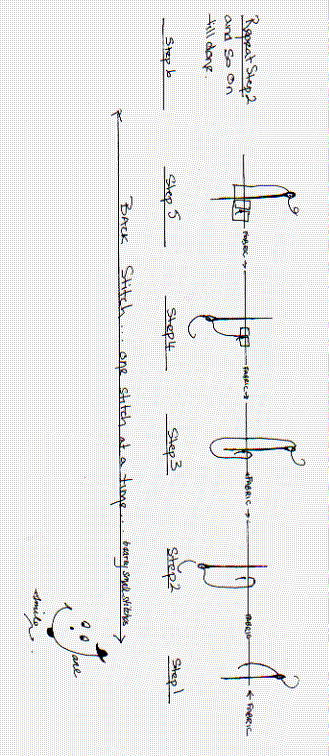
Sew head from A to B using tiny backstitch.  Next sew head gusset from A to C on other side and then A to C on the other side.  Turn head with tweezers.

TMP18.JPG (5628 bytes)

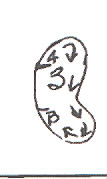
Sew arms from A to B leaving small opening to turn and stuff. 

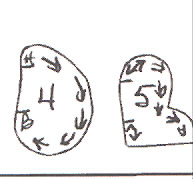
Sew body and legs like arms, leaving  space in back to turn.   For legs, also leave bottom of foot open.  Sew pad in bottom of foot and turn.

TMP20.JPG (10366 bytes)

TMP13.JPG (14199 bytes)

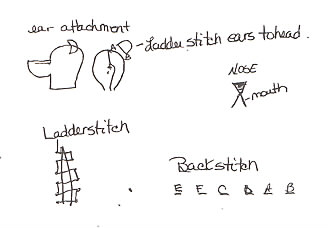
Next stuff all pieces except ears.  Then ladder stitch pieces closed.

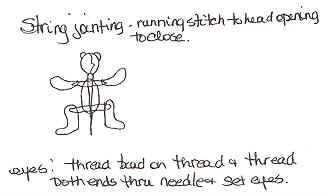
String joints together as shown.  Place eyes and embroider nose and mouth.  Sew on ears.

TMP12.JPG (15492 bytes)


Site Created by Annie
using
Graphics by

beelg1a.gif


Hosted by www.Geocities.ws

1