Making a Wooden Toy Cart
Open
Open a new image at 600 x 400, resolution at 72, 16 million colors and transparent. Open the wood pattern you will be using. Try using a light color wood as it will turn darker further down the tut. If you want you can use the pattern I used, just click here to download. REMINDER:SAVE your work often, cause you never know when the cat will jump on the keyboard and mess things up.Making the Side
Add a new layer and name it "side". Select the "Selection Tool" and choose the "Rounded Rectangle" selection. Draw a selection starting at "100 x100" and ending at "350 x 250" and flood-fill with your pattern at angle "0". Deselect. With the selection tool set to "Circle" make a circle starting at "160 x 150" and draw out to "187 x 177" and then hit delete. Make another circle starting at "290 x 150" and draw out to "317 x 177" and hit delete. Deselect.Go to "Effects/3D Effects/Inner Bevel" and choose the "Pillow" preset. If your wood turns too dark, then decrease the "Elevation" in the bevel to about "25 - 30".
Click on the "Deformation Tool" (see NOTE) and while holding down the "shift" key, click on the middle handle to the right and drag it up about 50 pixels. Turn on the rulers to help out. Apply the deformation. NOTE: If you put your cursor on the middle handle to the right and note your location in the status bar, just go the required amount of pixels and then you can see about where you need to drag your deformation.
Making a Tube
Go to "Edit/Copy" and then "Edit/Paste/Paste As New Image". Click on "File/Export/Picture Tube". In the dialog box change "Placement mode" to "Continuous" and "Step Size" to "1". Give it a name and hit "Ok". Close the new image and say "No" to saving it.Making the Wheel
Turn off the "side" layer and create a new layer named "wheel". Click on the selection tool and choose "circle". Make a circle starting at location "200 x 150" and draw out to "249 x 199" and flood-fill with your pattern at angle "315". Deselect.Use the same inner bevel. Make a smaller circle in the middle of your first circle starting at "200 x 150" and draw out to "215 x 165". This will be the axel cover and you can flood-fill with white then use Blade Pro on it or use the "Sculpture" effect under "Effects/Texture Effects/Sculpture". Deselect. Refer to "Making a Tube" to tube your wheel.
Making the Front
Turn off the "wheel" layer and create a new layer named "front". Click on the selection tool and set it to "Rounded-rectangle" and make a selection starting at "200 x 100" and draw out to "300 x 270". Flood-fill with your pattern at angle "90". Deselect. Use same "Inner Bevel" as before.Click on the "Deformation Tool" (see NOTE above) and while holding the "shift" key click the far-right middle handle, then drag down about "70" pixels. Use the "Rulers" to help out. Now just click the middle handle again and drag to the left about 40 pixels. Apply the deformation. Refer to "Making a Tube" to tube your front.
Making the 3-D Parts
Okay, we now have our 3 main parts to create our cart. Turn off all layers and add a new one naming it "side 1".Click on the "Tube Tool" and select your "cart_side" tube. Put your cursor at location "300 x 200" and click once with your tube tool. Now while holding down the "left-shift" key click your tube tool again at location "310 x 210". Now your cart is starting to get its 3d shape.
Go to "Edit/Copy" to copy this layer and then "Edit/Paste/Paste As New Layer". Name this layer "side 2".
Turn off these layers and add a new layer naming it "front 1".
Click on the "Tube Tool" and select your "cart_front" tube. Put the cursor at location "300 x 200" and click your tube once. Now while holding down the "left-shift" key click your tube tool again at location "290 x 210". Go to "Edit/Copy" then "Edit/Paste/Paste As New Layer" and give it a name of "back".
Turn off these layers and create a new layer named "wheel 1".
Select your tube tool and choose the "cart_wheel" tube. Put your cursor at location "300 x 200" and click once with your tube. Now while holding down the "left-shift" key click again at location "305 x 205". Go to "Edit/Copy" then "Edit/Paste/Paste As New Layer" and name it "wheel 2". Do this again for "wheel 3".
Assembling the Parts
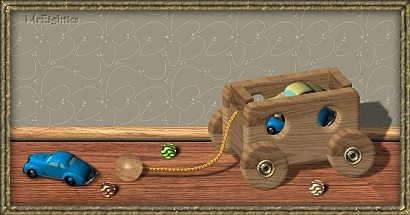
Now turn on these layers; "back", "front 1", "side 1" and "side 2". The "wheel" layers should also be on. We will now re-arrange these layers and then "assemble" the cart. Refer to the layer sample below to put the layers in order.


Final Notes
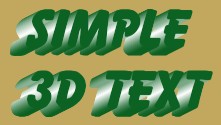
With the "Rope" tube (click here if you need it) you can add a string to the cart. Just set the "scale" at "30". Also you can create a "shpere" or "handle" at the end of the rope. Before "merging" the parts you can add another layer between the two "side" layers and add "stuff" to the cart. You can also try other patterns besides "wood" to make your cart.This is just a sample of what you can do with tubes to make thinks look "3-D". You can make text look 3D like the sample below. See if you can make another toy like a car or boat. Use your imagination and if it doesnt look right then "Undo" it and try again.
![]()
![]()
![]()