In this tut you will learn how to make realistic looking candles with a tube. You need to download my modified version of the "3d-orange" tube that came with PSP 6 and up. Just click on the link below:
3d-orange2 tube
Making Realistic Candles
Step 1
Open a new image at 300 x 300, resolution at 72, 16 million colors and transparent.Step 2
Click on your tube tool and select the "3d_orange" tube. Click at location "150 x 250" with the tube tool. Now while holding down the left-shift key, click your tube again at location "150 x 150" and let go. You should now have what looks like a "hotdog" as pictured below.

Step 3
Click on the "Deformation tool". Put your cursor on the left-center node of the deformation outline. Click and drag the outline left about half the hotdog size. Do the same for the right-center node of the outline. Apply the deformation. It should now look like the image below.

Step 4
Save this as a ".psp" file so you can go back later and change the color. Choose "Colors/Colorize" and adjust the saturation and hue to your likeness.Step 5
After getting the candle the color you want, go and click on the tube tool and choose the "Rope" tube that came with PSP. Scale the tube to about 30% and then click on top of the candle and draw a "wick" for the candle.Step 6
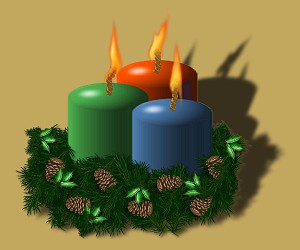
Again click on the tube tool and select the "Fire" tube that came with PSP. Scale it down to about 25-30 % . Make a new layer and then click on top of the wick. Adjust the fire with the mover tool to your likeness.Final Step
Just merge all layers visible and export your candle as a tube. Above is a sample of different colored candles with some added tubes.If you have any questions you can click on the email link below. Thanks for trying this tut and I hope to see some of the results from using it.
![]()
![]()
![]()