Setting Up Your Local Network and Network Basics
OverView
This chapter will cover setting up your own local network in your home or office. If you already have a functioning network, you may skip to the next chapter on configuring TCP/IP, though you may wish to skim through this section on Network Basics before you do.
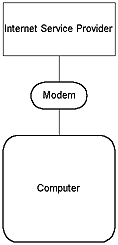
I will assume that you already have Internet access through an Internet Service Provider:

For the user new to networks, I will go through the following steps in order in this chapter:
- Go through the basic hardware requirements for a local network; Install the hardware and set up a local peer-to-peer network;
- Show you how to navigate around your network settings;
- Give you a brief tutorial on Network basics;
And I'll go through the following steps in succeeding chapters:
- Install and configure the TCP protocol and IP addressing on the network;
- Configure browsers to surf the net and get mail. At this point you are set up for browsing and email access to the Internet from any machine on your local network. If you need additional functionality, we will:
- Setup Domain Name Service on the local net;
- Configure Socks and other protocols and applications which require DNS;
- Show you some more complex network setups including those which include web and mail servers on the local net.

Setting Up A Local Network
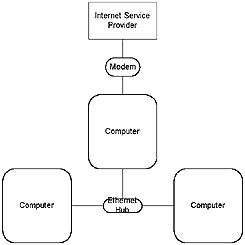
The simple network topology shown above will be the best configuration for most setups, including dial-up access and cable-modem access. For simplicity here the computer which uses the modem has to be a Windows95 or 98 or a Windows NT machine; the other machines on the local network can be any machines which can speak TCP/IP, including WfW3.11, Unix boxes, and Macs. To start setting up your local network, you need to first assemble the components you will need:
For Dial-Up Access:
a) One network card for each computer.
b) One hub.
c) A cable for each connection to the hub.For Cable Modem or Direct Access:
a) One network card for each computer.
b) One additional network card to connect to the modem (your direct Internet machine will get two cards, one for the modem and one for your local net).
c) One hub.
d) A cable for each connection to the hub.
e) An additional cable for the connection from the computer to the modem. If the modem is the type that connects directly to the hub, make this last cable a cross-over cable and you'll still be able to connect to the computer as shown. (Note: many cable modem providers will insist on installing the cable modem card themselves, and may insist upon using their own card. You may want to check out that possibility beforehand).
A Little Information About Network Hardware
Ethernet 10BaseT has become ubiquitous in the industry and is the network type we recommend for most new users, though you can certainly go with 100BaseT if you want to impress your friends. The "10" in 10BaseT refers to the speed of the network connections, in this case 10 Megabits per second. (Most networks actually top out at less, though most users would never know). The "T" in 10BaseT refers to the wire type, Twisted-Pair, and to the connector, commonly called an RJ-45 which looks like a bigger and wider telephone connector. The cables can be purchased in different lengths and often different colors; they come with a male RJ-45 plug at each end. Cards and hubs will have female RJ-45 jacks.There is a wide variety of network cards (also referred to as 'NICs', or Network Interface Cards) available. Most anything you can find will do at least an adequate job. For the novice networker, the primary things to look for are 1) the right kind of connection jack on the back, 2) Plug 'n Play operation if it is going in a Windows95 or 98 computer, 3) the range of interrupt addresses available, and 4) whether you've heard of it before. While everything else has grown, the interrupts on any machine are at a premium. In a very general way, the more you pay the more latitude you will have with interrupt addresses.
You need to figure out beforehand which interrupts you have available (inW95, control panel � systems � device manager � properties � IRQ), and if the card can utilize the ones you have left. ISA-bus cards are usually fast enough for a 10BaseT network; if you are running 100BaseT you'll probably want to go with a PCI-bus card. If you've only got one interrupt left and have to add two cards, you can use PCI-bus network cards; part of the PCI spec is that cards can share interrupts with each other.
Ethernet hubs are also commodity items, and available in most computer stores. It's probably a good idea to buy one with one or two more ports than you will use, just in case. When you get one of these, you might want to watch for 1) the right kind of connection jack, 2) a 'cascading' jack so that you can add an additional hub later if you need to without replacing the whole unit, and 3) little lights on the front which can be pretty useful when you are trying to diagnose network connection problems.
Installing And Configuring The Cards
Follow the directions in the box when you install a card. Win95 will usually find a new card when it starts up; if not the directions in the box will tell you how to do the installation manually. Many common brands have drivers within Win95, but they usually ship more current drivers with their cards. Go with the more current drivers.Run a cable between each card and the hub (except for the network card intended for a cable modem). You can probably get away with plugging or unplugging a cable from a card while the computer is running; to be safe do it while the computer is off. You can usually plug or unplug from the hub whenever you need to.
Once you have the cards installed, you'll need at least one protocol assigned to each of your cards. Choose NetBeui as a minimum; you can have others as well. There isn't any problem with having multiple protocols on your local network (there is a security issue when running multiple protocols on your connection to the rest of the world; this is covered in the following chapter). You will need the TCP/IP protocol later on in order to run multiple connections, but you don't need it in order to set up a basic peer-to-peer network. Set up your basic network first, get it working, and we'll add TCP/IP later on.
You will want to add 'Client for Microsoft Networks' on each machine, and probably 'File and Printer Sharing' if they aren't there already. You will most likely be prompted for these during the card installations. You can add them at any time. Anytime you make a change to your network settings, you will have to reboot the computer in order for the changes to take effect.
Inspecting And Changing Your Network Settings
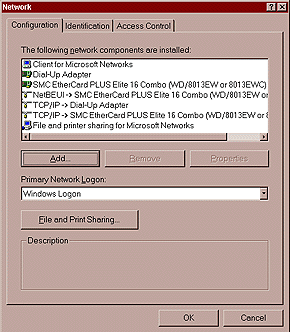
You can check what is set up on your machine by going to Control Panel � Networks. In the window presented under the 'configuration' tab, you should see a list of adapters and protocols. A typical setup at this point would show a couple of small computer-shaped icons, one captioned 'Client for Microsoft Networks' the other 'File and Printer Sharing'. It will also show small green network card shaped (sort of) icons, one for each network card and one for the Dial-Up Adapter. You'll note from this that the Dial-Up Adapter counts as a network connection, with its own set of addresses and protocols. Finally, you'll see a series of wire-and-node icons, each listing a different protocol and adapter combination, written in a form like 'NetBEUI -> NE2000 Compatible Card'.

To add 'Client for Microsoft Networks' if you haven't already, hi-lite any adapter, then click on 'add', then 'client', then 'Microsoft', then on 'client for Microsoft networks'. To add a protocol capability to a network card, hi-lite the network card, click on 'add', then 'protocol', then usually 'Microsoft', then on the protocol you want. [A bit of warning: while most of the time the protocol you designate will be assigned exactly as you ask, Microsoft will assign the NetBEUI protocol to all network adapters when you assign to any single network adapter. If you don't want it in the other locations, you'll have to hi-lite the one you don't want and click 'remove'].
While you're here, click on the 'Identification' tab. You'll see some entry boxes for 'Computer name', 'Workgroup', and 'Computer Description'. The computer name is a name that you make up for that computer � you'll need a unique name for each computer on your network. Some punctuation marks are legal in the name and some are not; it's easiest to just avoid them. In the long run, you'll find it better to use distinctive names for each rather than drier names that could be any of several machines ("Old486" might be a good name, but if there is more than one 486 then something like "PapaBear" might be a better choice).
You'll find that the computer name will get used fairly often in your network configurations. NetBEUI (NetBios Extended User Interface) uses this name to know where to find things for it's networking magic. You'll sometimes see this computer name referred to as 'the NetBios name' in various documentations. The workgroup name is a name that you can make up (you don't have to use the default 'workgroup'), but all of the computers on your network should have the same workgroup name. The computer description is a caption that will show up in some circumstances as additional information for other users on your local network.
You should have a stable, working local network at this point. You can see the other computers, move files between them, and print documents. To get ready for the Internet, you'll need to add the TCP/IP protocol to each of the computers on your local network. We have prepared some information about TCP/IP in the following section to give you an idea of what is going on. If your eyes start to glaze over, skip right on to the next chapter and start plugging in settings.
Network Basics
The three common protocols you will see on a local network are NetBEUI, IPX/SPX, and TCP/IP. NetBEUI is well suited for small networks, and is easy to set up. It is also non-routable, since it uses computer names to find it's way around, and there isn't a good way for it to find a distant computer. IPX/SPX is Novell networks version of IP addressing. It is used on Novell NetWare networks, for small to large systems.TCP/IP is the language of the Internet, and can be used on small networks as well. TCP (Transmission Control Protocol) is the packet protocol for the data sent over the wires; IP (Internet Protocol) is the addressing method used to get these packets to and from the right place. It is a routable protocol, designed to be good at finding distant computers. There are some carefully defined address groups that are designated as intentionally non-routable; we'll be using one of these to set up TCP/IP on your local network in the next chapter.
Network addresses may be assigned by the user or they can be assigned automatically by another computer. These are commonly called static and dynamic assignments. These addresses are not assigned to the computer itself, though people often speak that way as a convenient shorthand. The addresses are actually assigned to each network connection; the computer that you will use to connect directly to the Internet, for instance, will have two network connections, one to the rest of your computers and a different connection to your Internet Service Provider, or ISP. If you connect via a dial-up connection then you will probably have a dynamic IP assignment to your Dial-Up Adapter; if you connect with a cable modem then most often you will have to make a static IP assignment for your Internet connection.
In Internet talk, any machine that has a network address is a Host. That is another term you will see as you set up you network. For most simple TCP/IP systems, each host is a computer and each computer is a host.
The IP address is a 32-bit address, subdivided into four fields. It is a binary number, of course, but is usually written in decimal form such as 222.222.222.222. When you do the math, it turns out that each field can have a value from 0 through 255, though since the end values are used for special purposes the actual range available is from 1 to 254. Associated with the IP address is the subnet mask, which is a way to tell the computer which part of the address is unique to that machine, and which part is the general network address. There are lots of weird and esoteric addressing things you can do with subnet masks. For most simple networks, the subnet mask of 255.255.255.0 is the best and easiest choice, as the numbers in the final field will be unique to each computer and the preceding three fields will be the network address.
There are some specific IP address ranges which are reserved for special uses. We will make use of these later when we are setting up IP addressing on your local network. Network addresses which are reserved for testing or for local networks are 10.x.x.x, 90.x.x.x, 172.16-35.x.x and 192.168.x.x. These addresses all share a crucial distinction � routing computers on the Internet will not route these numbers. They are perfectly good numbers on a local network, but cannot be routed across the 'net; this adds a nice bit of additional security for the local network.
Parts of a TCP packet are fields to specify the source and destination ports. These are 16-bit fields, and can thus specify 65 thousand some-odd ports. You will see lots of references to ports when you interface your local net to the Internet. Ports 1 through 1024 are set aside for specific uses; each Internet protocol has a standard port that it uses. Port 25 to send mail and 119 for news groups are examples of this. In many cases, things can be easier to follow if you consider a port designation to be part of the address; some software will even allow you to specify an IP address and port combination in the same statement.