Disaster
Recovery for Microsoft® Exchange 2000 Server
Índice
1. Full computer backup set Backup of exchange 2000
databases
2. Perform a full computer restore
3. Restore Exchange 2000 databases
3. Backup of
Exchange 2000 databases
3. Restore the Windows backup set
5. Run exchange 2000 service packs in disaster Recovery
mode
6. Reinstall Exchange 2000 service pack in Disaster
Recovery mode
7. Restore Exchange 2000 databases
I. To replace a damaged production server with a stand-by
recovery server
1. Problems with the hard disk
3. Repair your operating system, your installation, or
your databases
4. Shut down the server that experienced the disaster
5. Connect the stand-by recovery server to the network,
and then start that computer
6. Restore the windows backup set
7.
Install any Windows 2000 service packs
8.
Install any other applications
9.
Exchange 2000 Setup in Disaster Recovery mode
10.
Install any Exchange 2000 hotfixes
11.
Install any Exchange 2000 service packs in Disaster Recovery mode
12. Recover an Exchange 2000 database
13. Re-Indexing the Data on Your Exchange Databases
I. Backing Up Exchange 2000 Clusters
1. Preparing a server to replace a failed node
2. Backing up a Cluster's Shared Disk Resources
3. Backing Up the Quorum Disk Resource
4. Backing Up the Exchange Databases on Your Shared Disk
Resources
5. Maintaining Informational Records About Your Clusters
6. Using the Dump Config Tool to Record a Disk Signature
of a Cluster Shared Disk
7. Using Microsoft Cluster Tool
II. Restoring Exchange 2000 Clusters
1. Replacing Damaged Exchange 2000 Cluster Nodes
2. Restoring or Rebuilding a Cluster Node from Backups
3. Restoring Shared Disk Resources
4. Restoring an Exchange Database to a Cluster
5. Restoring a Quorum Disk Resource
6. Rebuilding a Quorum Disk Resource
III. Recovering an Entire Exchange 2000 Cluster
1. Full computer backup set
Backup of exchange 2000 databases
1.1 Creating Full Computer Backup Sets Using
Backup
To create a full
computer backup set using Backup
- Click Start, point to Programs, point to Accessories, point to System Tools, and then click Backup.
- In Backup, click the Backup tab.
- On the Backup tab, under Click to select the check box for any drive,
folder, or file that you want to back up, click the box next to each item you want to
back up (Figure 1.1).
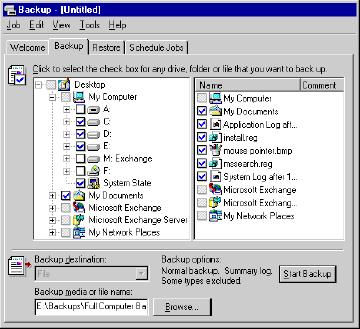
Figure 1.1 Full backup using Backup
Cautions do not select the drives
or folders listed as exceptions earlier in this section.
Important You must include the
Windows boot partition and system partition (by default, located in drive C),
the
- Next to the Backup media or file name box, click Browse to select the media for your
backup. For more information about how to select the media for your backup
- Click Start Backup.
- In Backup Job Information, in the Backup description text box, type a backup
description, set the appropriate options, and then click Start Backup. For more information about how
to set the options for the backup.
- After the backup completes, verify
that the backup was successful. For more information about how to verify
the success of a backup job
1.2 Backing up Exchange 2000 Data
Back up Exchange 2000
databases
- On any computer in the Windows
2000 domain forest running Exchange 2000, click Start, point to Programs, point to Accessories, point to System Tools, and then click Backup. For information about how to
run or schedule Windows 2000 Backup jobs
- In Backup, click the Backup tab.
- On the Backup tab, in the console tree,
expand Microsoft
Exchange Server, and then expand the server that contains the Exchange 2000
databases that you want to back up.
Note In the console tree, you use the Microsoft Exchange
option only to back up databases on previous versions of Exchange.
- To back up the Exchange 2000
databases, perform one of the following procedures:
If you want to back up all storage
groups on that server, select the check box next to Microsoft Information Store (Figure 1.2).
If you want to back up specific
storage groups in their entirety, expand Microsoft Information Store, and then select the check boxes
next to the storage groups you want to back up.
If you want to back up specific
mailbox stores and public stores in a storage group, expand Microsoft Information Store, click the storage group that
contains the databases you want to back up. Then, in the details pane, select
the check boxes next to the databases you want to back up.
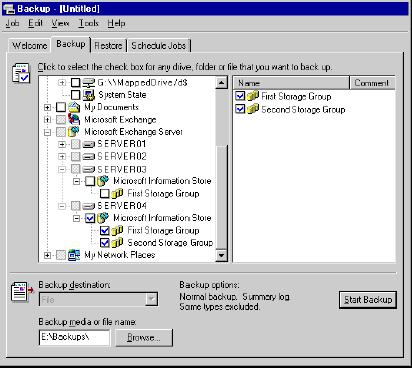
Figure 1.2 selecting the storage groups under Microsoft Information Store
- Next to the Backup media or file name box, click Browse to select the media for your
backup. For more information about how to select the media for your
backup,
- Click Start Backup.
- In Backup Job Information, in the Backup description text box, type a backup
description, set the appropriate options, and then click Start Backup. For more information about
how to set the options for the backup
- After the backup completes, verify
the backup was successful. For more information about how to verify the
success of a backup job
Exchange 2000 Connector-Specific
Data
Servers running
Exchange 2000 that include connectors to other messaging systems, such as
Novell GroupWise or Lotus cc:Mail, contain connector-specific configuration
data. Connector-specific configuration data is stored in the registry of the
computer where the connector is installed, as well as in Active Directory. If
your server recovery strategy includes restoring either a Windows 2000 backup
or a full computer backup, the connector-specific data is automatically
restored to your server when you run Exchange 2000 Server Setup in Disaster
Recovery mode. However, for specific mail connectors, there are additional
files that must be backed up and restored manually (such as the contents of the
CONNDATA directory and subdirectories).
2. Perform a full computer
restore
To restore a full
computer backup set
·
On the computer for which you want to restore your
full computer backup set, start the Windows 2000 operating system.
·
Click Start, point to Programs, point to Accessories, point to System Tools, and then click Backup.
·
Click the Restore tab, and then, in the console tree, click the backup
media you want to restore. If the correct media does not display under File, you may need to
rebuild the catalog.
·
Click the check boxes next to the drives that you want
to restore, and then click
Important If the full computer backup set you are
restoring includes the Exchange IFS drive (letter M by default) or the drives
or folders that contain the Exchange database files and transaction log files,
do not select those drives or folders. If you restore those drives or folders,
your log files may be out of sync. To restore your Exchange databases, you
should restore the Exchange database backup you performed using the Microsoft
Exchange Server option in Backup.
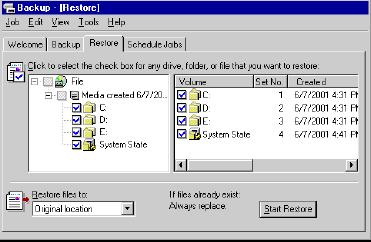
Figure 1.3
- In the Restore files to list, select the location to
where you want the files restored. By default, the location specified is Original location.
- Click Start Restore.
- If you are restoring the System
State data as part of the full computer backup set restore, in the Restoring System State will
always overwrite current System State unless restoring to an alternate
location warning
dialog box, click OK.
- In Confirm Restore, click Advanced to specify advanced restore options, or click OK to start the restore. For more
information about the advanced restore options in Backup,
- If Backup prompts you for the
location of the backup file to use in the restore, select the correct
backup file, and then click OK.
- After the restore is complete,
ensure that the restore was successful. For more information about how to
check the success of a restore job
- After you verify that the full
computer backup set is successfully restored, in the Restore Progress dialog box, click Close. You are then prompted to
restart your computer to complete the restore. Click Yes to restart.
3. Restore Exchange 2000
databases
3.1 Preparing to Recover Exchange 2000
Databases
Before you restore
Exchange 2000 databases, perform each of the following steps. Each step is
described in detail in this section.
1. Dismount the Exchange databases that
you are restoring.
2. Configure the Exchange databases so
the restore process can overwrite them.
3. Determine the database and log file
locations of the files you are restoring.
4. Copy or move the existing versions
of the database files you are restoring.
5.
Ensure that the
storage group and database display names match the names of the files you are
restoring.
3.1.1 Dismounting the Exchange
Databases That You are Restoring
Dismount the mailbox and public
folder stores that you are restoring
·
Click Start, point to Programs, point to Microsoft Exchange, and then click System Manager.
·
In Exchange
System Manager, in
the console tree, expand Administrative Groups, and then expand the administrative group that contains the server that
has the storage groups you want to restore.
·
Expand the server that contains the databases you want to restore,
right-click each database, and then click Dismount Store (Figure 1.4). You must dismount every database that
you want to restore.
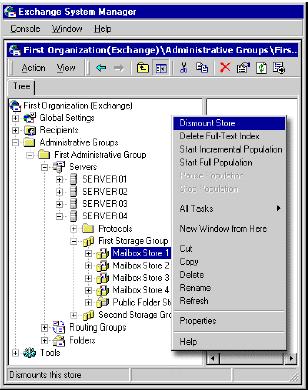
Figure 1.4 dismounting
a mailbox store
3.1.2 Configuring the Exchange
Databases so the Restore Process Overwrites Them
Configure the Exchange databases
so the restore process overwrites them
·
Click Start, point to Programs, point to Microsoft Exchange, and then click System Manager.
·
In Exchange
System Manager, in
the console tree, expand Administrative Groups, and then expand the administrative group that contains the server that
has the storage groups you want to restore.
·
Expand the server that contains the databases you want to restore,
right-click each database, and then click Properties (Figure 1.5).
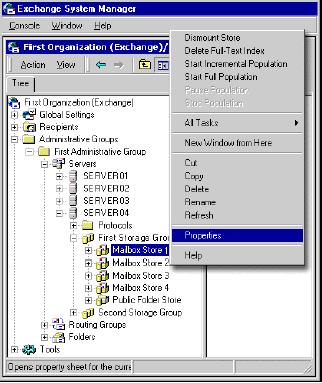
Figure 1.5 Mailbox
store properties
- In <Database Name> Properties, on the Database tab, select the This database can be
overwritten by a restore check box (Figure 1.6). You must select this
option for every database that will be overwritten by the restore process.
This option is cleared every time a database is mounted, thereby
preventing your databases from being overwritten by mistake.
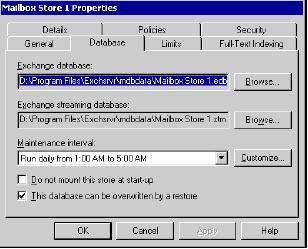
Figure 1.6 The Database tab in the <Database
Name> Properties dialog box
3.1.3 Determining the Database
and Log File Locations of the Files You are Restoring
Determine the database and log
file locations of the files you are restoring
- Click Start, point to Programs, point to Microsoft Exchange, and then click System Manager.
- In Exchange System Manager, in the console tree, expand Administrative Groups, and then expand the
administrative group that contains the server that has the databases you
are restoring.
- Expand the server that contains the databases you
want to restore, right-click the storage group you want, and then click Properties (Figure 1.7).
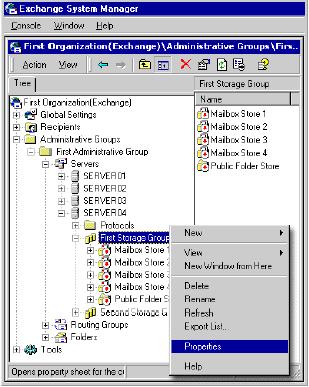
Figure 1.7 Storage
group properties
- In <Storage Group
Name> Properties, on the General tab, record the paths in the Transaction log location and System path location boxes, and then click OK (Figure 1.8). Repeat Steps 3 and 4 for each
storage group that contains databases you want to restore.
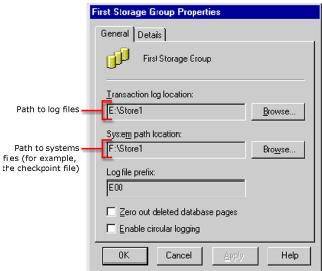
Figure 1.8 Log
file locations in the <Storage Group Name> Properties dialog box
- In Exchange System Manager, right-click the database that
you want to restore, and then click Properties.
- In <Database Name> Properties, on the Database tab, record the paths in the Exchange database and Exchange streaming database boxes, and then click OK (Figure 1.9). Repeat Steps 5
and 6 for each database that you want to restore.
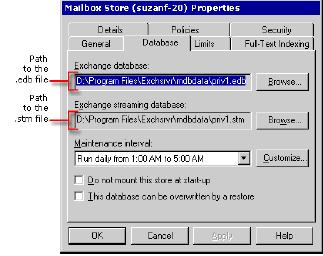
Figure 1.9 Log
file locations in the <Database Name> Properties dialog box
3.1.4 Copying or Moving the
Existing Versions of the Database Files That You are Restoring
Copy or move the
existing versions of the database files you are restoring
·
Ensure that the databases that you are copying or
moving are dismounted. For more information about how to dismount databases
·
Click Start, point to Programs, point to Accessories, and then click Windows Explorer.
·
In Windows Explorer, create a folder to store the
database files you want to copy or move, preferably a temporary folder on the
same hard disk. If you are going to copy the files, ensure that there is enough
disk space on the drive to which you are copying the files.
·
In Windows Explorer, go to the location of the
database files you want to copy or move, and then copy or move the existing
files to the folder that you created in the previous step (Figure 1.10).
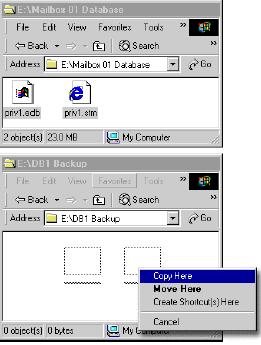
Figure 1.10 Copying
database files prior to the restore process
3.1.5 Ensuring That the Storage
Group and Database Display Names Match the Names of the Files You Are Restoring
Ensure storage group
and database display names match the names of the files you are restoring
·
In your backup/restore device, insert the backup media
that contains the backups you want to restore.
·
Click Start, point to Programs, point to Accessories, point to System Tools, and then click Backup.
·
Click the Restore tab, and then, in the console tree, click the backup
media that you want to restore. If the correct media does not display under File, you may need to
rebuild the catalog.
·
Expand the tree structure of the media so the name of
each Exchange database you are restoring is displayed.
·
Record the storage groups and display names you want
to restore, and then close Backup (Figure 1.11).
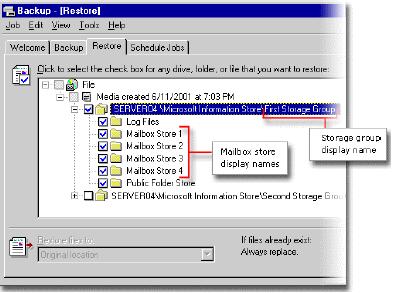
Figure 1.11 Storage
group and Exchange Information Store service display names
- Click Start, point to Programs, point to Microsoft Exchange, and then click System Manager.
- In Exchange System Manager, in the console tree, expand Administrative Groups, and then expand the
administrative group that contains the server for which you are going to
restore databases.
- Expand Servers, expand the server that
contains the storage group you want, and then expand the storage group
that contains each of the databases you want to restore.
- In the console tree and detail pane, compare the
display names of the storage groups and databases in Exchange System
Manager with the storage group and database names you recorded from your
backup media (Figure 1.12). These display names must match or the restore
process will fail.
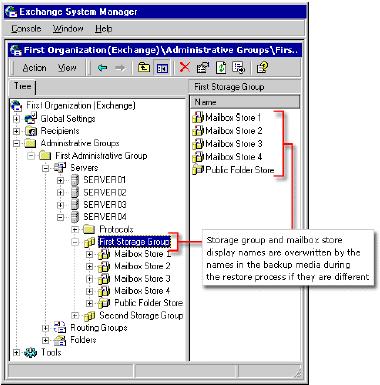
Figure 1.12 Viewing
storage groups and databases in System Manager
3.2 Recovering an Exchange 2000 Database
Recover an Exchange 2000
database
1. To ensure that the Microsoft
Exchange Information Store service is running, click Start, click Run, and then type
services.msc. In Services, if Started does not display as the Status of the Microsoft Exchange Information
Store services
object, right-click Microsoft Exchange Information Store, and then click Start.
2. Determine which Exchange databases
you want to restore.
3. Ensure that the databases you want to
restore are dismounted. For more information about how to dismount databases
4. Configure the databases so that the
restore process overwrites them. For more information about how to configure
these databases
5. Backup the database
files for the databases you want to restore by copying or moving these files to
different folders. For more information about how to copy or move these files
.
6. Ensure that the display
names of the storage groups and databases you are restoring match the display
names in Exchange System Manager. For more information about how to ensure
these display names match
7. Click Start, point to Programs, point to Accessories, point to System Tools, and then click Backup.
8. Click the Restore tab, and then, in the console
tree, click the backup media that you want to restore. If the correct media
does not display under File, you may need to rebuild the catalog.
9. Click the boxes next to the storage groups
and databases you want to restore. For example, if you want to restore an
entire storage group, click the check box next to the <Server
Name>\Microsoft Information Store\<Storage Group Name> object that represents
the storage group you want to restore (Figure 1.13). If you want to restore
just one database in a storage group, select only the check box next to the
database you want to restore.
Note Selecting or clearing the Log Files check box does not
affect the restore process. Exchange automatically detects whether log files
are to be restored based on the type of backup you are restoring.
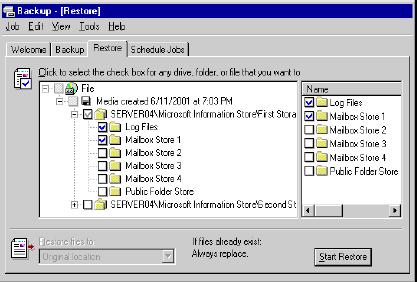
Figure 1.13 Selecting
the storage groups and databases you want to restore
10. In the Restore
files to list, select
the location to where you want the files restored. By default, the location
specified is Original
location.
11. Click Start Restore.
12. In the Restoring Database Store dialog box, in the Restore to box, specify to which server running Exchange 2000 you
want the databases restored (Figure 1.14).
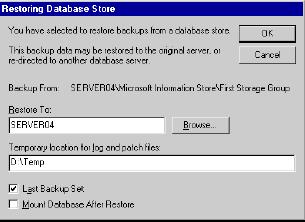
Figure 1.14 The Restoring Database Store dialog box
13. In the Temporary
location for log and patch files box, specify a directory to store log and patch files during the restore
process. Ensure that there is enough space in the directory to store the files
(the disk space requirement is about 10 MB more than the size of the
transaction log files and patch files that are being restored).
Important If the directory that you specify in
the Temporary location for log and patch files box is the same as the original
location of the database or log files, the restore process will fail.
14. If you are restoring a backup that is the
only one in its set (for example, if you are restoring a
Important If you forget to select the Last Backup
Set check box, you can use ESEUTIL /CC after the restore is complete. To run
ESEUTIL /CC, from a command prompt in the folder where the Restore.env
file is located, type eseutil /cc. Do not use any
other parameters. ESEUTIL performs the same function as the Last Backup Set
check box. Use all other /CC switches with extreme caution.
15.
If this is the last
backup set you are restoring, select the Mount Database After Restore check box to mount the
Exchange databases at the end of the restore process, and then click OK.
Note If there are other tasks that you want to perform that
require databases to be dismounted (such as applying an Exchange service pack
during the "rebuild the server" recovery method), do not select the
Mount Database After Restore check box.
16.
If Backup prompts you
for the location of the backup file to use in the restore, select the correct
backup name, and then click OK.
17.
After the restore
process is complete, the Restore Progress dialog box displays. Ensure that the
restore process was successful. For more information about how to check the
success of the restore process
18.
After you have verified
that the restore process was successful, in Restore Progress, click Close. You are prompted to
restart your computer to complete the restore. Click Yes to restart.
19.
Perform any further
steps required by your disaster recovery process, such as installing Exchange
service packs.
20.
If you did not select
the Mount
Database After Restore check box in the Restoring Database Store dialog box (see Step
15), mount the databases manually. however, in Step 3 of that procedure, click Mount Store instead of Dismount Store (Figure 1.15).

Figure 1.15
I. Backup requirements
1. Windows backup set
Create a Windows
backup set
1. Click Start, point to Programs, point to Accessories, point to System Tools, and then click Backup.
2. In Backup, click the Backup tab. In the console
tree, click the boxes next to the drive letters for your boot partition and
system partition, and then select the check box next to
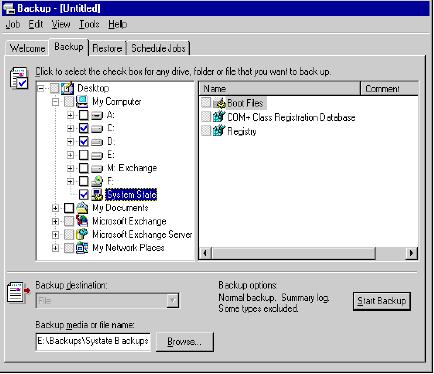
Figure 2.1 Selecting a
3. In the Backup destination list, perform one of the
following steps:
Select File if you want to back up files and folders to a file.
If you do not have a tape device installed on your
computer, this option is selected by default and cannot be changed. Select a
tape device if you want to back up files and folders to a tape.
4. Next to the Backup media or file
name box,
click Browse
to
select a location and file name for your backup. For more information about how
to select the media for your backup
5. Click Start Backup.
6. In Backup Job Information, in the Backup description text box, type a backup
description, set the appropriate options, and then click Start Backup.
7. After the backup
completes, verify the backup was successful. For more information about how to
verify the success of a backup job,
Dynamic data
includes, but is not limited to, the following types of data:
Active Directory
Windows 2000
Internet Information Services (IIS) metabase
Exchange databases and transaction
log files
Site Replication Service (SRS)
databases
Key Management Service
Connector-specific information
2.1 Active
Directory
En nuestro caso Exchange no está en un servidor
controlador de dominio
2.2 Windows 2000
En este caso fue
hecho en el apartado
interior “Windows backup set”
2.3 IIS Metabase
You do not need
to back up IIS separately because a
2.4 Exchange
2000 Databases and Transaction Log Files
Exchange 2000
uses the Microsoft Information Store options in Backup to back up Exchange 2000
databases and their associated transaction log files.
2.5 Site Replication Service
En nuestro caso no tenemos implementado
ese servicio
2.6 Key Management Service
No
aplica en este caso
Exchange
2000 Connector-Specific Data
If your server
recovery strategy includes restoring either a Windows 2000 backup or a full computer
backup, the connector-specific data is automatically restored to your server
when you run Exchange 2000 Server Setup in Disaster Recovery mode. However, for
specific mail connectors, there are additional files that must be backed up and
restored manually (such as the contents of the CONNDATA directory and
subdirectories).
3. Backup of Exchange 2000 databases
Back up Exchange
2000 databases
3.1. On any computer in the Windows 2000 domain
forest running Exchange 2000, click Start, point to Programs, point to Accessories, point to System Tools, and then click Backup. For information about
how to run or schedule Windows 2000 Backup jobs
3.2. In Backup, click the Backup tab.
3.3. On the Backup tab, in the console tree, expand Microsoft Exchange
Server,
and then expand the server that contains the Exchange 2000 databases that you
want to back up.
Note In the console tree, you use the Microsoft Exchange
option only to back up databases on previous versions of Exchange.
3.4. To back up the Exchange 2000 databases, perform one of the following
procedures:
If you want to back up all storage
groups on that server, select the check box next to Microsoft Information Store (Figure 2.2).
If you want to back up specific
storage groups in their entirety, expand Microsoft Information Store, and then select the check boxes
next to the storage groups you want to back up.
If you want to back up specific
mailbox stores and public stores in a storage group, expand Microsoft Information Store, click the storage group that
contains the databases you want to back up. Then, in the details pane, select
the check boxes next to the databases you want to back up.
Figure 2.2 Selecting the storage groups under Microsoft Information Store
3.5. Next to the Backup media or file name box, click Browse to select the media for
your backup. For more information about how to select the media for your
backup,
3.6. Click Start Backup.
3.7. In Backup Job Information, in the Backup description text box, type a backup
description, set the appropriate options, and then click Start Backup. For more information
about how to set the options for the backup
3.8.
After the backup
completes, verify the backup was successful. For more information about how to
verify the success of a backup job
Exchange 2000 Connector-Specific Data
Servers running
Exchange 2000 that include connectors to other messaging systems, such as
Novell GroupWise or Lotus cc:Mail, contain connector-specific configuration
data. Connector-specific configuration data is stored in the registry of the
computer where the connector is installed, as well as in Active Directory. If
your server recovery strategy includes restoring either a Windows 2000 backup
or a full computer backup, the connector-specific data is automatically
restored to your server when you run Exchange 2000 Server Setup in Disaster
Recovery mode. However, for specific mail connectors, there are additional
files that must be backed up and restored manually (such as the contents of the
CONNDATA directory and subdirectories).
1. Replace damaged hardware
To rebuild an
Exchange 2000 member server
2.1. (Optional) If you can still access the hard disks of
the damaged server, and if you have sufficient time, copy the Exchange 2000
database files from that server to a folder on a network share or to a
removable storage device. Even if the files are damaged, you should copy these
files as a safely precaution. In the event that the restore process is
unsuccessful, you can revert back to the original versions, which might be
repairable. To archive the database files:
a. Determine where on the
server the database and log files resided prior to the disaster.
b. Copy these files to a
folder on a network share or to a removable storage device. For more
information about how to copy database files
Note If you have sufficient time, you should also archive
the log files of the damaged server. If you do not have a copy of the most
recent log files, you cannot bring your recovered Exchange databases up-to-date
to the moment the disaster occurred.
2.2. (Optional) Before you perform the remaining
procedures involved in the "rebuild the server" method of server recovery,
consider repairing your operating system, your Exchange 2000 installation, or
your Exchange databases. To repair your operating system, your installation, or
your databases, perform the appropriate procedure:
a. Search the Microsoft
Knowledge Base at http://search.support.microsoft.com for a solution to the problem.
b. Repair Windows 2000. For
more information about how to repair Windows 2000, see "Repairing Windows 2000" earlier in this
chapter.
c. Repair your Exchange
2000 installation. For more information about how to repair your Exchange 2000
installation, see "Repairing Exchange 2000" earlier in this chapter.
d. Repair your Exchange
databases. For more information about how to repair Exchange databases, see
"Repairing
Exchange 2000 Databases" earlier in this chapter.
Note Unless your server experiences a major hardware
failure that results in complete data loss, you should attempt to repair the
damaged files instead of restoring them from a Windows backup set. Repairing
these files may help your server recover from minor data corruption or other
problems that render the server unusable.
2.3. Replace
any damaged hardware. If possible, ensure that all replacement hardware in
the server you are rebuilding is identical to the hardware that existed in the
server that experienced the disaster.
2.4. Install
Windows 2000 on the server that you are rebuilding. To install Windows 2000, perform
the appropriate procedure:
a. If you have a Windows
2000 disk image of the damaged server, restore that image, and then start
Windows 2000. If the disk image included every Windows 2000 service pack and
software update that was on the damaged server, go to Step 6.
b. Install Windows 2000 on
the server you are rebuilding. During Windows 2000 Setup, install Windows with
the optional NNTP and SMTP components, install the computer into a temporary
workgroup instead of a domain, and allow Setup to create a random computer name
(NetBIOS) instead of manually specifying a name.
2.5. Restore
the Windows backup set that was performed on the damaged server to the
server you are rebuilding. Restoring the Windows backup set restores the
Windows 2000 system files (including the registry database and IIS metabase files). This process also provides the server you
are rebuilding with its original NetBIOS name, and returns it to the correct
domain. If you do not perform this step, you cannot properly run Setup in
Disaster Recovery mode. For more information about how to restore the Windows
2000
2.6. Install any Windows 2000 service packs and software
updates that were running on the damaged server to the server you are
rebuilding. For information about how you can archive these updates to a
network share or to a removable storage media
2.7. Install any other applications (other than Exchange
2000) that run on the server.
Note Install the applications to the same locations and
with the same configurations as the applications that were installed on the
damaged server.
2.8. On the server you are rebuilding, restore
any additional dynamic data backups that were performed on
the damaged server.
2.9. On the server you are rebuilding, run Exchange 2000 Setup in Disaster Recovery mode. This process installs
Exchange applications and any necessary Exchange files to the server you are
rebuilding. This process also uses the configuration information that is stored
on the Exchange Server object in Active Directory to reclaim the configuration
of the original server. The configuration information that is reclaimed includes
the Exchange storage group names, mailbox store names, public folder store
names, virtual server configuration settings, and so on. When you run Exchange
in Disaster Recovery mode, ensure that all of the components that existed on
the damaged server are selected. For information about Exchange 2000 Setup
modes
a. Insert the Microsoft
Exchange 2000 CD.
b. Click Start, click Run, and then type <D>:\SETUP\I386\Setup.exe
/DisasterRecovery, where <D> is the CD-ROM drive.
c. On the Welcome page, click Next.
d. On the Components Selection page, under Action, next to each component
that was installed on the damaged server, select Disaster Recovery. If any components that
were originally installed do not have Disaster Recovery selected, then you must
manually select them. You should install Exchange 2000 to the same drive and
directory that it was installed to on the damaged server. At a minimum, you
should ensure that all the drive letters on which databases and log files were
kept are available.
Important
When recovering an
Exchange server, always use the DisasterRecovery
switch. If you run Setup without using the DisasterRecovery
switch, Setup runs in Reinstall mode and automatically mounts the mailbox
stores and public stores after the Setup process completes. Mounting mailbox
stores and public folder stores before restoring your Exchange databases can
cause problems, including the potential loss of e-mail messages.
e. On the Components Summary page, click Next to reinstall Exchange in
Disaster Recovery mode.
Note During Disaster Recovery mode, a dialog box appears
reminding you that you cannot restore Exchange 2000 unless Active Directory
contains a server object for the server being restored. To verify that the
server object still exists for the server you are restoring, use Exchange
System Manager on another Exchange 2000 server. If the server object does not
exist, the recovery process will not succeed.
2.10. Install any Exchange 2000 hotfixes that were running on the damaged server to the server
you are rebuilding.
2.11. Install
any Exchange 2000 service packs in Disaster Recovery mode that were running
previously on the damaged server to the server you are rebuilding. Installing
Exchange 2000 service packs in Disaster Recovery mode prevents the Exchange
databases from being mounted at the end of the service pack installation
process; therefore, you can proceed directly to restoring the Exchange
databases from backup. To install an Exchange 2000 service pack in Disaster
Recovery mode, perform Step 9 of this procedure, but replace Setup.exe with Update.exe, and replace D: with
the location of the service pack installation.
2.12. If the drives that contain the Exchange
database files and log files were also lost in the disaster, restore the Exchange 2000 databases that existed on the
damaged server to the server you are rebuilding. For information about how to
restore Exchange 2000 databases
Important If you were able to archive the log files
from the damaged server as recommended in Step 1 of this procedure, copy these
files to the correct location on the recovery server. If you do not copy the
most recent log files to the proper locations on the server you are rebuilding,
changes that were made to Exchange databases up to the time the disaster
occurred are lost.
2.13. If the server that experienced the
disaster included any Exchange full-text indexes, you may need to repair
full-text indexing by re-creating full-text indexes on the server you are
rebuilding. For information about how to repair full-text indexing
2.14. If the Exchange databases on the restored
server fail to mount, attempt to repair the server again. To repair the server
again, use the repair techniques in Step 2 of this procedure.
2.15. If the damaged server was running SRS, you
must restore the SRS database to the server you are rebuilding. For more
information about how to restore the SRS database
2.16. If the damaged server was running Key
Management Service, you must restore the Key Management Service database to the
server that you are rebuilding. In addition, you must also restore the CA to
the server you are rebuilding if the CA was running on the damaged server. For
more information about how to restore the Key Management Service database and
the CA
3. Restore the Windows
backup set
To restore a Windows
backup set
3.1. Click Start, point to Programs, point to Accessories, point to System Tools, and then click Backup.
3.2. Click the Restore tab, and then, in the console tree, click
the backup media you want to restore. If the correct media does not display
under File, you may need to
rebuild the catalog.
.
3.3. Click the check boxes next to the drive
letters for your boot partition and system partition, and then click the check
box next to
Important To properly restore all Windows
components, a Windows backup set must contain the
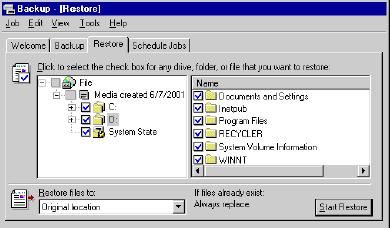
Figure 2.3 Drive letter and
3.4. In the Restore files to list, select the
location to where you want the files restored. By default, the location
specified is Original location.
3.5. Click Start Restore.
3.6. In the
3.7. In Confirm Restore, click Advanced to specify advanced
restore options, or click OK to start the restore. For more information about the
advanced restore options in Backup
3.8. If Backup prompts you for the location of
the backup file to use in the restore, select the correct backup file name, and
then click OK. For more information
about how to select the correct backup file name, see "Selecting the Backup File
Name"
in Chapter 4.
3.9. After the restore is complete, ensure that
the restore was successful. For more information about how to check the success
of a restore job, see "Checking the Success of a Completed Restore Job" in Chapter 4.
3.10. After you verify that your Windows backup
set is successfully restored, in the Restore Progress dialog box, click Close. You are then prompted
to restart your computer to complete the restore. Click Yes to restart.
Important
If you perform this
procedure as part of rebuilding a server, after restarting your computer, you
may experience errors indicating that one or more services could not start.
These errors occur because restoring the Windows backup set also restores the
original registry of the server being rebuilt. That registry may include
entries that attempt to start services that are not yet reinstalled (such as
SMTP). Ignore the errors. These errors should be resolved when you finish
rebuilding the computer.
On the server you are
rebuilding, restore any additional dynamic data backups that were performed on
the damaged server.
Dynamic data
includes, but is not limited to, the following types of data:
Active Directory (do no apply, is a
member server)
Windows 2000
Internet Information Services (IIS) metabase (is in
Exchange databases and transaction
log files
Site Replication Service (SRS)
databases (do not apply)
Key Management Service (do not apply)
Connector-specific information ( is
in Windows 2000 backup or a full computer backup)
5. Run exchange 2000 service
packs in disaster Recovery mode
To run Exchange 2000 in Disaster
Recovery mode:
5.1. Insert the Microsoft Exchange 2000 CD.
5.2. Click Start, click
Run, and then type <D>:\SETUP\I386\Setup.exe /DisasterRecovery, where <D> is the CD-ROM drive.
5.3. On the Welcome page,
click Next.
5.4. On the Components Selection page, under Action, next
to each component that was installed on the damaged server, select Disaster Recovery. If any components that were
originally installed do not have Disaster Recovery selected, then you must manually select them. You should install
Exchange 2000 to the same drive and directory that it was installed to on the
damaged server. At a minimum, you should ensure that all the drive letters on
which databases and log files were kept are available.
Important When recovering an Exchange server,
always use the DisasterRecovery switch. If you run
Setup without using the DisasterRecovery switch,
Setup runs in Reinstall mode and automatically mounts the mailbox stores and
public stores after the Setup process completes. Mounting mailbox stores and
public folder stores before restoring your Exchange databases can cause
problems, including the potential loss of e-mail messages.
5.5. On the Components Summary page, click Next to
reinstall Exchange in Disaster Recovery mode.
Note During Disaster Recovery mode, a
dialog box appears reminding you that you cannot restore Exchange 2000 unless
Active Directory contains a server object for the server being restored. To
verify that the server object still exists for the server you are restoring,
use Exchange System Manager on another Exchange 2000 server. If the server
object does not exist, the recovery process will not succeed.
6. Reinstall Exchange 2000
service pack in Disaster Recovery mode
Install any Exchange 2000 service
packs in Disaster Recovery mode that were running previously on the damaged
server to the server you are rebuilding. Installing Exchange 2000 service packs
in Disaster Recovery mode prevents the Exchange databases from being mounted at
the end of the service pack installation process; therefore, you can proceed
directly to restoring the Exchange databases from backup.
To install an Exchange 2000 service
pack in Disaster Recovery mode, perform
6.1. Insert the Microsoft Exchange 2000 CD.
6.2. Click Start, click
Run, and then type <Z>:\SETUP\I386\ Update.exe /DisasterRecovery, where <Z> is the location of
the service pack installation.
6.3. On the Welcome page,
click Next.
7. Restore Exchange 2000 databases
Recover an Exchange 2000
database
7.1. To ensure that the Microsoft Exchange Information
Store service is running, click Start, click
Run, and then type services.msc. In Services, if Started
does not
display as the Status
of the Microsoft Exchange Information
Store services
object, right-click Microsoft Exchange Information Store, and then click Start.
7.2. Determine which Exchange databases
you want to restore.
7.3. Ensure that the databases you want to
restore are dismounted. For more information about how to dismount databases
7.4.
Configure the databases
so that the restore process overwrites them. For more information about how to
configure these databases
7.5.
Backup the database
files for the databases you want to restore by copying or moving these files to
different folders. For more information about how to copy or move these files.
7.6.
Ensure that the display
names of the storage groups and databases you are restoring match the display
names in Exchange System Manager. For more information about how to ensure
these display names match
7.7.
Click Start, point to Programs, point to Accessories, point to System Tools, and then click Backup.
7.8.
Click the Restore tab, and then, in the
console tree, click the backup media that you want to restore. If the correct
media does not display under File, you may need to rebuild the catalog. For more
information about how to rebuild the catalog
7.9.
Click the boxes next to
the storage groups and databases you want to restore. For example, if you want
to restore an entire storage group, click the check box next to the <Server
Name>\Microsoft Information Store\<Storage Group Name> object that represents
the storage group you want to restore (Figure 2.4). If you want to restore just
one database in a storage group, select only the check box next to the database
you want to restore.
Note Selecting or clearing the Log Files check box does not
affect the restore process. Exchange automatically detects whether log files
are to be restored based on the type of backup you are restoring.
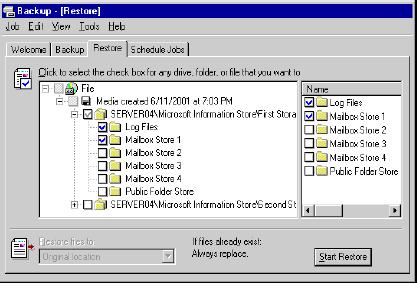
Figure 2.4 Selecting
the storage groups and databases you want to restore
7.10. In the Restore
files to list, select
the location to where you want the files restored. By default, the location
specified is Original
location.
7.11. Click Start
Restore.
7.12. In the Restoring
Database Store dialog
box, in the Restore
to box, specify to
which server running Exchange 2000 you want the databases restored (Figure 2.5).
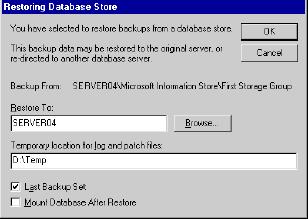
Figure 2.5 The Restoring Database Store dialog box
7.13. In the Temporary
location for log and patch files box, specify a directory to store log and patch files during the restore
process. Ensure that there is enough space in the directory to store the files
(the disk space requirement is about 10 MB more than the size of the
transaction log files and patch files that are being restored).
Important If the directory that you specify in
the Temporary location for log and patch files box is the same as the original
location of the database or log files, the restore process will fail.
7.14. If you are restoring a backup that is the
only one in its set (for example, if you are restoring a
Important If you forget to select the Last Backup
Set check box, you can use ESEUTIL /CC after the restore is complete. To run
ESEUTIL /CC, from a command prompt in the folder where the Restore.env
file is located, type eseutil /cc. Do not use any
other parameters. ESEUTIL performs the same function as the Last Backup Set
check box. Use all other /CC switches with extreme caution.
7.15. If this is the last backup set you are
restoring, select the Mount Database After Restore check box to mount the
Exchange databases at the end of the restore process, and then click OK.
Note If there are other tasks that you want to perform that
require databases to be dismounted (such as applying an Exchange service pack
during the "rebuild the server" recovery method), do not select the
Mount Database After Restore check box.
7.16.
If Backup prompts you
for the location of the backup file to use in the restore, select the correct
backup name, and then click OK. For more information about how to select the correct
backup file name, see "Selecting the Backup File Name" in Chapter 4.
7.17.
After the restore
process is complete, the Restore Progress dialog box displays. Ensure that the
restore process was successful. For more information about how to check the success
of the restore process, see "Checking the Success of a Completed Restore Job" in Chapter 4.
7.18.
After you have verified
that the restore process was successful, in Restore Progress, click Close. You are prompted to
restart your computer to complete the restore. Click Yes to restart.
7.19.
Perform any further
steps required by your disaster recovery process, such as installing Exchange
service packs.
7.20.
If you did not select
the Mount
Database After Restore check box in the Restoring Database Store dialog box (see Step
15), mount the databases manually. For more information about how to mount
databases, see the procedures in "Dismounting the Exchange Databases that
You are Restoring" earlier in this chapter; however, in Step 3 of
that procedure, click Mount Store instead of Dismount Store (Figure 2.6).
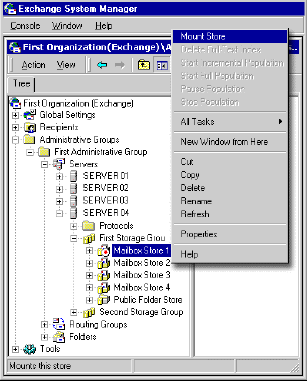
Figure 2.6
I. To replace a damaged
production server with a stand-by recovery server
1. Problems with the hard disk
If the physical hard
disks of the damaged production server appear to be undamaged, you can remove
the disks from the damaged server and install them into the stand-by recovery
server. To remove the hard disks from the damaged server and install them into
the stand-by recovery server:
a. Shut down the server
that experienced the disaster.
b. Remove the hard disks
from the damaged production server.
c. Replace the hard disks in
the stand-by recovery server with the hard drives from the damaged server.
d. Start the stand-by recovery
server and run Chkdsk on all disk partitions to
ensure there are no problems with the file system.
1.1 Running the Windows 2000 Chkdsk Utility
If
your Windows 2000 installation experiences a problem, you can use the Chkdsk disk repair utility included in Windows 2000 to
ensure that the file system integrity and the hard disk integrity are sound.
The Chkdsk utility creates and displays a status
report for a disk based on the file system used. Chkdsk
also lists and corrects errors on the disk. You can run Chkdsk
from within Windows 2000. If you are unable to start Windows 2000 as a result
of the problem, you can run Chkdsk from Windows 2000 Recovery
Console in
Windows 2000 Setup.
1.2 Windows
2000 Recovery Console
Para iniciar la
consola de recuperación, emplee cualquiera de los métodos siguientes:
Inicie el equipo mediante los discos de instalación de
Windows 2000 o con el CD-ROM de Windows 2000. En la pantalla Programa de instalación, presione
F10 o R para reparar y, después, presione C para iniciar la consola de recuperación.
Agregue la consola de recuperación a la carpeta Inicio de
Windows 2000 mediante la aplicación Winnt32.exe con
el modificador "/cmdcons". Esto requiere
aproximadamente 7 MB de espacio de disco en la partición de sistema para alojar
el directorio y los archivos de cmdcons. Tenga en
cuenta que si utiliza el reflejo de software, debe consultar también el
siguiente artículo en Microsoft Knowledge Base
Note If you determine that any of the hard
disks from the damaged server are not functioning properly in the stand-by
recovery server, reinstall the stand-by recovery server's original hard disks,
and then proceed to Step 2.
2. Archive the database files
(Optional) If you can still access the hard disks of the damaged
server, and if you have sufficient time, copy the Exchange 2000 database files
from that server to a folder on a network share or removable storage device.
Even if the files are damaged, you should copy these files as a safely
precaution. In the event that the restore process is unsuccessful, you can
revert back to the original versions, which might be repairable. To archive the
database files:
Determine where the
database and log files resided on the server prior to the disaster.
2.1 Determining the Database and Log File
Locations of the Files You are Restoring
Determine the database and log
file locations of the files you are restoring
·
Click Start, point to Programs, point to Microsoft Exchange, and then click System Manager.
·
In Exchange
System Manager, in
the console tree, expand Administrative Groups, and then expand the administrative group that contains the server that
has the databases you are restoring.
·
Expand the server that contains the databases you want to restore,
right-click the storage group you want, and then click Properties (Figure 3.1).
Figure 3.1 Storage
group properties
·
In <Storage
Group Name> Properties, on the General
tab, record the
paths in the Transaction
log location and System path location boxes, and then click OK (Figure 3.2). Repeat Steps 3 and 4 for each storage
group that contains databases you want to restore.
Figure 3.2 Log
file locations in the <Storage Group Name> Properties dialog box
·
In Exchange
System Manager,
right-click the database that you want to restore, and then click Properties.
·
In <Database
Name> Properties, on the Database tab, record the paths in the Exchange database and Exchange streaming database boxes, and then click OK (Figure 3.3). Repeat Steps 5 and 6 for each database that you want to
restore.
Figure 3.3 Log
file locations in the <Database Name> Properties dialog box
Copy
these files to a folder on a network share or to a removable storage device.
2.2 Copying or Moving the Existing Versions
of the Database Files That You are Restoring
copy or move the
existing versions of the database files you are restoring
1. Ensure that the
databases that you are copying or moving are dismounted. For more information
about how to dismount databases, see "Dismounting the Exchange Databases That
You are Restoring" earlier in this chapter.
2. Click Start, point to Programs, point to Accessories, and then click Windows Explorer.
3. In Windows Explorer,
create a folder to store the database files you want to copy or move,
preferably a temporary folder on the same hard disk. If you are going to copy
the files, ensure that there is enough disk space on the drive to which you are
copying the files.
4. In Windows Explorer, go
to the location of the database files you want to copy or move, and then copy
or move the existing files to the folder that you created in the previous step
(Figure 3.4).
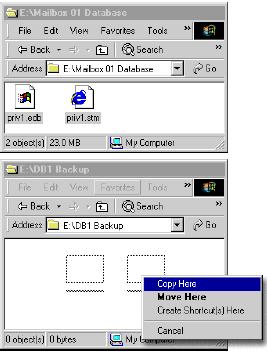
Figure 3.4 Copying database files prior to the restore process
Note If you have sufficient time, you should also archive
the log files of the damaged server. If you do not have a copy of the most
recent log files, you cannot bring your recovered Exchange databases up-to-date
to the moment the disaster occurred.
3. Repair your operating system, your installation, or your databases
(Optional) Before you perform the
remaining steps, consider repairing your operating system, your Exchange 2000
installation, or your Exchange databases on your damaged server. To repair your
operating system, your installation, or your databases, performs the
appropriate procedure:
Search
the Microsoft Knowledge Base at http://search.support.microsoft.com for
a solution to the problem, repair Windows 2000, and repair your Exchange 2000
installation.
3.1 Repairing Exchange 2000
Reinstall Exchange 2000
·
Insert the Exchange 2000 Installation CD, and then click Exchange Server Setup.
·
In Microsoft
Exchange 2000 Installation Wizard, on the Welcome
page, click Next.
·
On the Component
Selection page, under Action, select the Reinstall option next to each component name that is installed
on your server running Exchange, and then click Next (Figure 3.5). Components that are not installed are not available.

Figure 3.5 The Component Selection page of Microsoft Exchange 2000 Installation Wizard
- On the Component Summary page, click Next to begin the reinstall process (Figure 3.6).
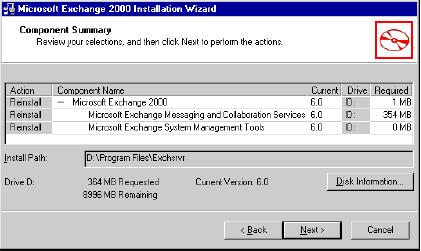
Figure 3.6 The Component Summary page
- As the reinstall process is in
progress, view the Component Progress page (Figure 3.7). Exchange 2000 stops all
Exchange services and performs all the necessary steps to reinstall
Exchange 2000 over the damaged installation, including recopying all
files.
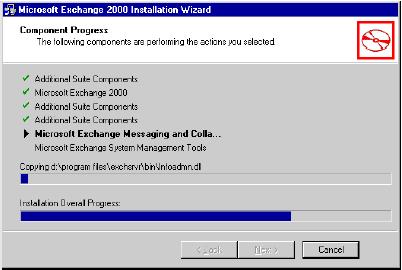
Figure 3.7 The Component Progress page
3.2 Repair your Exchange databases
You can repair Exchange 2000 database files (.edb files) using these Exchange 2000 utilities: Eseutil.exe
and Isinteg.exe (Eseutil replaces the Edbutil utility that was used with previous versions of
Exchange).
Consider
the following information when repairing Exchange 2000 databases:
- Repairing Exchange databases
with Eseutil and Isinteg
can result in losing data in the Exchange databases you repair. For this
reason, you should copy the database files you are repairing prior to
attempting the repair process. Because you cannot undo changes that were
made to a database during the repair process, only use Eseutil
and Isinteg as a last resort. It is recommended
that you recover a damaged database by restoring a backup set rather than
repairing a database.
- If you use Eseutil to
repair an Exchange 2000 database, you must have enough free disk space for
Eseutil to make a copy of the database being
repaired. Before you begin the repair process, ensure that the amount of
disk space on the hard drive containing your database files is greater
than the size of the database being repaired.
- Using the Eseutil and Isinteg utilities to repair a database file takes a
substantial amount of time. Typically, it takes much longer to repair a
database than it does to restore a database from backup.
- If both utilities run successfully (for example,
if there are not any errors at the end of the last Isinteg
run), the database is generally considered to be repaired and ready to
replace the damaged database.
- If Eseutil and Isinteg are unable to fix every error in the database,
you should not discard a repaired database. You should only discard a
repaired database if you experience specific problems with it; for
example, if a database does not mount after completing the repair process,
you should discard that database.
- You can restore data from a damaged database by
using an alternate server. For example, you can restore a damaged database
to an alternate server, extract data from it using the Exmerge
utility, and then insert the data into a new database file.
Note Unless your server experiences a major hardware failure
that results in complete data loss, you should attempt to repair the damaged
files instead of restoring your entire computer using the "stand-by
recovery server" method. If you repair these files, it may help your
server recover from minor data corruption or other problems that render the
server unusable.
4. Shut down the
server that experienced the disaster.
5. Connect the
stand-by recovery server to the network, and then start that computer.
Important To ensure that your stand-by recovery server
was properly prepared, verify that the following procedures were performed:
5.1 Hardware that is identical to
the hardware on the damaged was installed.
5.2 Windows 2000 Server was
installed with the following specifications:
Installed optional NNTP and SMTP components of
Windows.
Installed the computer into a temporary workgroup
instead of a domain during Setup.
Specified for Setup to create a random computer
(NetBIOS) name instead of manually specifying the name of the damaged server.
5.3 Any Windows 2000 service packs, patches, or updates
were installed.
6. Restore the windows backup set
Restore the Windows
backup set that was created on the damaged server before the disaster occurred
to the stand-by recovery server. Restoring the Windows backup set restores the
Windows 2000 system files (including registry database and IIS metabase files) of the damaged server to the stand-by
recovery server. This process also provides the stand-by recovery server with
the NetBIOS name of the damaged server, and joins the stand-by server to the
correct domain. If you do not perform this step, you cannot properly run Setup
in Disaster Recovery mode.
7. Install any Windows 2000
service packs
On the stand-by recovery
server, install any Windows 2000 service packs and software updates that were
running on the damaged server, but were not preinstalled on the stand-by
recovery server.
8. Install any other
applications
Install any other
applications that were on the damaged server (with the exception of Exchange
2000) to the stand-by recovery server.
Note Install the applications to the same locations with
the same configurations as those of the damaged server.
9. Exchange 2000 Setup in Disaster Recovery mode
On the stand-by recovery
server, install Exchange 2000 Setup in Disaster Recovery mode. This process
installs Exchange applications and any necessary Exchange files to the stand-by
recovery server. This process also uses the configuration information stored on
the Exchange Server object in Active Directory to reclaim the configuration of
the original server. The configuration information that is reclaimed includes
the Exchange storage group names, mailbox store names, public folder store
names, virtual server configuration settings, and so on. When you run Exchange
in Disaster Recovery mode, ensure that all of the components that existed on
the damaged server are selected.
To run Exchange 2000 in
Disaster Recovery mode:
a. Insert the Microsoft
Exchange 2000 CD.
b. Click Start, click Run, and then type <D>:\SETUP\I386\Setup.exe
/DisasterRecovery, where <D> is the CD-ROM drive.
c. On the Welcome page, click Next.
d. On the Components Selection page, under Action, next to each component
that was installed on the damaged server, select Disaster Recovery. If any components that
were originally installed do not have Disaster Recovery selected, then you must
manually select them. You should install Exchange 2000 to the same drive and
directory that it was installed to on the damaged server. At a minimum, you
should ensure that all the drive letters on which databases and log files were
kept are available.
Important When recovering an Exchange server, always
use the DisasterRecovery switch. If you run Setup
without using the DisasterRecovery switch, Setup runs
in Reinstall mode and automatically mounts the mailbox stores and public stores
after the Setup process Mounting mailbox stores and public folder stores before
restoring your Exchange databases can cause problems, including the potential
loss of e-mail messages.
e. On the Components Summary page, click Next to reinstall Exchange
2000 in Disaster Recovery mode.
Note During Disaster Recovery mode, a dialog box appears
reminding you that you cannot restore Exchange 2000 unless Active Directory contains
a server object for the server being restored. To verify that the server object
still exists for the server you are restoring, use Exchange System Manager on
another Exchange 2000 server. If the server object does not exist, the recovery
process will not succeed.
10. Install any Exchange 2000 hotfixes
Install any Exchange
2000 hotfixes that were running on the damaged server
to the stand-by recovery server.
11. Install any Exchange 2000 service packs in Disaster Recovery mode
Install any Exchange 2000 service packs in Disaster
Recovery mode that were running on the damaged server to the stand-by recovery
server. Installing Exchange 2000 service packs in Disaster Recovery mode
prevents the Exchange databases from being mounted at the end of the service
pack installation process; therefore, you can proceed directly to restoring the
Exchange databases from backup. To install an Exchange 2000 service pack in
Disaster Recovery mode, perform Step 10 of this procedure, but replace Setup.exe with Update.exe, and replace D with the
location of the service pack installation.
12. Recover an Exchange 2000 database
If the drives containing
the Exchange database files were also lost in the disaster, restore the
Exchange 2000 databases that existed on the damaged server to the stand-by
recovery server.
Recover an Exchange 2000 database
·
To ensure that the Microsoft Exchange Information Store service is
running, click Start, click Run, and then type services.msc. In Services, if Started does not display as the Status of the Microsoft Exchange Information Store services object, right-click Microsoft Exchange Information
Store, and then
click Start.
·
Determine which Exchange databases you want to restore.
·
Ensure that the databases you want to restore are dismounted.
For more information about how to dismount databases
·
Configure the databases so that the restore process
overwrites them. For more information about how to configure these databases
·
Backup the database files for the databases you want
to restore by copying or moving these files to different folders. For more
information about how to copy or move these files
.
·
Ensure that the display names of the storage groups
and databases you are restoring match the display names in Exchange System
Manager. For more information about how to ensure these display names match
·
Click Start, point to Programs, point to Accessories, point to System Tools, and then click Backup.
·
Click the Restore tab, and then, in the console tree, click the backup
media that you want to restore. If the correct media does not display under File, you may need to
rebuild the catalog.
·
Click the boxes next to the storage groups and
databases you want to restore. For example, if you want to restore an entire
storage group, click the check box next to the <Server Name>\Microsoft Information
Store\<Storage Group
Name> object that represents the storage group you want to restore (Figure 3.8).
If you want to restore just one database in a storage group, select only the
check box next to the database you want to restore.
Note Selecting or clearing the Log Files check box does not
affect the restore process. Exchange automatically detects whether log files
are to be restored based on the type of backup you are restoring.
Figure 3.8 Selecting
the storage groups and databases you want to restore
- In the Restore files to list, select the location to where you want the
files restored. By default, the location specified is Original location.
- Click Start Restore.
- In the Restoring Database Store dialog box, in the Restore to box, specify to which server
running Exchange 2000 you want the databases restored (Figure 3.9).
Figure 3.9 The Restoring Database Store dialog box
- In the Temporary location for log and patch files box, specify a directory to
store log and patch files during the restore process. Ensure that there is
enough space in the directory to store the files (the disk space
requirement is about 10 MB more than the size of the transaction log files
and patch files that are being restored).
Important If the directory that you specify in
the Temporary location for log and patch files box is the same as the original
location of the database or log files, the restore process will fail.
- If you are restoring a backup
that is the only one in its set (for example, if you are restoring a
Important If you forget to select the Last Backup
Set check box, you can use ESEUTIL /CC after the restore is complete. To run
ESEUTIL /CC, from a command prompt in the folder where the Restore.env
file is located, type eseutil /cc. Do not use any
other parameters. ESEUTIL performs the same function as the Last Backup Set
check box. Use all other /CC switches with extreme caution.
- If this is the last backup set you are restoring,
select the Mount
Database After Restore check box to mount the Exchange databases at the end of the restore
process, and then click OK.
Note If there are other tasks that you want to perform that
require databases to be dismounted (such as applying an Exchange service pack
during the "rebuild the server" recovery method), do not select the
Mount Database After Restore check box.
- If Backup prompts you for the location of the
backup file to use in the restore, select the correct backup name, and
then click OK.
- After the restore process is complete, the Restore Progress dialog box displays. Ensure
that the restore process was successful. For more information about how to
check the success of the restore process
- After you have verified that the restore process
was successful, in Restore Progress, click Close. You are prompted to restart your computer to complete the
restore. Click Yes to
restart.
- Perform any further steps required by your
disaster recovery process, such as installing Exchange service packs.
- If you did not select the Mount Database
After Restore check box in the Restoring Database Store dialog box (see
Step 15), mount the databases manually. however, in Step 3 of that procedure, click Mount Store instead of Dismount Store (Figure 3.10).
Figure 3.10
Important If you were able to archive the log files
from the damaged server as recommended in Step 2 of this procedure, copy these
files to the correct location on the recovery server. If you do not copy the
most recent log files to the proper locations on the stand-by server, changes
that were made to Exchange databases up to the time the disaster occurred are
lost.
13. Re-Indexing the Data on Your Exchange Databases
If the server that experienced the disaster included
any Exchange full-text indexes, you may need to repair full-text indexing by
recreating the full-text indexes on the stand-by recovery server.
Re-Indexing the Data on Your Exchange Databases
Re-indexing the data on your
Exchange databases requires that you remove full-text indexing information and
re-create full-text indexes. To delete the damaged indexes and re-create them,
use the following procedure.
13.1 Remove full-text indexing information
- Click Start, point to Programs, point to Microsoft Exchange, and then click System Manager.
- In Exchange System Manager, in the console tree, expand Administrative Groups, and then expand the
administrative group that contains the server that has storage groups of
the full-text indexes you want to remove.
- Under the server that has storage groups that
contain the mailbox stores or public stores for which you want to remove
full-text indexes, right-click each storage group, and then click Delete Full-Text Index for each storage group (Figure 3.11).
- Close Exchange System Manager.
- Click Start, click Run, type Regedit, and then click OK.
- In Registry Editor, locate the following key:
HKEY_LOCAL_MACHINE
\SOFTWARE\Microsoft\Search\1.0\Databases
·
Under Databases, click ExchangeServer<ServerName>, where <ServerName> is the server from which you want to
delete full-text indexes.
·
In the details pane, view the following string values: FileName and LogPath. FileName points to the property store used by full-text indexing. LogPath points to the folder that contains the log files and
checkpoint files for the property store.
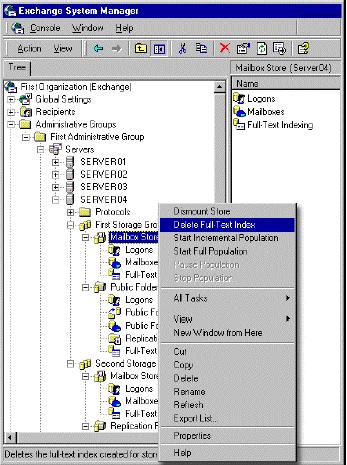
Figure 3.11 Deleting
full-text indexes
- Next to Log Path, under Data, locate the folder where the
property store and log files are kept. Record the path to this folder, as
you need it for the next step. By default, the folder is:
<C>:\Program
Files\Exchsrvr\ExchangeServer_<ServerName>
<C> is the
drive where Microsoft Exchange 2000 was installed and <ServerName>
is the name of your server running Exchange.
- In
Windows Explorer, or from a command prompt, go to the folder that you
recorded in the previous step.
Caution Because you are going to delete files from this folder, consider copying
the contents of this folder to a safe location to save the folder information
in the event an error occurs while deleting the files.
- Under the ExchangeServer_<ServerName>
folder,
delete the contents of the Projects and GatherLogs subfolders. Do not delete the Projects and GatherLogs folders. View the contents of the Projects and GatherLogs folders to ensure the required files are deleted.
- Close Windows Explorer or the command prompt.
13.2 To re-create
full-text indexes
·
Click Start, point to Programs, point to Microsoft Exchange, and then click System Manager.
·
In Exchange
System Manager, in
the console tree, expand Administrative Groups, and then expand the administrative group that contains the server that
has storage groups of the full-text indexes you want to create.
·
Under the server that has storage groups that contain the mailbox stores
or public stores for which you want to re-create full-text indexes, right-click
each mailbox store or public folder store, and then click Create Full-Text Index for each store.
·
For each mailbox store or public folder store in which you performed
Step 3 of this procedure, right-click each store again, and then click Start Full Population.
·
For each index that you want to make available for full-text index
searching, right-click each mailbox store or public folder store, click Properties, click Full-Text Indexing, and then select the This index is currently available for searching by
clients check box
(Figure 3.12).
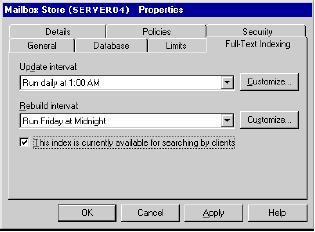
Figure 3.12 Enabling
the indexes for searching
·
For each index that you want to customize the update and rebuild
intervals, click Customize, and then make the appropriate
changes.
Note Exchange 2000 Service Pack 2 (SP2)
and future releases do not have the ability to specify the rebuild interval.
I. Backing Up Exchange 2000
Clusters
To secure your
Exchange 2000 clusters, it is important to back up specific information on your
servers in the cluster. This section provides detailed descriptions and
procedural information about the following Exchange 2000 clustering topics: • • • •
Preparing a server to replace a failed node
Backing up a cluster's shared disk resources
Backing up the Exchange databases on your shared disk
resources
Maintaining informational records about your clusters
1. Preparing a server to
replace a failed node
1. Install Windows 2000 Server, including the latest service pack that the
server was running, software updates, and software you run on your Exchange
2000 cluster nodes (such as anti-virus software).
2. Join it to the same domain as the
other nodes in the cluster.
3. Connect the computer to the shared
SCSI bus being used by the cluster.
4. If the cluster already has the
maximum number of nodes, you may need to temporarily evict one of the nodes
from the cluster and remove it from the shared SCSI bus so you can attach the
stand-by cluster node while you configure it. To evict a node from the cluster:
a. Open Cluster Administrator (click Start, point to Programs, point to Administrative Tools, and then click Cluster Administrator). If Cluster Administrator cannot find the cluster the node belongs to
by its name, type the name of an active node in the cluster. You can also
connect to the cluster by opening Cluster Administrator on a cluster node and
entering a PERIOD (.) in Cluster or server name.
b. Stop the Cluster service on the node you wish to
evict. To stop the Cluster service, click Start, point to Programs, point
to Administrative
Tools, and then
click Services. In Services, double-click Cluster Service, and then click Stop. When
the Cluster service has stopped successfully, click OK.
c. On the File menu,
in Cluster
Administrator, click
Evict Node.
d. Uninstall the Cluster service from the Add-Remove
Windows Components part of Add/Remove Programs in the Windows 2000 Control
Panel.
e. If you use SCSI, make sure that the SCSI bus is
terminated before you remove the evicted node from the SCSI bus.
5. Start the stand-by cluster node computer,
and join the cluster by adding the Cluster service from the Add-Remove Windows
Components part of Add/Remove Programs in the Windows 2000 Control Panel. Use
the wizard to add the computer as a node to the cluster.
6. Install Exchange 2000
Server on the stand-by cluster node. Exchange automatically notifies you it is
installing the "cluster-aware" version of Exchange 2000.
(Applications that support the Cluster API are defined as
"cluster-aware.") After Exchange 2000 Setup completes, install any
Exchange 2000 Service Packs running on the other nodes in the cluster.
7. Evict the stand-by node
from the cluster by following procedures in Step 4 of this procedure.
8. Power off the stand-by
cluster node, it is now prepared to be joined back to the cluster in the event
of a disaster occurring to one of the online nodes after the failed node is
removed.
9. Store this computer in a
safe place until it is needed to replace a node in the cluster that fails due
to a disaster.
10.
If you temporarily
evicted a node from the cluster to configure the stand-by cluster node, you can
now reconnect the node to the shared bus and turn on the computer. Install the
cluster software on the node that was temporarily evicted so it can rejoin the
cluster. Reconfigure the preferred owners for groups in the cluster, if
necessary.
2. Backing up a Cluster's
Shared Disk Resources
The
shared disks in an Exchange 2000 cluster are a critical part of the cluster
technology. A cluster's shared disk resources include the quorum disk resource
and the resource that contains Exchange 2000 databases. Any of the nodes in a
cluster can access the shared disks, and all nodes rely on those disks to be
intact. If a cluster's shared disk fails, any new node that joins a cluster
will not be able to access the necessary data from the failed shared disk.
If
you use the "restore the server" method to recover your shared disk
resources, do not include the drives for those resources in your full computer
backup set. To back up your quorum disk resource, perform either a full
computer backup or a Windows backup on the node that owns the quorum disk
resource. To back up the Exchange 2000 databases and log files on your
cluster's shared disks, perform a separate backup set using the Microsoft
Information Store option in Backup.
Important When you create backup sets of your
cluster node that contains a cluster's shared disk, you should also back up any
dynamic data that exists on that disk.
3. Backing Up the Quorum Disk
Resource
The
quorum disk resource maintains the consistency of your cluster. For example,
the quorum disk resource ensures that the cluster databases (which reside in
the Windows registries of each node in the cluster) are consistent. The cluster
databases contain information about all physical and logical elements in a
cluster, including cluster objects properties, configuration data, and so on.
The
quorum disk resource contains all of the files necessary to maintain the
consistency of your cluster. For example, the quorum disk resource contains the
quorum log file (Quolog.log), and uses this file to
ensure that the cluster registries on all nodes of the cluster are consistent.
The cluster registry for each node is located in the %systemroot%\Cluster\CLUSDB
directory of each node.
Note You should create a separate cluster group for your
quorum disk resource and keep it on its own physical hard disk.
Quorum
disk resource files are located in the Microsoft Windows Cluster Server (MSCS)
folder of the drive that contains the quorum disk resource. When you back up
the quorum disk resource, the following files are also backed up:
chk????.tmp Cluster registry
snapshot files
Quolog.log The quorum log file
<GUID of resource>\*.CPT The
registry checkpoint files for the resource identified by the globally unique
identifier (GUID)
<GUID of resource>\*.CPR The
crypto checkpoint files for the resource identified by the GUID
Clusbackup.dat Backup completion marker file (read-only, hidden,
0-byte file)
To back up the
quorum disk resource • •
Create a full computer
backup set
—Or—
Create
a Windows backup set for the node that owns the quorum disk resource.
Both
of these backup sets properly preserve the quorum disk resource because each
backup type includes a backup of
After
you create the backup set for the node that owns the quorum disk resource,
label that backup set in order to remember that it is the backup set that
contains your quorum disk resource. If a disaster occurs that requires you to
rebuild an entire cluster, you must first restore the node that owned the
quorum disk resource. By first restoring the node that owned the quorum disk
resource, you ensure that objects in the cluster are properly re-created before
introducing new nodes into the cluster.
Note Although the node's local cluster registry
hive is not backed up in a full computer backup set or Windows backup set, you
can back it up using the Registry Backup tool (Regback.exe) in the Microsoft Windows NT
Resource Kit. For more information about how to back up a node's local cluster
registry, see the Microsoft Knowledge Base article Q257892, "Emergency
Repair Disk Does Not Create Cluster Configuration Database" (http://go.microsoft.com/fwlink/?LinkId=3052&ID=257892).
4. Backing Up the Exchange
Databases on Your Shared Disk Resources
To back up the
Exchange databases on your shared disk resources
1. Start Backup on any
computer running Exchange 2000 in the Windows 2000 domain forest (clustered or
not clustered). To start Backup, click Start, point to Programs, point to Accessories, point to System Tools, and then click Backup.
2. Click the Backup tab, and then, in the console tree, expand
Microsoft
Exchange Server. Under Microsoft Exchange Server, you should see a list of the Exchange 2000
stand-alone servers and Exchange 2000 clustered virtual servers in the Windows
2000 forest of which your Exchange organization is a part.
Note The Microsoft Exchange node above it is only for
backing up Exchange databases of previous versions of Exchange.
3. Expand the cluster's Exchange 2000 virtual
server that contains the Exchange databases that you want to back up.
4. Select the databases you
want to back up by performing one of these procedures.
If you want to back up all storage groups on that
server, click the box next to Microsoft Information Store (Figure 6.12).
If you want to back up specific storage groups in
their entirety, expand Microsoft Information Store, and then click the
boxes next to the storage groups you want to back up.
If you want to back up specific mailbox stores and
public stores in a storage group, expand Microsoft Information Store, click the storage
group that contains the databases you want to back up. Then, in the details
pane, click the boxes next to the databases you want to back up.
5. Next to the Backup media or file
name box
(Figure 4.1), click Browse to select the media for your backup. 6. Click Start Backup (Figure 4.1).
7. In Backup Job Information, in the Backup description text box, type a backup
description, set the options and advanced options, and then click Start Backup.
8. After the backup is complete, verify the
backup was successful. For more information about how to verify the success of
a backup job
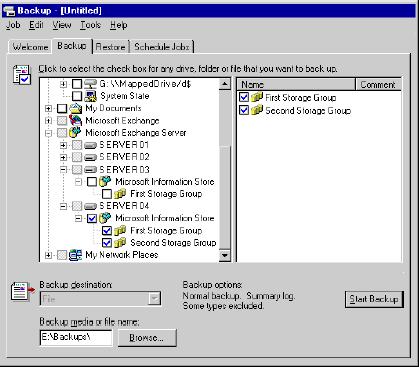
Figure 4.1 Selecting
the storage groups under Microsoft Information Store
5. Maintaining Informational
Records About Your Clusters
It is important
to maintain a record of the configuration information for your Exchange
clusters; this information may be required to recover from a major disaster.
For example, if all of the servers in a cluster are damaged, you may need to
entirely rebuild the cluster. If you do not have full computer backup sets or
Windows backup sets for each node, a record of cluster information may still
allow you to recover the cluster.
To help you
recover a cluster, keep records of the following information about your
cluster: • •
• • •
• • •
Disk signatures
of your cluster's shared disks
NetBIOS names
of each node
NetBIOS names
for each Exchange Virtual Server
Cluster group
names
Cluster
resource names
Virtual server
storage group names
Virtual server
information store names
Virtual server
IP addresses
Note You can use the Cluster Administrator and
System Manager snap-ins to manually record most of the configuration
information of your Exchange clusters. For example, you can use these tools to
access cluster resource names, cluster resource properties, IP addresses of
your virtual servers, and so on.
The
Microsoft
Windows 2000 Server Resource Kit includes tools that help you record and back up
clustering information. To record the critical storage configuration
information about your cluster's shared disk, use the Dump Config
command-line tool (DumpCfg.exe). To back up the configuration of an entire cluster, use Microsoft Cluster Tool (Clustool.exe).
Important If you do not keep a record of this
information, you may not be able to recover your Exchange clusters.
6. Using the Dump Config Tool to Record a Disk Signature of a Cluster Shared
Disk
You
can record the critical storage configuration information about your cluster's
shared disks to a text file using the Dump Config
(DumpCfg.exe) command-line tool. The information contained in the text file is
referred to as the disk signature. DumpCfg.exe is located in Microsoft Windows 2000
Server Resource Kit.
To record the disk signature of a
cluster's shared disk
1. On the node from which you want to record the
cluster's shared disk information, install the Microsoft Windows 2000 Server Resource Kit
and
the Microsoft
Windows 2000 Server Resource Kit supplements.
2. Use Cluster Administrator to ensure that the node you
are using to record the disk signature is the owner all of the shared disk
resources for the cluster.
3. Open a command prompt on the node that owns all of the
shared disk resources for the cluster. To open a command prompt, click Start, point to Programs, point to Accessories, and then click Command Prompt. At the command prompt,
type DumpCfg.exe
> C:\dumpfile.txt, and then press ENTER.
4. Start Windows Explorer. To start Windows Explorer,
click Start, point to Programs, point to Accessories, and then click Windows Explorer. Go to drive C and
locate the newly created dumpfile.txt that contains the newly created
Dumpfile.txt file. Double-click the Dumpfile.txt file to open it in Notepad. In
addition to other information, Dumpfile.txt should contain the disk signatures
and volume information for each of the cluster disks similar to the following
format:
---------------------------
Disk
Number: 0
Signature:
D1C7750B
Volume
#1:
Volume
name: \\?\Volume{5bb07c00-44c0-11d5-9743-806d6172696f}\
Drive
letter: G:
Volume
Label: Quorum
File
System: NTFS
Boot\Boot.ini\System
Volume:
Volume
Type: Simple Volume \ Logical Drive
Number
of members: 1
Member
#1: Partition - Disk: 0, StartingOffset: 8257536
bytes, Length: 17500 MB
---------------------------
5. Copy the dumpfile.txt
file to a safe location, such as a network share containing the software
updates for this node.
7. Using Microsoft Cluster
Tool
Microsoft
Cluster Tool (Clustool.exe) is a tool you can use to back up the configuration
of an entire cluster. For example, with Microsoft Cluster Tool, you can back up
information about the groups and resources in your cluster. Microsoft Cluster
Tool can also assist you with a few common tasks related to the Cluster
service, including backing up and restoring a cluster configuration and moving
resources to a cluster.
Microsoft
Cluster Tool includes the following wizards:
Configuration Backup
Wizard
Creates
a backup of the configuration for a selected cluster.
Configuration
Restore Wizard
Restores
the configuration of a cluster from a selected configuration backup file.
Resource Migration
Wizard
Migrates
resources (file shares and shared printers) from a stand-alone Microsoft
Windows 2000 or Microsoft Windows NT server to a cluster.
Apart
from being a quick way to record all your cluster configuration information, a
Clustool.exe backup can help you restore a clusters configuration information
without having to restore or rebuild all the nodes from your full computer or
Windows backups. A Clustool.exe backup can also provide additional restore
options if your cluster's configuration is damaged.
Note Because Clustool.exe only backs up the configuration information about
your cluster, do not use Clustool.exe as a replacement to creating full backup
sets or Windows backup sets of each node.
Use
Clustool.exe to perform cluster configuration backups after your initial
cluster configuration is complete and after making any configuration changes to
the cluster. Keep the backup in a safe place, such as in a network server that
contains the software updates for the production servers in your Exchange
organization.
Note Microsoft Cluster Tool is located in
Microsoft
Windows 2000 Server Resource Kit. Microsoft Cluster Tool is not automatically installed during the Microsoft Windows 2000 Server
Resource Kit installation
process. The files required for Microsoft Cluster Tool are located in the <CD_drive>:\apps\ClusTool\
directory of your Microsoft
Windows 2000 Server Resource Kit companion CD.
To install Microsoft Cluster
Tool
1. Insert the Microsoft Windows 2000 Server
Resource Kit companion
CD in your CD-ROM drive.
2. In Setup, click Explore the CD.
3. In the <cdroot>\Apps\Clustool
directory, double-click Setup.exe.
4. Follow the directions that appear on
your screen.
To back up the Exchange cluster
configuration using Microsoft Cluster Tool
1. On any node in the Exchange cluster,
start Clustool.exe. To start Clustool.exe, click Start, point to Programs, point
to Accessories, point to Administrator Tools, and then click Cluster Tool.
2. On the Welcome page, click Next.
3. Click Backup a Cluster configuration, and then click Next.
4. In Cluster, type the name of the cluster you want, or click Browse to browse the current network domain for the
appropriate cluster. (If you do not specify a cluster, the Configuration Backup
Wizard attempts to connect to a local cluster node. This option only works if
you are running Clustool.exe on a cluster node.)
5. In Backup Name, type a file name for the backup you want to create.
6. In Description, type the current date and any other notes specific
to this backup.
7. Click Browse to specify a location to save the file, and then click Next.
8. Click Next to begin the backup process. When the backup completes, click Report to view the backup log, and then click Finish to exit Microsoft Cluster Tool.
For more
information about how to use Clustool.exe to back up the configuration
information for a selected cluster, open Microsoft Cluster Tool, and then click
Help.
II. Restoring Exchange 2000
Clusters
1. Replacing Damaged
Exchange 2000 Cluster Nodes
To replace a node if
you have not prepared a stand-by recovery server
1. To evict the damaged
node from the cluster and remove it from the cluster's shared small computer
system interface (SCSI) bus:
a. Click Start, point to Programs, point to Administrative Tools, and then click Cluster Administrator. If Cluster
Administrator does not automatically locate the cluster to which the node
belongs, in the Cluster or server name box, type the name of an active node in the cluster.
You can also connect to the cluster by opening Cluster Administrator on a
cluster node and entering a PERIOD (.) in the Cluster or server name box.
b. Stop the Cluster service
on the node you want to evict.
c. In Cluster Administrator, on the File menu, click Evict Node.
d. From the Windows 2000
control panel, double-click Add or Remove Programs, and then click Add/Remove Windows
Components.
e. In Components, clear the check box
next to Cluster
Service,
and then click Next to uninstall Cluster service.
f. Remove the evicted node
from the cluster's shared SCSI bus.
2. Install Windows 2000
Server, including the latest service pack that the server was running, software
updates, and the software for your Exchange 2000 cluster nodes (such as
anti-virus software). You can use any computer name that is not on the network
for the new node. Do not install Exchange 2000 on the new node at this time.
3. Join this replacement
node to the same domain as the other nodes in the cluster.
4. Connect the computer to
the shared SCSI bus that the cluster is using.
5. Start the replacement
node.
6. To add the replacement
node to the cluster, from the Windows 2000 control panel, double-click Add or Remove Programs, and then click Add/Remove Windows
Components.
7. In Components, select the check box
next to Cluster
Service,
and then click Next to install Cluster service.
8. In Cluster Wizard,
follow the steps to add the node to the cluster.
9. Install Exchange 2000
Server on the replacement node. Exchange automatically notifies you that the
"cluster-aware" version of Exchange 2000 is being installed.
(Applications that support the Cluster API are defined as
"cluster-aware.") After Exchange 2000 Setup completes, install any
Exchange 2000 service packs that are running on the other nodes in the cluster.
Note For detailed information about how to set up an
Exchange 2000 cluster, see the technical paper Deploying Exchange 2000 Server Clusters
with Service Pack 2 (http://go.microsoft.com/fwlink/?LinkId=6275).
Important When you run Exchange 2000 Setup as part of rebuilding a cluster node,
you do not run Exchange 2000 Setup in Disaster Recovery mode. The Disaster
Recovery mode Setup option is not available when running Setup on cluster
nodes. The Setup modes available for Exchange clusters are Install, Change,
Uninstall, and Reinstall.
To replace a node if you have a
stand-by cluster node recovery server
1. To evict the damaged node from the
cluster and remove it from the cluster's shared SCSI bus:
a. Click Start, point
to Programs, point to Administrative Tools, and then click Cluster Administrator. If Cluster Administrator does not
automatically locate the cluster to which the node belongs, in the Cluster or server name box, type the name of an active node
in the cluster. You can also connect to the cluster by opening Cluster
Administrator on a cluster node and entering a PERIOD (.) in the Cluster or server name box.
b. Stop the Cluster service on the node you want to
evict.
c. In Cluster Administrator, on the File menu, click Evict Node.
d. From the Windows 2000 control panel, double-click Add or Remove Programs, and then click Add/Remove Windows Components.
e. In Components, clear the check box next to Cluster Service, and then click Next to uninstall the Cluster service.
f. Remove the evicted node from the cluster's shared SCSI
bus.
2. Start the stand-by cluster node.
3. To add the stand-by cluster node to
the cluster, from the Windows 2000 control panel, double-click Add or Remove Programs, and then click Add/Remove Windows Components.
4. In Components, select the check box next to Cluster Service, and then click Next to install Cluster service.
5. From Cluster Wizard, follow the
steps to add a node to the cluster.
2. Restoring or Rebuilding a
Cluster Node from Backups
An
alternate recovery method to replacing a failed node is restoring or rebuilding
a failed node. The procedures for restoring or rebuilding a node are identical
to the procedures for restoring or rebuilding a stand-alone server.
Furthermore, to restore or rebuild a failed node, you must have the required
backup sets. For more information about how to restore or rebuild a server, see
Chapter 3, "Selecting an Exchange 2000 Disaster Recovery Strategy."
3. Restoring Shared Disk
Resources
If
any of the shared disk resources used by the groups in the cluster are damaged,
you may need to replace the failed hard disk and restore the contents of the
lost disk from backups. A cluster server relies on disk signatures to identify
and mount volumes. If the disk signature for a shared disk resource should
change, it could prevent the Cluster service from starting.
For
more information about how to resolve this problem, see Microsoft Knowledge
Base article Q280425, "Recovering from
an Event ID 1034 on a Server Cluster" (http://go.microsoft.com/fwlink/?LinkId=3052&ID=280425).
4. Restoring an Exchange
Database to a Cluster
If
any drives containing database files or transaction log files are lost, you
must use your Exchange database backups to recover those drives. To restore a
backup of the Exchange 2000 cluster node databases, you must perform steps that
are similar to restoring Exchange databases to a stand-alone member server. The
only difference between these processes is that, when restoring the cluster
node databases, you use the computer (NetBIOS) name of the Exchange virtual
server computer instead of the Windows 2000 computer name of the cluster node.
The NetBIOS name of the Exchange virtual server is located in the Restore to text box of the Windows
2000 Backup utility. The virtual server's NetBIOS name is the same computer
name that users use to connect to their Exchange 2000 virtual server running in
the cluster. You can back up and restore the Exchange databases of an Exchange
2000 virtual server from any node within the cluster, or from any other
Exchange 2000 server in the domain.
5. Restoring a Quorum Disk
Resource
The
quorum disk resource is a shared disk resource that contains details of all the
changes that have been applied to the cluster database. The quorum disk
resource is accessible to other cluster resources; therefore, if one node fails
over to another, all cluster nodes have access to the most recent database
changes.
If
the drive containing the quorum disk resource is lost, you can use the Backup
utility and the Cluster Quorum Restore utility (Clusrest.exe) to recover the
drive. First, you use Backup to restore the quorum data to the node that owned
the quorum disk. Specifically, you restore either a full computer backup or
Windows backup to the node that owned the quorum disk resource. When you
restore either of these backup sets, the
After
the quorum data is restored to the node that owned the quorum disk resource,
you use Clusrest.exe to move the quorum data from that node to the new quorum
drive resource drive.
To restore a quorum disk resource
1. If the signature of the
hard disk to which you are going to restore the quorum has changed since it was
backed up, use the Dump Config tool to restore the
signature. The Dump Config tool is located in Microsoft Windows 2000
Server Resource Kit.
2. Stop the Cluster service
on all nodes except the node that is performing the restore.
3. Use Backup to restore
the Windows backup set or full computer backup set to the replacement node.
(Restoring the
Important Because the
4. On the node where you restored the Windows
backup set or full computer backup set, use the Cluster Quorum Restore utility
(Clusrest.exe) tool to restore the contents of the Winnt\Cluster\Cluster_backup
folder to your quorum disk resource. For step-by-step instructions about how to
restore the contents of this folder to your quorum disk resource, use the Help
files that are included with the Clusrest.exe tool. The Clusrest
tool is located in Microsoft Windows 2000 Server Resource Kit.
5. Close the command prompt, and then restart
the computer. After the computer restarts, the quorum disk resource should be
fully restored.
6. After you complete the process, and the
Cluster service has successfully started on the newly restored node, restart
the other nodes.
6. Rebuilding a Quorum Disk
Resource
If
the restore process fails, or if the necessary backups are not available, there
are two methods you can use to rebuild the quorum disk resource: • •
Restart
the Cluster service as "clussvc –debug –resetquorumlog"
Follow
the instructions in Microsoft Knowledge Base article Q224999, "How to Use
the Cluster TMP file to Replace a Damaged Clusdb
File" (http://go.microsoft.com/fwlink/?LinkId=3052&ID=224999).
III. Recovering an Entire
Exchange 2000 Cluster
If
you simultaneously lose all of the nodes of an Exchange 2000 cluster, you must
recover the entire cluster. The process for recovering an entire cluster
includes many of the same procedures for recovering stand-alone Exchange 2000
member servers.
If
you do not have the required full computer backups or Windows backups of the
nodes in your cluster, you may still be able to recover your entire cluster. To
attempt this type of recovery, you must have backups of your Exchange databases
(or your Exchange database files and transaction log files must be intact on
one of your cluster's shared disk resources). You must also have sufficient
informational records about your cluster configuration..
Important To rebuild an entire cluster using your
cluster's information records and Exchange database backups, contact Microsoft
Product Support Services at http://support.microsoft.com. The procedures
required in this type of recovery are for advanced-level administrators only.
Furthermore, advanced-level administrators should only consider this cluster
recovery method if there is no alternate method available.
When
implementing a recovery strategy for an entire cluster, the first node you
recover (also known as "first node") must be the node that owned the
quorum disk resource at the time you created the backup sets for your nodes.
After you recover the first node, ensure that all of your cluster resources
come online. After your cluster resources are online, you can insert new nodes,
insert stand-by recovery nodes, or continue to restore or rebuild additional
failed nodes.
The
following information provides further explanation about using the
"restore the server" and the "repair the server" methods to
recover the first node of your cluster:
Restoring the Server
If
you use the "restore the server" method to recover the first node,
you may need to restore one or more of the cluster's shared disk resources (for
example, the quorum disk resource or Exchange databases) after you restore the
full computer backup set. After you ensure that the first node in the cluster
is able to bring all cluster resources online, you can insert new nodes, insert
stand-by recovery nodes, or continue to restore nodes from your full computer backup
sets.
Repairing the Server
If you use the
"rebuild the server" method to recover the first node, you must
recover the quorum disk resource (if necessary) after you restore the Windows
backup set. After you restore your Windows backup set, the Cluster service
starts, and the objects in your cluster should appear as they did prior to the
disaster. To view your cluster information, use Cluster Administrator. After
you install Exchange 2000 in Install mode, restore your Exchange database
backups (if applicable). After you ensure that the first node in your cluster
is able to bring all cluster resources online, you can insert new nodes, insert
stand-by recovery nodes, or continue to rebuild nodes from your backup sets.
Important When you install Exchange to a
cluster node as part of a cluster node recovery, you must run Exchange 2000
Setup in Install mode, not in Disaster Recovery mode.