Set Back Block Position
The back block is the part at the back of the gun that is screwed onto the pump rod, connecting it to the ram. The block position is very important to ensure that there is enough backward movement of the block to cock the gun and allow another paintball to drop into the breech. Having the block screwed in too far can lead to several problems. Obviously if it's in way too far, it could not move back far enough to cock the gun or allow a paintball to drop into the breech. In less extreme cases, the ram has to push all the way to the back of it's stroke (where it is weakest) to draw the hammer back far enough to catch the sear. In this case, any reduction in pressure through the autococking system will lead to the block not being pushed back far enough to cock the gun or completely feed the next paintball. During slow-fire, this isn't a problem. But during rapid fire, when the regulator may not be fast enough to provide a steady flow of pressure it leads to stumbling, double firing, and chopped paintballs. You want to screw on the block such that, when the ram is all the way forward, the block just touches the back of the body. You should be able to fit a piece of paper in between the back block and the body. If a piece of cardboard can fit in between the body and the back block, then the back block needs to be screwed in. This accomplishes a few things. First, it ensures that the block can definately be pushed back far enough to cock the gun and that ram is in the middle of it's stroke (where it's strongest) when the hammer has been drawn back far enough to catch the sear. Second, it ensures that the block will definately be able to draw the bolt back far enough to allow a paintball to drop into the breech. Finally, with some work, you can actually position the block such that the block comes right up to the body, but doesn't actually meet it. This eliminates much of the clacking sound characteristic of an Autococker cycling.
Set The Cocking Rod Length
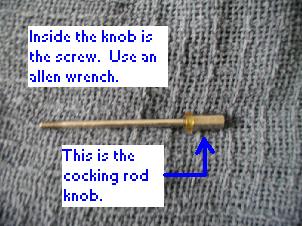
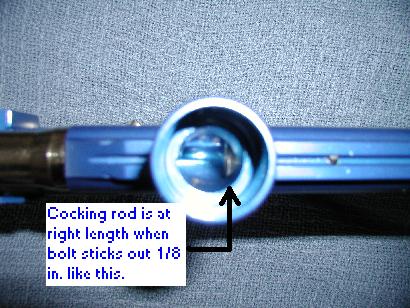
The cocking rod is the rod that goes through the back block and velocity adjuster below the bolt and screws into the back of the hammer in the lower half of the gun body. Setting the cocking rod to its proper length ensures that the bolt can move back far enough to allow paint to feed, and to ensure that the hammer is drawn back far enough to catch the sear. If the rod is too long, a ball will not be able to fit in the breech, causing problems. So this is what you need to do. First, unscrew the cocking rod out of your Autococker. Then, look at the knob on the end of the cocking rod. Inside, there should be a hole shaped for a small allen wrench to fit in. Take the right-sized allen wrench and unscrew the screw out of the cocking rod knob all the way out. Now that this is done, you will be able to screw the knob of the cocking rod in and out to lengthen or shorten the cocking rod. Turn the knob to the right to shorten the cocking rod and turn the knob to the left to lengthen the cocking rod. Once you have set your cocking rod to the length you feel will work, take the allen wrench and screw the screw back into the end of the cocking rod knob. Then take the entire cocking rod and screw it back into your autococker untill it stops snugley. Look down your feed tube and notice the bolt. If you have done the instructions correctly, the bolt should have moved forward or backward. Pull back the back block until the gun cocks and the cocking rod clicks. Look down the feed tube of your gun. If the bolt sticks out about 1/8 of an inch or so past the body of the gun, then you have set the cocking rod to its proper length and you have completed this part of timing your Autococker. If the bolt cannot be seen at all when you look down your feed tube then the cocking rod is to long. Therefore, you need to shorten the cocking rod. If you look down the feed tube and the bolt is sticking out past the body more than 1/8 of an inch, then the cocking rod is to short, and you need to lengthen it. Here are some pictures you can use for reference:
Set The Sear Lug Length
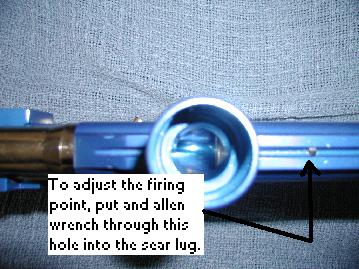
You now need to set the point where the gun fires in the trigger pull. This is set by setting the sear-lug length. The sear lug is a screw that goes through the hammer, and is the part of the hammer that catches the sear in the grip frame when the gun is cocked. You can ajust the sear lug length using an allen wrench through a hole that is at the top of your Autococker's body. When setting the length of the sear-lug, there are a couple of things to keep in mind. First, you want to make sure that there is enough lug catching the sear for the two to hold reliably with each fire of the gun. Setting the lug too short can allow the sear lug to slip over the sear once the parts get worn in some so the gun won't stay cocked on every shot. Second, you want to make sure that the gun fires early enough in the pull for you to set the cocking point past it. Screwing the lug back into the hammer such that less of it protrudes below the hammer moves the firing point forward in the pull (makes it fire earlier). Screwing the lug further out of the hammer so more of it sticks out below the hammer moves the firing point back in the trigger pull (makes it fire later). The lug has to be set to allow the gun to fire at least half way through the trigger pull for reliable operation. The trigger is about half way back when the hole in the trigger-plate is centered in the hole in the grip frame (this is if your trigger has not been shortend). Set the gun to fire at that point.
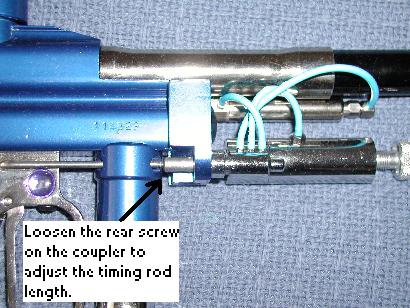
Set The Timing Rod Length
Now all you have to do is set the point in the trigger pull where the autococking system is triggered to cock the gun. This is set by adjusting the length of the timing rod. Make sure your gun is gased up for this part of Autococker timing. The timing rod is the bent rod on the right side of the gun that attaches to the 4-way valve at it's front and bends to go through the trigger frame and plate at its back. You'll note a small collar that the front end of the rod goes into. This collar couples the rod to the 3-way. There are two screws in this collar. The front screw attaches the collar to the 3-way. DO NOT REMOVE OR LOOSEN THIS SCREW! The back screw is the one that holds the rod in place. This is the screw that you have to loosen to adjust rod length. If you have a stock timing rod, the rod simply slides into the collar. It can be adjusted by loosening the back screw and sliding the rod in or out as needed. If you have a threaded timing rod, the rod screws into the collar, requiring you to rotate the collar around the rod to shorten or lengthen the rod after loosening the screw. Shortening the timing rod moves the cocking point of the trigger pull forward. Lengthening the rod moves the point where the gun cocks back in the pull. Since the way an Autococker works is to fire with the first part of the trigger pull, and to cock with the second part, obviously you want to set the point in the trigger pull where the gun cycles behind where it releases the hammer and fires the gun. To minimize blow-back (gas blown up the feed-tube), you want to set the trigger up such that when the gun fires the bolt is still being held firmly forward, and only after that does it cock. Slowly pull the trigger back until it fires. When it fires, watch the back block. If the block starts to move back before, or jumps back when the gun fires, lengthen the rod slightly and try it again. Repeat this procedure until when the gun fires, the block stays firmly forward, and doesn't start to move back until you slide the trigger further back. A too long timing rod can result in several problems. If the rod is extremely long, the block will always stay forward no matter how far you pull the trigger since it can't pull the 3-way piston back far enough. In less extreme cases the gun will cock close to the back of the trigger pull and will start to move forward on trigger release before the sear has come forward far enough for the sear to catch the lug. In this case, the block will cycle without the gun firing and the cocking rod slips forward on each return of the block. In the least extreme cases, the sear-lug will only sometimes slip over the sear, resulting in occasional double fires followed by dropped shots. A too short timing rod has several consequences as well. If the rod is far too short, the block will always stay back, even with the trigger completely released. In less extreme cases, the block will begin to cycle before the sear can release the hammer and the gun will cycle without firing. It differs from a the too long rod instance in that the gun stays cocked with the cocking rod staying back in the cocked position between cycles rather than returning all the way forward. In the least severe cases, the gun will appear to function normally, but excessive blow-back will result in poor velocity consistency and occasional chopped balls during rapid fire and when your hopper runs low on paint.