
THE LAND NAVIGATION PORTION OF THIS WEBPAGE IS UNDER CONSTRUCTION....PLEASE BE PATIENT!
A 12 Hour Basic Land Navigation Course
Developed for
Search and Rescue
The purpose of this course is to provide the student with a working knowledge of a United States Geological Survey (USGS) 7.5 minute topographic quadrangle map and the compass, and how to apply this knowledge to search and rescue situations.
Upon completion of this 12 hour course, the student should:
Have a basic knowledge of the terminology and symbols commonly found on a standard USGS 7.5 minute topographic quadrangle.
Have a working knowledge of various geographic and coordinate locator systems commonly used in search and rescue.
Have a working knowledge of the use of a compass.
Have a working knowledge on the use of a map and compass together.
Have a basic understanding of GPS capabilities.
Be able to apply learned skills to problems presented by the instructor.
The course is roughly divided into three parts. It is designed such that approximately four hours are spent in classroom lecture. Two to three hours are spent on hands-on skill development. The remainder of the time is devoted to the application of learned skills (problem solving).
Search and rescue is a very mentally and physically demanding activity. It is imperative that anyone wanting to become a team member become proficient in the use of the map and compass. Together, the map and compass can make the difference between a successful search or a total disaster.
Definition
Projections
Types
Map Legend
Locating Systems
Definition
Types
Use
Introduction
Use of the Map and Compass
Introduction
Sources of Error
Potential SAR Use
GPS Comments
* A map is a graphical representation of a portion of the earth�s surface.
* The biggest problem of producing a map is taking a nearly spherical object (geoid) and making it flat. For small areas of the earth�s surface, this is not a major problem.
* Projections are mathematically complex.
A. SMALL SCALE -
Maps that cover large areas. These include road maps, county maps, state maps, atlas, world maps, etc.
B. LARGE SCALE -
Maps that cover smaller areas. Although there are many varieties of these maps, we are most concerned with the topographic quadrangle map produced by the United States Geological Survey.
Nearly everything you need to know abouth the map is in the margins outside of the�neatline� (the thin black line bordering the map). This information includes the five �D�s� - Descriptions, Directions, Declination, Distances, and Details.
A. DESCRIPTIONS
DATE - located in the lower right corner of the map. This is the date the map was made. It is important to check this to be sure you have the most up-to-date version of the map.
NAME - the name of the map is presented in the upper and right lower right corners of the map.
LOCATIONS - a small state map is located in the bottom margin of the map to the left of the map name. A small black block on the state symbol indicates the area covered by the map.
B. DIRECTIONS
Directions are found in the map margin.
North is usually �up� when viewing the map. The left and right edges of the map are true north lines.
To the left of center in the bottom margin is a north arrow; true north is shown with a star on top, magnetic north has �MN� on it, and grid north is designated with �GN�.
C. DECLINATION - True North vs Magnetic North
True north is located at the north pole (Lat 90 N)
Magnetic north is located in the Hudson Bay area in Canada.
Declination is shown on the map in degree and mils.
Declination can be preset on many types of compasses.
A map can be make to �speak magnetic north�.
Declination west, compass best; declination east, compass least.
D. DISTANCES - MAP SCALES
1. GRAPHICAL - uses a bar graph to visualize scale in feet, miles, or kilometers.

2. RATIO - 1:X.
7.5 minute quadrangles are 1:24000. This is 1 unit to 24,000 units, not one inch equals 24,000 feet. If the units were inches, one inch would equal 24,000 inches. If the units were feet, one foot would equal 24,000 feet.
To convert the units to more understandable and easier to use terms, 1 inch:24,000 inches, divided by 12 inches per foot, would be 1 inch equals 2,000 feet.
E. DETAILS
1. CONTOUR LINES
Contour lines are lines of equal elevation.
Contour lines are the brown lines on the map.
The interval between contour lines is shown on the bottom of the map.
2. MAP SYMBOLS
a. Color
- Black - manmade features
- Blue - water
- Brown - contour lines
- Red - roads, fencelines, etc.
- Green - woody vegetation
- White - non-woody vegetation (fields, etc.)
- Pink - Urban areas
- Purple - photorevisions
b. Topographic Symbols
Boundaries, roads, buildings and structures, railroads, transmission lines, pipelines, contours, mines and quarries, vegetation, rivers, lakes, swamps, elevations, benchmarks, area names, towns, etc., etc., etc.
A. COORDINATE SYSTEMS
1. LATITUDE AND LONGITUDE
a. Introduction
The earth is a slightly flattened sphere, thicker through the equator.
By dividing the earth into a circle, it is split north to south into 360 degrees. Meridians of longitude run east to west from the Prime Meridian, located in Greenwich, England, 180 degrees to the International Date Line in the Pacific Ocean. These meridians converge at the North and South Poles; therefore, the distances are not consistent. This is the reason that topographic maps are typically rectangular instead of square. Longitude is actually a measure of the rotation of the earth (15� of longitude equals 1 hour of time).
Parallels of latitude run north and south from the equator to the poles. Parallels are equal distances apart, approximately 69 miles for 1 degree of latitude. The latitude of the North and South Poles is 90N and 90S, respectively. Latitude is a measurement of the angular distance from the equator.
Each degree of latitude and longitude is subdivided into minutes and seconds.
1 degree = 60 minutes 1 minute = 60 seconds
The reference latitude and longitude is located in the lower right map margin below the name of the quadrangle.
Latitude and longitude are most widely used by ships and airplanes
b. Calculating Latitude and Longitude
Calculating latitude and longitude is not overly difficult, but does require a little mathematics and practice. Coordinates can be calculated using proportions - the relationship of distances and degrees shown on the map. The easiest way to accomplish this is with a ruler and a simple computer program.
*The following steps explain how to calculate latitude and longitude using the proportion method:
1) Measure the total longitudinal distance from left to right (LONGT), units are arbitrary, although metric is easier to read and is more accurate.
2) Measure the longitudinal distance from let to right to the point in question (LONGD).
3) Set up the following ratio:
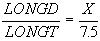
Solve for X: this gives the answer in minutes.
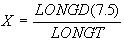
4) Convert the number to the right of the decimal point to seconds using the following formula: Y=(.X)(60) seconds. Don�t panic here, follow the provided example.
5) Subtract X minutes Y seconds from the highest longitude value on the map. This will give you the longitude of the point.
6) Do the same calculations for latitude using: LATD=total distance measured top to bottom, and LATT=measured distance from top to point in question.
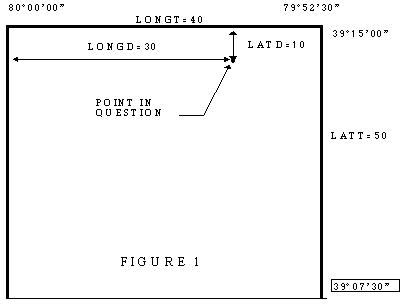
EXAMPLE: Given the following:
The map (Figure 1) has reference coordinates of N390730/ W795230.
The total measured longitudinal distance (LONGT) on the map is 40 cm.
The distance to the point in question (LONGD) from the left side of the map is 30
cm. The total measured latitudinal distance (LATT) is 50 cm. The distance to the
point in question from the top of the map is 10 cm.
Longitude Calculations

This is 5.625 minutes. To convert to seconds: Y=(0.625)(60)=37.5 seconds. You can round this to 38 seconds if you wish. This is now written as 5� 38�. Subtract this number from 80� 00� 00�. This value may be written as 79� 59� 60�. The result is 79� 54� 22�.
Latitude Calculations

This is 1.5 minutes. To convert to seconds: Y=(.5)(60)=30 seconds. This is now written as 1� 30�. Subtract this number from 39� 15� 00�. This value may be written as 39� 14� 60�. The result is 39� 13� 30�.
The latitude and longitude for the point in question is N39� 13� 30� / W79� 54� 22�.
* Another method of calculating latitude and longitude involves using geometry.
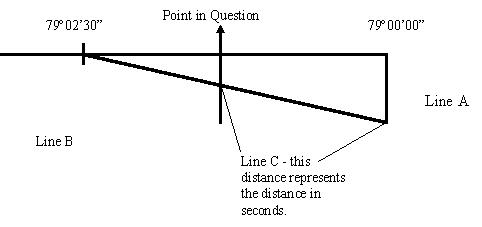
1) Draw a line at an angle from one of the know 2.5 minute tic marks along the margin. Measure off 150 equal parts (metric is by far the best for this) which represents 150 seconds (2.5 minutes x 60 seconds/minute equals 150 seconds).
2) Draw a line from the next known tic (Line A)
3) Draw a line parallel to Line A. This is Line B.
4) Measure distance between Lines A and B. This reading is in seconds.
5) Add this distance to the lowest tic number.
6) This works for latitude and longitude.
Both methods require practice!
Latitude/longitude is accurate to about 1000 feet.
Difficult to calculate in the field - slow
Commercial templates are available that make calculations much easier. Accuracy is about the same
Poor locating method for search and rescue - too much margin of error, not easily accomplished by field personnel.
Aircraft may require latitude and longitude coordinates.
2. UNIVERSAL TRANSVERSE MERCATOR (UTM)
a. Introduction
* The incremental unit is the kilometer (1000 meters).
* Increments indicated with light blue tics along the neatline.
* Developed by the military.
* Coordinates are given as eastings and northings.
* Eastings contain 6 digits, indicating meters east of the International Date Line. Shown on maps as 440000mE or simply as 440.
* Northings contain 7 digits, indicating meters north of the equator. Shown on maps as 4352000mN or simply as 4352.
* The UTM system is simple to use; unlike latitude and longitude, the increment distances are the same north and east.
* Accurate to at least 330 feet.
* Remember, the coordinates are read �Right Side, Up�
b. Calculating UTM Coordinates
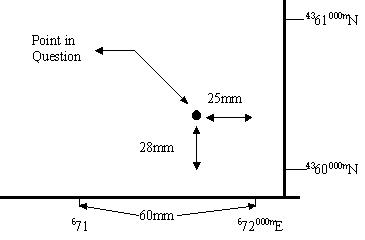
Measure the total distance between the blue tics. This distance will be used for both northing and easting calculations. For example, let�s say that this distance is 60mm. This means that 60mm represents 1000m or by dividing 1000 by 60, 1mm=16.7m. Draw lines perpendicular from the point in question to the map margins. Measure the distance to the easting tic to the right and the northing tic below the point. In our example, the easting distance is 28mm and the northing distance is 25mm. It�s simple math from this point on: (28)(16.7) = 467.6 (25)(16.7.) = 417.5 both can be rounded up.
Take the known easting to the right of the point in question and subtract the easting calculation from it (672000m - 468m = 671532m). Locate the known northing below the point in question and add the calculated number to it
(4360000 + 418 = 4360418)
The UTM coordinates for the point in question have now been calculated and are written as 671532E / 4360418N.
* The UTM coordinate system is simple and accurate. It is much easier to calculate than latitude and longitude, especially in the field.
* Commercial templates are available to enable the user to quickly determine UTM positions within 100 meters.
* Computer programs are also available that enable rapid calculations.
3. MOUNTAIN RESCUE ASSOCIATION (MRA)
* Developed specifically by the MRA. Uses Civil Air Patrol Sectional Aeronautical Charts (1:500,000 scale).
* Accurate to about 528 feet.
* A very confusing system, hard to learn, difficult to use in the field. Only some MRA members actually use it!!!.
4. SAN DIEGO MOUNTAIN RESCUE TEAM (SDMRT)
* Requires same map for all personnel using the method.
* Requires an accurate ruler and a sharp pencil
* Measure to the smallest increment on the ruler.
* All measurements taken from the map border
* 1/16 inch = 125 feet on a 7.5 minute quadrangle
* 1 mm = 80 feet on a 7.5 minute quadrangle...USE METRIC!
* Report measured distances from the right or left margin, then from the bottom or top margin. If you get in the habit of measuring right side, then up, you�ll be consistent with the way UTM coordinates are measured, so you won�t have to think differently.
* The SDMRT method is fast, easy, and accurate for use in the field. The measurements can easily be converted to other coordinates systems by base personnel, thus eliminating coordinate calculations for field personnel. Instead of making field determinations of where N39�07�18�/W79�17�34� is located, the field crew can receive the coordinates as 27.3 cm from right, 14.6 cm from bottom.
5. GOVERNMENT LAND OFFICE SYSTEM (GLO)
* The Township and Range System...�the North forty�
* Accurate to within several acres.
* Not used in search and rescue - too inaccurate and cumbersome..
* The GLO is not used in all states.
6. STATE COORDINATE SYSTEMS
* Units are usually in feet.
* These systems vary from state to state - virtually unknown by the average person.
* Not commomly used in search and rescue.
7. GEOGRAPHIC DESCRIPTIVE SYSTEM
* Easy to use, although slow to transmit over the radio.
* Not very accurate...can be confusing.
* Users must have the same map.
* Example: the sharp turn in the second dirt road near the �E� in Bear Den Mountain on the upper right side of the map approximately a mile southwest of the hospital.
* Used primarily by untrained search and rescue personnel.
8. THE WHEREINTHEHELLAMI SYSTEM
* Not very accurate.
* Easily transmitted over the radio.
* Requires no map, compass, or knowledge.
* Commonly used by untrained search and rescue teams.
* Similar to the WHERINTHEFUKAWI Method used by many untrained teams.

* A compass is simply a magnetized needle that is supported in such a way that it allow it to freely swing. This needle will always point towards magnetic north.
A. SIMPLE COMPASS
* A suspended needle with basic compass points (NSEW).
* Not very accurate and not easily used with a map.
B. LENSATIC COMPASS
* Military style
* Cheaper models are air-filled. Better models are liquid-filled.
* Good for taking bearings.
* Moderately easily to use with maps...depends on particular model.
C. ORIENTEERING COMPASS
* The �Silva� or �Boy Scout� type compass.
* Easy to use - the most popular compass
* Accurate, especially models with sighting mirrors.
* Most are liquid-filled.
* Transparent base makes it very easy to use with a map.
* Can be used as a protractor.
III. USING THE COMPASS
A. BASICS
* Bearings vs. Azimuth - bearings are taken from compasses set up on the quadrant system and are given as, for example, N36E. Azimuths are read from 0-360 degrees.
* Taking azimuths - a simple task. Sight compass on landmark, turn dial until north arrow lines up in the north arrow on the dial and read the reference mark.
* Setting an azimuth- set compass on desired reading, line up north arrow and go. This will be demonstrated during the class.
* Problems associated with compasses- usually involve metallic objects that deflect the magnetic needle. Most problems are typically user induced.
B. USES OF THE COMPASS
* Orienting the map - positioning the map to represent the actual land features
* Land navigation - using the compass to traverse an area, especially when landmarks are uncommon.
* Plotting points from given azimuths
* Map making - not commonly performed in search and rescue. Occasionally performed to delineate a crime scene
THE MAP AND COMPASS
I. INTRODUCTION
A proper working knowledge of the map and compass can allow you to find your way in completely unknown area.
The most common search and rescue acronym is L.A.S.T
L - LOCATE
A - ACCESS
S - STABILIZE
T - TRANSPORT
The �L� and �T� may involve the use of the map and compass.
Among the first concerns of a search are:
WHERE IS THE VICTIM and HOW CAN WE SAFELY GET THERE
II. USES
A. Locating and defining the search area
B. Locating natural and man-made boundaries
C. Determining the nature of the terrain - what is the topography like?
D. Plotting search lines - in areas with few natural boundaries, the compass can be used to define search lines.
E. Search crew placement - the map and compass can be used to determine search pattern grids.
F. Prevents search crews from getting lost - in remote areas, a search team can maintain its position and know where it�s at.
G. Reporting the location of the victim - once the victim has been located, the exact location and coordinates can be reported.
MODERN TECHNOLOGY - GLOBAL POSITIONING SYSTEMS
I. INTRODUCTION
Global Positioning System (GPS) was developed by the United States Department of Defense as a world-wide navigation and positioning resource for both military and civilian use. GPS is based on a constellation of twenty-four (24) satellites orbiting the earth over 12,000 miles up. These satellites act as reference points from which GPS receivers on the ground �triangulate� their position.
In a nutshell, the satellites transmit radio signals which are received by GPS instruments on the ground. By measuring the travel time of the signals transmitted from the satellites, a GPS receiver can determine its distance from the satellite. With distance measurements from four (4) satellites and some high-powered math, the receiver can calculate its latitude, longitude, course, and speed. Hand-held GPS units can figure positions anywhere on earth to within 100 meters and will do it faster than once per second.
II. SOURCES OF ERROR
GPS has several problems that can, and do, introduce error into your positional readings. These errors include:
A. Satellite Error - slight imperfections in the atomic clocks or orbital drift can cause inaccuracies in position measurements.
B. The Atmosphere - as the GPS signal comes through the atmosphere, it encounters various �obstacles� such as charged ionic particles, water vapor, etc., that can translates into a miscalculation of the satellite�s distance, which in turn, leads to an error in position.
C. Multipath Error - when the GPS signal reaches the earth�s surface, it may reflect off of various objects (vegetation, buildings, cliffs, etc.). This leads to multipath error similar to �ghosting� seem on a TV screen.
D. Receiver Error - GPS receivers can introduce error which is usually due to their clocks or internal noise.
E. Selective Availability - the largest of the GPS errors is the intentional error known as selective availability that is put into the system by the Department of Defense. If this error was plotted for a stationary receiver, you would see that the position of the unit wanders around within about a 100 meter circle. Selective Availability varies from moment to moment and from day to day. The only way to effectively counteract selective availability is through the use of differential GPS (DGPS). Through the use of DGPS, accuracy of one centimeter is possible.
III. POTENTIAL SAR USE
A. Basic Navigational Aid - used to supplement the compass and provide the team with waypoint entry capabilities and the ability to radio positional information concerning clues and other search-specific information.
B. Integrated Search Tool - each field team would have a GPS unit and would maintain scheduled communication with the Command Post, providing positional information. This information would be intered into a computer, allowing the Command Post to monitor locations and progress of each team, thus greatly enhancing the POD calculations.
IV. FINAL COMMENTS
The GPS has revolutionized the navigational world. There are a few things that one must keep in mind when using GPS. The single most important thing is batteries. Keep plenty of spares on hand..without them the GPS is worthless. The second key item is knowledge..without it, you are worthless. Know your equipment and it�s limitations. Batteries are no substitute for brains. You must have a thorough understanding of coordinate systems. The coordinates that the GPS gives you are meaningless if you don�t have the ability to plot them on the map.
REFERENCES
Blandford, Percy W., 1984, Maps and Compasses: TAB Books, Inc. 243 p.
Boy Scouts of America, 1984, Fieldbook: BSA, Irving, TX, 630 p.
-
Cowan, Robert, 1990, The UTM Coordinate System: Response!, NASAR, Fairfax, VA. v. 9, no. 4, p. 22-26.
Hurn, Jeff, 1993, Differential GPS Explained: Trimble Navigation Limited, Sunnyvale, CA, 55 p.
Kjellstrom, Bjorn, 1976, Be an expert with map and compass: MacMillan Publishing Company, New York, NY, 214 p.
May, W.G., 1973, Mountain Rescue Techniques: Rocky Mountain Rescue Group, >Inc., Boulder, CO, 301 p.
Strahler, Arthur N., 1969, Physical Geography: John Wiley & Sons, Inc., New York, NY, 733 p.
Wehbring, John, 1988, Where are you?: Response!: NASAR, Fairfax, VA, v. 7, no. 2, p. 12-18.