|
|
|
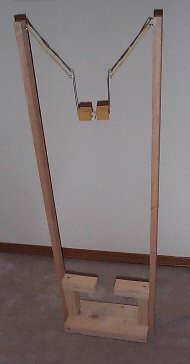
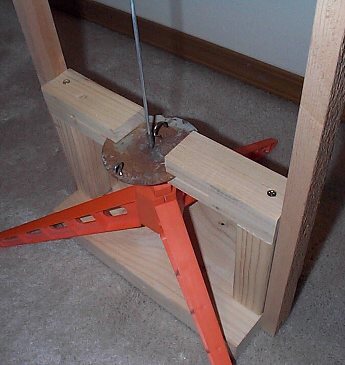
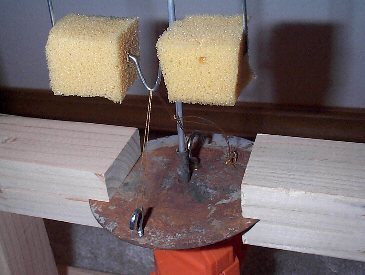
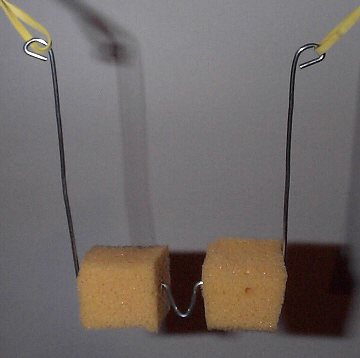
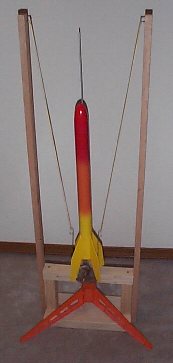
I really love some of my larger Estes rockets, like the Shadow and Broadsword. But the D engines that are recommended are barely enough for them. I thought about the obvious solution - use Aerotech E or F engines. However, our local launch field is limited to D engines and less. THE IDEA One day I was launching my 2-stage Beta - a very small, light, mini-engine rocket. I first launched just the upper stage on an A engine. Next, I launched it with a 1/2A booster and an A upper stage engine. The booster only took the rocket up about 30 feet before it lit the upper stage and separated. I was amazed to see the upper stage go considerably higher than the previous flight - a lot more than 30 feet higher. Then I realized that a good part of an engine's thrust is used just to get the rocket moving and up to a reasonable speed. If a rocket is already moving, then the engine will send it far higher. This must hold doubly true for larger, heavier rockets that use a large part of their thrust just to get off of the pad. So, if I could come up with a way to help a heavy rocket accelerate off of the pad, perhaps the engine would have more thrust available to take the rocket higher. I started thinking about what an accelerator might look like and how it might work. While watching a program on amusement park rides, I saw a bungee launcher - sort of the opposite of bungee jumping. Two towers pointed skyward. A bungee cord was attached to each tower and to a cage. The cage was pulled down between the towers and loaded with "passengers". When the cage is released, it shoots skyward - much like in an ejection seat of a jet fighter. In an instant, I had my concept for an elastic rocket accelerator. I would built two towers with the launch pad between them. I'd use rubber bands to provide a very rapid acceleration. (It has to be faster than the engine to do any good.) I'd attach the rubber bands to a cradle or saddle that would be positioned under the rocket. As long as the rubber bands pull the saddle faster than the rocket engine pushes the rocket, it should work. THE CONSTRUCTION One of my first problems was to figure out how to hold down the launch pad, since the rubber bands would want to lift it off of the ground. I thought about anchoring the launch pad legs with stakes, but I was concerned that they might come loose - or that the force of the rubber bands might even break the plastic legs. Since one of the strongest parts of the launch pad is the steel blast deflector, I decided to use it to hold the launch pad down. I would add some supports for the blast deflector between the two towers. Now I needed to figure out how to secure the saddle in the "armed" position. Whatever I picked needed to release the saddle the instant that the engine lit. If it released before the engine lit, then it could pull out the igniter or disconnect the clips and make for a pretty short flight. If it didn't release immediately and a gap formed between the saddle and the rocket, the saddle would slam into the rocket and most certainly damage it. I needed to have the initial engine thrust activate the launch accelerator. I attached two cup hooks to the blast deflector and ran a length of sewing thread between them. The thread is strong enough to secure the saddle and would run directly below the engine nozzle. The hot thrust would instantly burn the thread, which would immediately release the saddle. The rocket would have some pretty good acceleration off the pad. I hope.
THE EXPERIMENT To test my concept, I decided that I'd conduct some launch experiments with a smaller rocket that also has slow take-offs - the Big Bertha. My plan was to do a number of launches with and without the elastic rocket accelerator and measure the maximum altitude of each launch. If it helped the Big Bertha to considerably higher altitudes, I figured it would also work on my "big" rockets. Once I had the entire system assembled, I wasn't sure just how much "ummpph" the accelerator would provide. I was concerned that the rocket might not even leave the pad or might bind on the launch rod, or that that any of a number of things might go wrong. I decided to do a "cold launch". I stretched out the rubber bands and secured the saddle with the thread. I put a C6-5 engine in the Big Bertha to simulate launch weight and slid her down onto the launch rod.
Then, using a hobby knife, I cut the thread. In a fraction of a second the rocket not only left the pad, it crashed into the ceiling 8 feet overhead. It hit the ceiling with enough force to break loose the engine hook and drive the engine up into the engine mount tube. Luckily, there wasn't a (noticeable) dent in the ceiling. Yeah, it has quite a bit of "ummpph"!
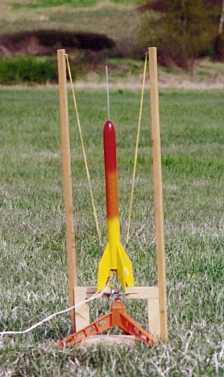
September 7, 2001 My daughter and I loaded up the car with the rocket accelerator and a few rockets. We had to wait an hour for the winds to die down, but then we launched both the Big Bertha on B4-4's and the Shadow on D12-3's. Here are the results:
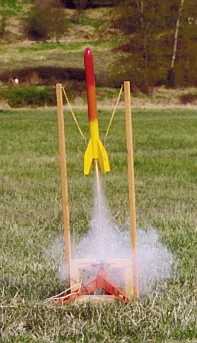
When we were launching the rockets, I could tell that they were flying noticeably higher, but what also caught my attention was how stable they were. Even in a slight breeze, the Shadow flew arrow-straight - which it would rarely do without the extra boost. The Big Bertha also weathercocked only very slightly into the breeze. The fact that they were traveling so much faster before they left the launch rod was certainly creating that added stability. CONCLUSIONS: The elastic rocket accelerator was intended to get my bigger rockets to fly higher. It certainly did that. As an added bonus, it also made them more stable. I'd have to say that this experiment was a success. It was a lot of fun and it also ended up being a real attention-getter.
*************************************************************************************************** This page was created: April 3, 2001 Modified: April 3, 2001 Modified: August 18, 2001 Modified: September 7, 2001 I welcome comments from viewers of my pages. Feel free to send me an email: [email protected]
|