 |
| All of these tutorials were created by me, Michelle L. Carter, copyrighted to MLC Creations, any similarity to any other tutorials out there are purely coincidental. Please link back to me if you use any of my tutorials for message boards, groups, websites, etc. Please do not copy or alter the tutorial in any way or attempt to portray it as your own if you use it. Thank you very much and enjoy the site! Michelle L. Carter, MLC Creations [email protected] |
| Animation Bead Names |
| Needed: Animation Shop Paint Shop Pro (I use PSP X) What You Are Making: |
 |
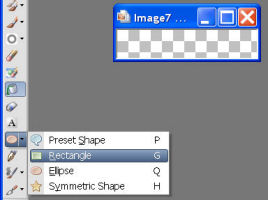
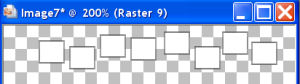
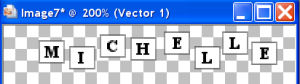
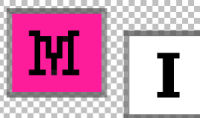
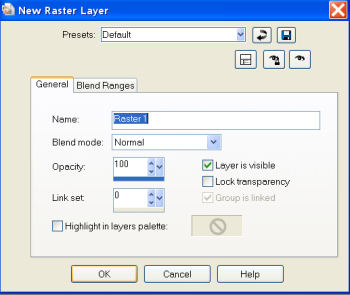
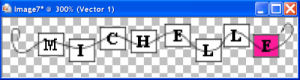
| Open a new image (File --> New), size 200 X 40, transparent checked, raster background marked. Click on your foreground color and change to black and change your background color to white in your materials palette. Over on the left toolbar, click on your preset shape tool, change it to rectangle. Use the following settings on your top tool bar. Using the transparent squares as a guide, draw out a square that is approximately the same size. You will now have a white box with a black border. Over on your layer palette (on the right side of the screen), right click on Vector 1 (your box), and convert to raster layer. Going back to your box, on your keyboard push CTRL+C (to copy) and then CTRL+L (to paste as a new layer). You will now have 2 boxes. Arrange the boxes next to eachother however you'd like and then repeat CTRL+L and lining up the boxes until you have one box for every letter of your name. I like to arrange them a bit uneven for more visual effect but you can also just make them straight across if you'd like. This image is zoomed in at 200% for you to see it more easily so that's why my boxes aren't the same size as my background right now, so don't worry about that! After you get all the boxes the way you'd like, merge visible (Layers-->Merge--->Merge Visible). Now click on your text tool on the left side of the screen (the letter A with a square around it). You might have to zoom in on the boxes to see them better (Usually about 200% or higher). And use the font of your choice. Times New Roman works the best and is easy to clean up and fit in the box. Font size needs to be a 3 or 4 depending on how big your boxes are. I'm using a size 4. Change your foreground color to null (click on the no smoking sign under the box) and your background color to black. Click inside the first box, put your caps lock button on, on your keyboard, type your first letter and click ok. It should have created a new vector layer on the right side of your screen in the layer palette. It also should put a box around your first letter. Move the letter to the center of the box. Now click inside the 2nd box and type your next letter and move it to the center of the box. Continue doing this until you have filled each box with a letter of your name. It now should look something like this. Now merge visible again (Layers-->Merge-->Merge Visible). Now for the tedious part! Zoom WAY in on your boxes (I do 1500%). Click on your paintbrush tool (on the left side of your screen), set it to size 1 or 2, and change your foreground color to white and go around each letter to tidy them up a bit. I like to also take change my foreground color to black after I'm done with the white and go over the letters so the whole thing is black and stands out really well. After you get each letter and box cleaned up so the letters and such are nice and crisp, go over to your layer palette, right click on your merged layer and duplicate it. Repeat this step until you have one layer for every letter of your name. My name has 8 letters so when I'm done, I should have 8 layers. Click on the first layer (at the very bottom of the layer palette) so it's highlighted. Now right click on it go to View-->Current Only. Now all your layers except this one should be hidden. Now on your image, zoom into the first letter, change your foreground color to whatever color you want to use to animate each box. I am using hot pink (#fc1e9b). Now still using your paintbrush tool set to size 1 or 2, fill in the first letter box surrounding the black letter with the color of your choice. So it should look about like this. Now hide the layer you are working on by clicking the little eye on your layer palette next to that layer. Move up one layer and click on the eye next to it to unhide that layer (all the other layers should still be hidden, including the one below it). Now do the same thing with your paintbrush to the 2nd box that you did to the first box on the first layer. Repeat these steps until you have filled in one box on each layer so that they move across your name. It's tedious but one of the smoothest looking and easiest ways to do it! After you have finished doing that add a new raster layer by going to Layers-->New Raster Layer. Use the following settings. Now find your pen tool on the left side toolbar. It's usually right below your preset shape tool. It usually looks like an old fashion pen top or head. Use the following settings in your top toolbar for your pen tool. Change your foreground color to black and set your background color as null. Now on your image draw a curvy line going through each bead (used as your string) in anyway you want! It should now look about like this. Now over on your layer palette click on the string layer (Vector 1) and right click on it go to Arrange-->Send To Bottom. The string should now be BEHIND your boxes. Now right click on Vector 1 again (your string layer) and go to View-->Current Only. Now right click on your Vector 1 layer again and go to duplicate. Duplicate this layer as many times as letters in your name. For me I would duplicate 7 times to make 8 string layers. Click on the Vector 1 Layer again (the very bottom one) and right click and go to View-->Current Only again just to make sure it's the only one visible. Now find your layer named Merged and click on the eye next to it to make it visible. So the only 2 things visible should be Merged and Vector 1. Now right click on Vector one and go to Merge-->Merge Visible. Now those 2 layers are merged. Hide that layer that you just merged by clicking the eye. Now go up one layer, unhide it by clicking the eye, find the next merged layer and unhide it, now merge these 2 together, then hide that layer. Keep doing this until you have merged one string layer and one colored letter layer together to make only 8 layers at the end. Now right click on any layer in your layer palette, go to View-->All. Now go to File-->Save As. When the box pops up type in anibeadsPSP for the file name. As the file type, find the one that says PSP Animation Shop (*.psp) and click on it. Then click Save. Make sure you save it to a place you can find it when you open it in Animation Shop. Now let's move to Animation Shop. Go to File-->Open. Find anibeadsPSP and open it. If you aren't already using it, click on the pointer tool (it looks like an arrow). Click on the first frame of your animation and hit CTRL+A and it will select all the frames. Now hit ALT+enter and type 25 into the box and click ok. Now go to View-->Animation. It should look something like this. Click on the crop tool, then click the options button. Click Surround the Opaque Area and then click ok. Now click the button that says Crop. Now save your file as whatever you want (it should automatically be in .gif mode but if it's not, change it). Now share your file wherever you want! You can put it on your MySpace page, message boards, signatures, etc. Here's some more I made. You can make them in whatever shaped beads you want, and whatever colors. I have given you the basic know-how to create them however you want! Good luck and remember to have fun!!! |
 |
 |
 |
 |
 |
 |
 |
 |
 |
|
|


 |