JJ Robinson's Torque Tutorial 1!
Now, we need to load the model and its animation sequence into the game engine, and tell the
engine how to run the sequence. We will load the model with the Torque World Builder, and
activate the animation with a simple script.
Step 2: Write scripts to execute animation
Go to ...torque\example\starter.fps\server\scripts, open "game.cs", and find the function
onServerCreated(). Add the following exec statement to the list of exec's in this method:
function onServerCreated()
{
[clip]
exec("./baker_test1.cs"); //load script to animate exported test model: JJR2
[clip]
}
I added mine to the end of the list to be sure the necessary resources were loaded before the
model. This loads the animation as the server starts. This script causes the model to function
as a Static object---not moving along a path as a whole, although performing an animated
movement while sitting in one place.
Now we need to create the animation script for the server to load. I called mine
"baker_test1.cs", placed in the \scripts folder with the "game.cs". Here are the contents of
the script file:
datablock StaticShapeData(baker_test1)
{
category = "Static Shape";
shapeFile = "./Baker_test1/baker_test1.dts";
};
function baker_test1::onAdd(%this,%obj)
{
%obj.playThread(0,"talk");
echo("Adding Talk Thread");
}
This assumes that my *.dts and the texture file are in ...torque\example\starter.fps\server
\scripts\Baker_test1. The included animation sequence is called "talk".
Step 3: Load the Model into the Torque Demo
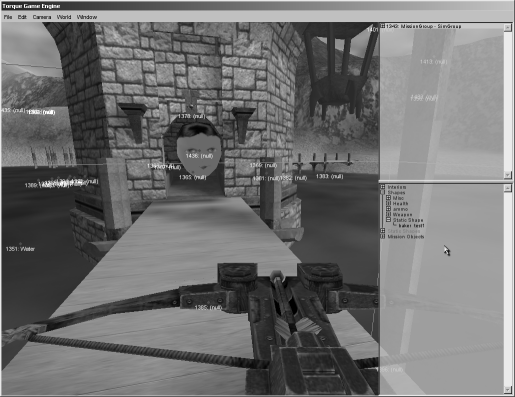
Start the Torque Demo, and load a mission. Select F11 to start the World Builder, then
Window->World Editor Creator so we can place the new object:
Under the World menu, you will see a list of options for where the object will drop when you
select it into the world. Experiment to see how these options work, but select one for now.
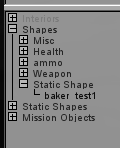
Expand "Static Shapes" in the lower right-hand pane, and find the name of our new model in the
list:
 When the model is selected, it should appear in the world---somewhere:
 Depending on the drop option you chose, you might have to look for it. Now select File->Save
As to save a copy ofyour new mission ( you should keep the original mission clean for reference
). Select F11 to close the Builder and return to the game. Trot over to where you placed the
model:
Depending on the drop option you chose, you might have to look for it. Now select File->Save
As to save a copy ofyour new mission ( you should keep the original mission clean for reference
). Select F11 to close the Builder and return to the game. Trot over to where you placed the
model:
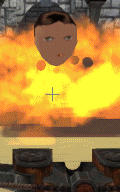
 You should find the model where you put it, with the animation sequence running as a continuous
ambient (non-triggered) motion. In this case, an early Baker is going to yak constantly as
long as the mission runs. Note that the model will stop you from moving through it, but
weapons fire will pass through it unimpeded. I haven't tried to include a collision mesh yet.
So that's the basics of getting a simple animation into the game demo. I'll try to expand on
this basic tutorial in future installments.
You should find the model where you put it, with the animation sequence running as a continuous
ambient (non-triggered) motion. In this case, an early Baker is going to yak constantly as
long as the mission runs. Note that the model will stop you from moving through it, but
weapons fire will pass through it unimpeded. I haven't tried to include a collision mesh yet.
So that's the basics of getting a simple animation into the game demo. I'll try to expand on
this basic tutorial in future installments.
Links:
Kevin Harris' tutorials for loading static shapes: http://www.codesampler.com/source/trq_tutorial_base.zip
http://www.codesampler.com/source/trq_static_shapes.htm
"Ambient Animations with the StaticShape Class" by Tim Gift:
http://www.garagegames.com/index.php?sec=mg&mod=resource&page=view&qid=1522
Note: All copyrighted material referred to here is the property of the holders of the respective copyrights.
All other artwork, computer program code, and material on these pages is copyright, JJ Robinson II, 1998-2006