9-14-2004: Complete construction article coming soon---
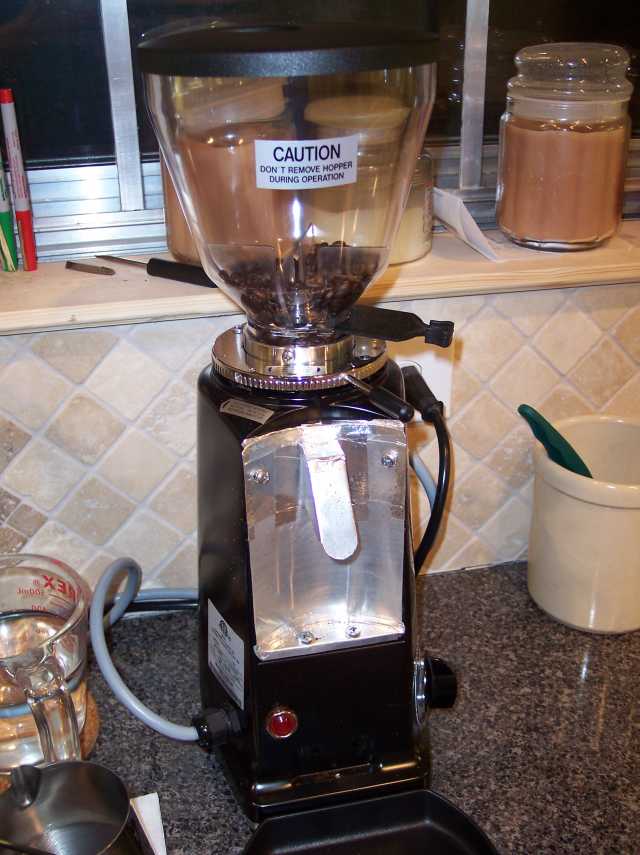
8-13-2006: Doserless Modification for the Mazzer Mini
The �Mini� is definitely the grinder to go to when you reach the level of coffee �appreciation� where you need to
essentially machine your coffee to the specified size more than just grind it. Unfortunately, the machine�s
commercial heritage results in a doser which is, frankly, impractical for home use. I would have to grind just about
the entire batch output of my I-Roast just to fill the doser to a level where it would function properly. The Mini also
has a well-documented quirk that causes the doser to shoot the coffee to the left when you trigger the lever.
The best solution would be for the manufacturer to offer a doserless option, but the company
hasn't seen the need provide this option for home users so far.
I�ve seen a couple of efforts at "Mini" doserless modifications, but they seem to all require butchering at least
some of the original parts, which is unacceptable to many of us. I finally came up with this modification, which
requires no irreversible changes to the original machine, allows reliable dispensing of coffee at all grind levels,
and prevents the grounds from entering the motor housing. It is patterned after commercial bag filler spouts I�ve
seen, and I�ve been using it for a couple of years. I can�t promise, of course, that none of this will void your
warranty, or take responsibility for any other consequences of mod�ing your Mazzer whatsoever.
The doserless adapter is fabricated from an annealed aluminum sheet used for flashing, a soft aluminum tape
with adhesive backing, and the screws from the original doser. The materials are readily available in the U.S.
from large hardware outlets. I scrubbed the aluminum sheet thoroughly with an abrasive pad and cleanser,
followed by soap, and rinsed it completely. I checked the MSDS on the tape, sold as flue tape, and found that
the adhesive was basically a rubber compound and contained nothing rated as harmful. Cut the tape into strips
about �� wide. The completely ductile metal strips can be worked into compound curves and seams with a
little determination.
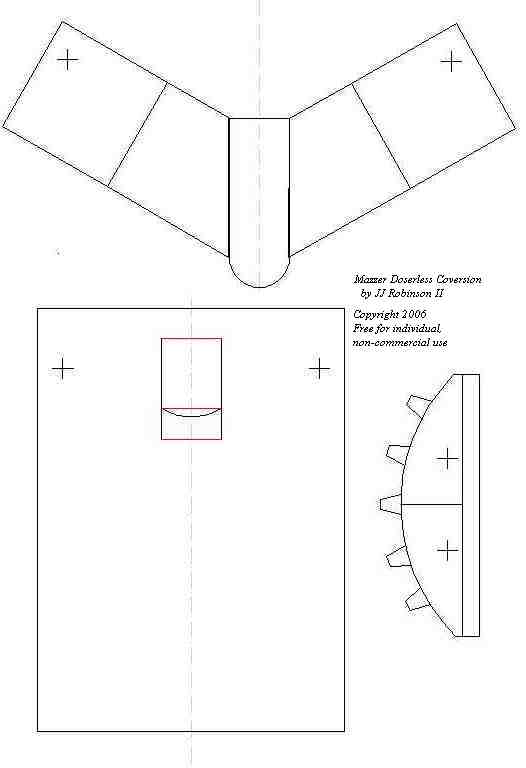
See the photos for a folding and assembly guide. Right-click on the pattern image and save to your disc.
Open in your usual image editor and print the pattern sheet to an 8.5�x11� sheet of paper (It needs to be full size, 1:1,
to work). It can be lightly coated with 3M 77 or similar spray adhesive and tacked on the aluminum sheet. The
patterns can then be cut out with regular scissors from the soft, thin aluminum along the outer edges of each.
Double-check the dimensions of the pattern against your Mazzer, and drill the holes (indicated by crosses) to
accept the original machine screws from the doser.
The rectangular area inside the motor cover should be cut only on the sides and the curve (the black lines) with
a stencil knife or something similar and folded along the red lines to form the top of the spout from the top part
and the jar lip from the bottom. The �butterfly�-shaped pattern is folded to form the front and walls of the spout
as in the photo.
The curved piece with the tabs on the right side of the drawing is for the bottom of the motor cover. Fold its
tabs �up�, and the straight lip �down�. Conform the rectangular piece of the motor cover to the curve formed
by the tabs, and fasten it with a strip of aluminum tape. Form the end tabs of the spout �butterfly�to fit the curve
of the motor cover, line up the screw holes, and bolt the assembly to the grinder in the locations where the doser
was fastened. Secure the �butterfly� to the motor cover with tape along the top and bottom edges. Tape the
top of the spout to the sides and front. You may want the trim the motor cover to the shape of the grinder shell
and add more tape to ensure that the ground coffee stays out of the motor housing.
After each use, I can usually pump the hopper lip up and down a few times to blow most of the built-up coffee
out of the grinder�s exit chute. During periodic cleaning, you can brush (or blow out with canned air, etc.)
excess grounds out the spout and exit chute from the inside. It would be nice to eventually come up with some
sort of hinged spout to facilitate brushing the grounds out, but the added complication may not be worth it.
Let me know if you run into problems with the basic design or if you come up with ideas for improvements.
Best of luck! JJR2
 I�ve seen a couple of efforts at "Mini" doserless modifications, but they seem to all require butchering at least
some of the original parts, which is unacceptable to many of us. I finally came up with this modification, which
requires no irreversible changes to the original machine, allows reliable dispensing of coffee at all grind levels,
and prevents the grounds from entering the motor housing. It is patterned after commercial bag filler spouts I�ve
seen, and I�ve been using it for a couple of years. I can�t promise, of course, that none of this will void your
warranty, or take responsibility for any other consequences of mod�ing your Mazzer whatsoever.
The doserless adapter is fabricated from an annealed aluminum sheet used for flashing, a soft aluminum tape
with adhesive backing, and the screws from the original doser. The materials are readily available in the U.S.
from large hardware outlets. I scrubbed the aluminum sheet thoroughly with an abrasive pad and cleanser,
followed by soap, and rinsed it completely. I checked the MSDS on the tape, sold as flue tape, and found that
the adhesive was basically a rubber compound and contained nothing rated as harmful. Cut the tape into strips
about �� wide. The completely ductile metal strips can be worked into compound curves and seams with a
little determination.
See the photos for a folding and assembly guide. Right-click on the pattern image and save to your disc.
I�ve seen a couple of efforts at "Mini" doserless modifications, but they seem to all require butchering at least
some of the original parts, which is unacceptable to many of us. I finally came up with this modification, which
requires no irreversible changes to the original machine, allows reliable dispensing of coffee at all grind levels,
and prevents the grounds from entering the motor housing. It is patterned after commercial bag filler spouts I�ve
seen, and I�ve been using it for a couple of years. I can�t promise, of course, that none of this will void your
warranty, or take responsibility for any other consequences of mod�ing your Mazzer whatsoever.
The doserless adapter is fabricated from an annealed aluminum sheet used for flashing, a soft aluminum tape
with adhesive backing, and the screws from the original doser. The materials are readily available in the U.S.
from large hardware outlets. I scrubbed the aluminum sheet thoroughly with an abrasive pad and cleanser,
followed by soap, and rinsed it completely. I checked the MSDS on the tape, sold as flue tape, and found that
the adhesive was basically a rubber compound and contained nothing rated as harmful. Cut the tape into strips
about �� wide. The completely ductile metal strips can be worked into compound curves and seams with a
little determination.
See the photos for a folding and assembly guide. Right-click on the pattern image and save to your disc.
 Open in your usual image editor and print the pattern sheet to an 8.5�x11� sheet of paper (It needs to be full size, 1:1,
to work). It can be lightly coated with 3M 77 or similar spray adhesive and tacked on the aluminum sheet. The
patterns can then be cut out with regular scissors from the soft, thin aluminum along the outer edges of each.
Double-check the dimensions of the pattern against your Mazzer, and drill the holes (indicated by crosses) to
accept the original machine screws from the doser.
The rectangular area inside the motor cover should be cut only on the sides and the curve (the black lines) with
a stencil knife or something similar and folded along the red lines to form the top of the spout from the top part
and the jar lip from the bottom. The �butterfly�-shaped pattern is folded to form the front and walls of the spout
as in the photo.
The curved piece with the tabs on the right side of the drawing is for the bottom of the motor cover. Fold its
tabs �up�, and the straight lip �down�. Conform the rectangular piece of the motor cover to the curve formed
by the tabs, and fasten it with a strip of aluminum tape. Form the end tabs of the spout �butterfly�to fit the curve
of the motor cover, line up the screw holes, and bolt the assembly to the grinder in the locations where the doser
was fastened. Secure the �butterfly� to the motor cover with tape along the top and bottom edges. Tape the
top of the spout to the sides and front. You may want the trim the motor cover to the shape of the grinder shell
and add more tape to ensure that the ground coffee stays out of the motor housing.
After each use, I can usually pump the hopper lip up and down a few times to blow most of the built-up coffee
out of the grinder�s exit chute. During periodic cleaning, you can brush (or blow out with canned air, etc.)
excess grounds out the spout and exit chute from the inside. It would be nice to eventually come up with some
sort of hinged spout to facilitate brushing the grounds out, but the added complication may not be worth it.
Let me know if you run into problems with the basic design or if you come up with ideas for improvements.
Best of luck! JJR2
Open in your usual image editor and print the pattern sheet to an 8.5�x11� sheet of paper (It needs to be full size, 1:1,
to work). It can be lightly coated with 3M 77 or similar spray adhesive and tacked on the aluminum sheet. The
patterns can then be cut out with regular scissors from the soft, thin aluminum along the outer edges of each.
Double-check the dimensions of the pattern against your Mazzer, and drill the holes (indicated by crosses) to
accept the original machine screws from the doser.
The rectangular area inside the motor cover should be cut only on the sides and the curve (the black lines) with
a stencil knife or something similar and folded along the red lines to form the top of the spout from the top part
and the jar lip from the bottom. The �butterfly�-shaped pattern is folded to form the front and walls of the spout
as in the photo.
The curved piece with the tabs on the right side of the drawing is for the bottom of the motor cover. Fold its
tabs �up�, and the straight lip �down�. Conform the rectangular piece of the motor cover to the curve formed
by the tabs, and fasten it with a strip of aluminum tape. Form the end tabs of the spout �butterfly�to fit the curve
of the motor cover, line up the screw holes, and bolt the assembly to the grinder in the locations where the doser
was fastened. Secure the �butterfly� to the motor cover with tape along the top and bottom edges. Tape the
top of the spout to the sides and front. You may want the trim the motor cover to the shape of the grinder shell
and add more tape to ensure that the ground coffee stays out of the motor housing.
After each use, I can usually pump the hopper lip up and down a few times to blow most of the built-up coffee
out of the grinder�s exit chute. During periodic cleaning, you can brush (or blow out with canned air, etc.)
excess grounds out the spout and exit chute from the inside. It would be nice to eventually come up with some
sort of hinged spout to facilitate brushing the grounds out, but the added complication may not be worth it.
Let me know if you run into problems with the basic design or if you come up with ideas for improvements.
Best of luck! JJR2
