Charred Dirt v.99c Map Editor Helper
Author: crazy_wombat
I wrote this after my own challenges with learning to use the CD editor. I hope it helps anyone else who is new to CD map making to
avoid my troubles.
Table of contents.
1 Basic Overview
2 Foregrounds
3 Backgrounds
4 Inside the Editor
5 Known Problems
6 Errata
1 Basic Overview.
Charred Dirt v.99c(also known as v1.00) has a built in level editor. The makers of the game felt that they
the included levels in the game should be sufficient for most gamers, but if someone felt that it needed
more, then they could make their own.(I made this statement based on my interpretation of several postings
on the CD Forum) I found out about CD during v.90 and have enjoyed it since. When v.99c came out, I
also learned of the editor that was included. After much trial and error, and even more help from those on
the forums, I managed to crunch out my first level. This help file is a place for me to share the lessons I
learned since then.
In order to design a level for CD you need the following things:
A working copy of CD v.99c,
Any graphic editing program that can make bitmaps
As I am most familiar with Adobe Photoshop 7.0, and that is what I used to make my own levels, then that
is what I will use in my examples. To access the built in level editor in CD, open CD, and at the main
screen press and hold ALT. In the place of multiplayer, a new option, EDITOR, will appear. Click on it to
open the editor. However, most of your level editing will happen before you ever go to the level editor.
2 Foregrounds.
Without a doubt, the biggest trouble I had was figuring out how to make the foreground right. CD uses to
.bpm's for every level. The foreground is the front level, and represents all of the dirt in the level. This dirt
is where the tanks rest, has its own gravity settings, and is destroyable in the game. The foreground affects
all of the strategy for a level. For example, if there is a large level area in your map, direct fire (i.e. railgun,
ect.) weapons will earn the most kills, where as if there is a large mountain, weapons with a ballistic
trajectory (i.e. nukes, ect.) will be more in order. Maps with water play different also. While water isn't
added to the .bmp, you do need to plan on it location while setting up the foreground bitmap. Water rolls
downhill, unless water gravity is turned off, so it collects in any low points you setup for it. On any map,
the foreground has empty space above, so projectiles can fly, and the background can be seen behind it. To
make an area of the foreground transparent it needs to be pure pink (225,000,225; or FF00FF).
Example Foreground:

3 Backgrounds.
The background is the picture behind the foreground. It has little effect on game play, but makes for a
more enjoyable level. If no contrasting colors are used, it is difficult to tell the difference between the
foreground and background. This can make the level less fun for some, but more challenging for others.
As the foreground is shot away, more of the background is exposed, so keep that in mind.
Example Background:

4 Inside the Editor.
Once you have your foreground and background set up, you need to turn them into a level.
When you first open the editor, it looks like this:
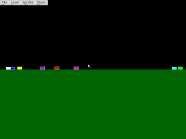
the black is the default, nonexistent background. The dark green is the default foreground. The little
multicolor rectangles are the spawn points for the tanks. Click on the level dropdown menu to find the
menu items to set the foreground and background picture. You can also find the menu item to set the level
gravity and wall type. The sprites menu lets you add and remove different sprites.
To add water, press and hold the W key and click where you want the water added. A little trial and error
will let you get the hang of this. When you add your foreground, you will notice that everywhere that was
pure pink is transparent now, and you can see the background through it.
5 Know Problems.
CD v.99c has a bug where in any level with tank gravity turned off will freeze after the first turn. To
prevent this, don't turn off tank gravity.
6 Errata.
Out of personal curiosity, I set up this map to help me to know what angled slopes tanks would slide down.
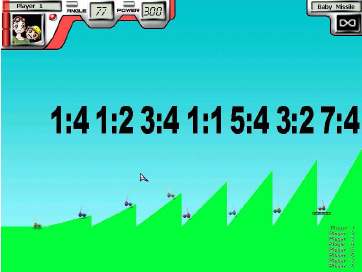
all of the tanks started at the top(right) side of their own hill.
As you can see, any angle steeper than 45 degrees (1:1) will cause the tanks to slide.