M3 mirrors installation
Warning: This procedure worked for me, but was not flawless. In the end, this is what I ended up doing, but after lots of wrong turns... Hopefully this experience will be hedeache-free (otherwise I would'nt have posted it) for you. I am in no way responsible if anything goes wrong while you are doing it. Read the entire procedure before begining and organise all your tools and materials.
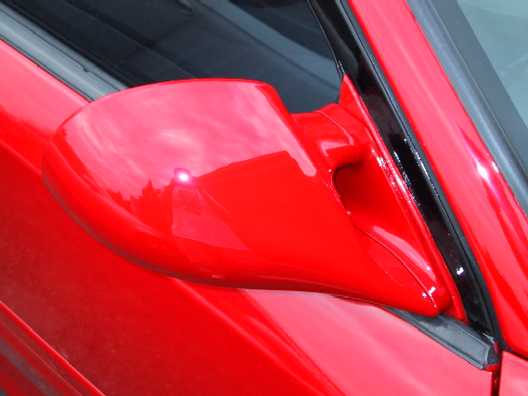
This what your mirror should look like once it is installed:
Ingredients:
-Ractive M3 style mirrors by Toucan Industries (others may be used as weel , but these were the ones I used)
-Material for the mounitng plate (find a material that is very strong, but easy to manipulate and preferably between 1/4" and 1/2" thick... I used the urethane from my stock bumper. Acrylic and fiberglass will not work.)
-6 (3 per mirror) small metal screws (meant for metal)
-6 (3 per mirror) small to medium sized bolts (measure the thickness of your material and the window frame plate it will be going through -- see below) and applicable nuts
-Silicone adhesive (interior / exterior)
-Drill, appropriately sized bits (see below for details) and a countersinking bit
-1 permanent marker (or any writing device that will write on the material you will be using)
-Measuring tape or a ruler
Step One: Making the mounting plate.
Using one of the stock mirors as a stencil, trace the outline of your plate on your sheet of material. Next, cut it out and trim the edges until it is the right shape. Place it where it will go on the car and make sure it's the right size and shape. I would suggest, for asthetics, to try and round off all outside edges.
Step Two: Drilling the mounting holes.
This part requires some creativity on your part. Figure out how you would like to place your mirrors (angles, height, etc.) Then, mark the outline of the mirror on the mounting plate. Next, measure the distance from the screw hole to the edge of the mirror for each of the 3 holes. Transfer each mark onto the mounting plate. Drill pilot holes in the mouting plate , then counersink them so the head of the screw will clear when the mounting plate is flush with the window frame plate. Next, drill three holes in the mounting plate in the area in the middle of the back of the mirror where there is an open space (hopefully this is clear if you are looking at the mirror...). Use these holes in the mounting plate to drill your holes in the window frame plate. Make sure the mirror mounting plate is correctly alligned when doing this.
Step Three: Putting together the pieces.
Insert the three bolts into the three holes in the mounting plate. Secure them with silicone adhesive so that they will not slide in and out or rotate. Screw the mounting plate into the mirror through the countersunk pilot holes. Slide the mirror by the three bolts into the three holes in the window frame plate. Screw the nuts onto the bolts from inside the car and adjust your mirros for best visibility.
Step Four: Hiding the bolts.
If your bolts are the right length, you should be able to re-install the stock interior cover that comes with power windows (I cannopt be sure that the stock mounting plates will fit because mine were stolen with my tweeters, so hopefully they will..:). Otherwise, a creative way of covering it is a good idea. I plan on making a custom tweeter enclosure to cover up the bolts. It is also important to make sure that the bolts are not too long as they will block the door panel from coming on or off... Measure twice, buy once!!
Good luck. This does require some finesse and ALOT of measuring so BE PATIENT. I hope it all works out as well for you as it did for me. For any questions, email me.