![]()
Anytime a component fails in a closed system, it tends to spread remains throughout the entire system. I have had 350 gallon hydraulic systems completely contaminated with pieces of filter, after the filter fell apart and went through the main gear pump - ugly! Large industrial systems have lots in common with MVAC and HVAC systems. Many times it is just not cost effective, or even possible to remove the contaminated item and clean it thoroughly. Removing a 50 horsepower electric motor just to get at a heat exchanger is sometimes easier than removing an evaporator from a late model car. Many times flushing in place is the only reasonable answer. At least with a car, you only have a few ounces of contaminated fluid.
First, why are we flushing? A conversion to different oil / refrigerant? A failed component? "Black Death"? (see my black death page for more info)
Let?s assume the worst, a compressor that ran until it seized, spreading bits of itself all the way back to it's own intake. First, we need to get some solvent into the system to help loosen the crud, old oil, etc. that is holding the metal chips in place. I prefer to do this several days before opening the system, and completing repairs. If you are not faced with a completely trashed and abused system, you could skip the WD40 part of this...
1) Several (6?) aerosol cans of light penetrating oil, WD40 or similar
2) Several (6?) aerosol cans of brake cleaner or degreaser. The non flammable type is preferred, but you can use the flammable stuff if you work outside, and use proper precautions. LPS brand HDX cleaner is my personal favorite for final cleaning of A/C components.
Here is how to do this
1) Evacuate the system, in compliance with your local regulations.
2) Disconnect the clutch wire(s), and remove the schraeder valves.
3) Using your side can tapper and your service hoses and gauges as shown in the picture, connect to your service port.
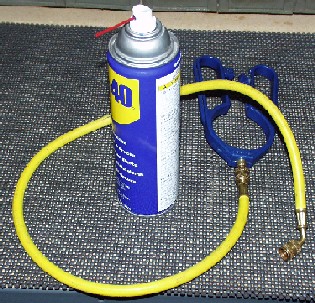
4) Almost any light oil / solvent is ok - WD40, JB80, LPS 1, etc. DO NOT use highly flammable solvents like carb cleaner for this job. Fill the system up. Don't be shy, find the highest port and soak the system internally.
5) Re-install the Schrader valves, and use the vehicle as you usually do.
Now for the next step you will need a couple of adapters, and a compressed air or gas source. Here are some photos of the adapters I seem to use the most.
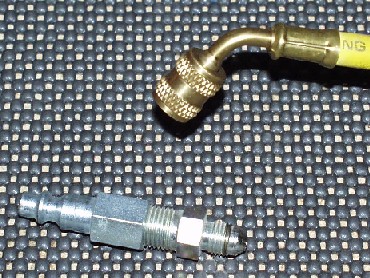
These were all made at the local hardware store without much fuss. Since you will not be building much pressure you can make whatever special fitting you need by simply sawing the end off of an old hose (or evaporator!) and using epoxy mate it with the necessary fitting.
Remove the Schrader valves CAREFULLY! THE SYSTEM MAY HAVE DEVELOPED PRESSURE!.
Now you are almost ready. Every vehicle is different, so use your imagination when deciding how to contain the crud you are about to blow out of your system. Depending on how your system is laid out you may have to disconnect lines at several places to blow out all of the filthy WD40 in your system. Make sure to connect a suitable hose to collect the crud for recycling as shown Secure the hose to the catch can. In practice, I like to keep as much of the high side together as I can, so if the compressor is equipped with a high side service fitting, I disconnect the high side line at the orifice tube, then blow into the service fitting. If your vehicle is equipped with a receiver drier in the high side remove it - no sense trying to flush it, since you will be replacing it. Standby for crud. Lots of it. If you did everything right, it is all in the catch can.
Now to remove the oil. Remember the 6 cans of brake cleaner you bought? That's right, break out the can tapper, and flush 1 whole can through the system. Follow up with a blast of air. Repeat the process until you are satisfied the condenser and lines are clear of oil and debris.
Remove the compressor and disconnect lines as needed to flush remaining components of the system. Don't bother trying to flush the accumulator on CCOT systems - just replace it. When flushing the evaporator, be sure to connect a hose to the catch can, or you might get a face full of crud. Use any combination of fittings and your imagination to thoroughly clean all of the components that can be cleaned. Remember, hoses with metal "cans" installed in their length should be replaced - that can is a filter or perhaps a muffler and cannot be adequately flushed. Flushing in the reverse direction of flow can sometimes dislodge stubborn stuff - flush in the flow direction first, then try in reverse to see if you get any more crud out.
Follow up the solvent flushing with compressed air, or inert gas. Some people prefer nitrogen, but eventually ALL of the non-condensing gasses must be removed before recharging the system. Once you are satisfied with the cleanliness of the system, make sure to plug and protect all openings from dirt. Rubber stoppers work well here, and I personally like to tape a plastic bag over the whole fitting until I am ready to re-assemble the system. Remember that when things are this clean there is nothing protecting the metal parts from corrosion - if the system will be open for more than a few hours you will need to take steps to protect your clean parts!
Remember the contaminated 350 gallon hydraulic system? Do you really think I tossed out 2500 bucks worth of oil??? Of course not! This is a pneumatic diaphram pump.

We use these in industry to pump all kinds of awful stuff. Air operated, and able to pass solids the size of a marble. I used this pump to move the contaminated oil into drums. Then the pump was hooked into the system, the system charged with 55 gallons of solvent (kerosene) and allowed to circulate for 2 days. The solvent was removed to a drum with the same pump. The oil was transferred from the storage drums with the diaphram pump, through a filter, back into the machine tank. Total man hours, 14. Hours required to R&R the heat exchanger 22. Ok, it took 2 extra days, but no labor.
How does this apply to A/C?? Easy. The pump in the picture is 8 years old, and has pumped thousands of gallons of stuff at 12 gallons per minute. Today it would cost about 300.00 to replace. A more reasonable size pump for MVAC or HVAC work would be a 3 gallon per minute pump like this:
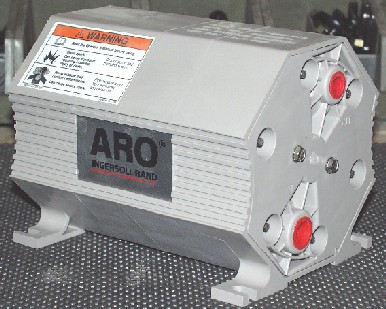
Made from Polypropylene and Teflon, it will pump virtually any solvent. At 50 psi it needs about 2 cfm of shop air. If you do a lot of dual air, rear air, busses, motorhomes, or HVACs at 5+ tons.... this is the way to go. For instance, on a rear air system in a van, you can circulate solvent at up to 100 psi for a couple of hours through the lines to the rear evaporator - all you need to make is a fitting to couple the low side line to the high side line back at the evaporator - sometimes just a piece of hose and a couple of clamps will do fine. A 5 gallon plastic bucket, a spin on oil filter bracket and you have a fine solvent flush system. My personal favorite for a filter assembly is the fuel filter from a VW Rabbit Diesel.
Simple, effective and cheap to operate. Many of you already have most of it laying in your junk boxes. Once you have a little pump like this around, you will use it continually. You can suck all of the fluid out of your automatic transmission in a few minutes - from the dipstick tube! The list is endless.
Don't forget to clean the outside of the condenser! a thin film of oil, road grime, dead bugs and dust can raise your discharge line temperatures 20 degrees f or more. Some serpentine condensers can hold more crud than you will believe. I prefer to soak a cold condenser with un-diluted simple green, then hose off with a low pressure hose. Do NOT use a high pressure washer for this - the high velocity water can bend the fine fins and actually trash your condenser!
![]()
 The rest of the STUFF...
 BLACK DEATH
TOOLS page
PAO Oil Specifications
A GREAT place to ask questions, and the BEST place to buy parts!
BACK to the HOME page
![]()
A completely clean system will always perform better
� 1997-2004 [email protected]
![]()