|
DOCUMENTATION ON CREATION OF ANIMATION, June 11, 2004 |
NOTE: This documentation is prepared with Photoshop 7 and Image Ready 7 as tools used for the implementation
of the following procedures.
|
TERMS :
|
|
Creation of Thumbnails There are 4 categories for the creation of thumbnails:
- For the creation of 82 x 82 GIF and 82 x 97 GIF, it is best to use the 128 x 128 PSD file of an application. Only the homepage image is needed for the thumbnails. Resize the homepage image to the appropriate size and save as GIF file. Do NOT forget to REMOVE the �Press 8 to continue� text. - For the creation of 82 x 56 GIF, it is beest to use the 96 x 65 PSD file. Resize the homepage image to the necessary file and save as a GIF file. Do NOT forget to REMOVE the �Press 8 to continue� text. - For the creation of 50 x 60 GIF thumbnaill, it is best to use the 96 x 56 PSD file. Only the �validated image� (not the homepage image) is needed for this marketing material. - Files are saved this way : [size]short ttitle ; except for the 50 x 60 GIF thumbnail, save it as short title only. - These thumbnails are saved to the folderr where the screenboards are saved. Hence, they are uploaded together to the folder where the screenboards will go. |
|
Creation of Boxsets Boxset templates are already available for mobile applications. Templates can be availed from the mobile web designers. 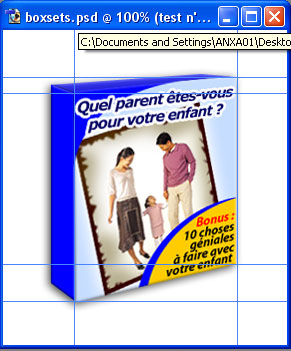 Series 60 (176 x 208) PSD homepage images are used to create boxset. It is best to create a �New Document from the current state�, change the color of the box, then flatten the image. Paste the homepage image of an application and skew the sides along the guides created. Resize the image to 110 x 115 . (It is best to resize the boxset along with an image from the mobile webpage to get the appropriate dimensions.) For TNP boxsets, the color of the �box� is similar to the border color of the homepage image. Other boxsets (QNP, LNP and PT) remain as what is in the template. NOTE : REMOVE the �Press 8 to continue� text and �anxa� logo. - Files are saved this way : bsw-[short tittle] ; save as GIF TERM : �New Document from the current state� is found at the bottom of the history toolbar. 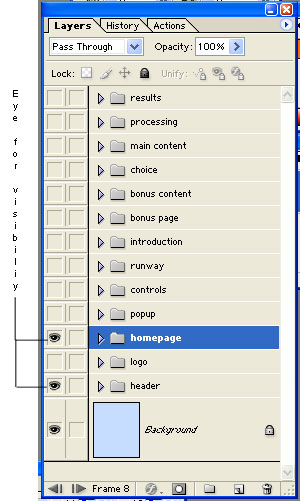 |
|
Creation of Animation The PSD files are used to create the animation due to their layer-by -ayer features, which would provide easy �turn on� and �turn off� visibility of layers once the PSD file is exported to Image Ready 7. ASSEMBLING THE ANIMATION In the Layers palette turn on visibility for the layer you want to use for the first frame of your animation and turn off visibility for other layers. (You can turn visibility on or off by clicking in the Eye column.) Open the Animation layer palette (Windows, Show Animation). You�ll find your currently active layer automatically designated as Frame 1. Open the Animation palette�s pop-up menu by clicking the triangle in the circle at the upper right corner of the palette. And choose Make Frames From Layers. This puts the layers into individual frames in the same order as they appear in the Layers palette. * Image Ready Animation layer palette  * Image Ready layer palette  ADJUSTING THE TIMING AND LOOPING By pointing the cursor over the time delay number at the bottom of and individual frame and dragging upward, you can choose a frame delay time for that frame � the amount of time that frame will be shows before the next one is displayed. Or select all the frames by Shift-clicking the final frame in the Animation�s palette, or by choosing Select All Frames from the palette�s pop-up menu, and then choose a time delay. By choosing the shortest delay (0.1 second) is the slowest rate that still produces fairly smooth animation. Use the pop-up list in the bottom left corner of the Animation palette to set the number of times the animation will play � Forever, Once, or a custom Other setting. PREVIEWING THE ANIMATION To see the animation running, click to the Optimized tab in the main working window and click the Play button (the triangle immediately to the right of the square Stop button) at the bottom of the Animation�s palette. If you see something that needs changing, go back to the appropriate palette or window and make the necessary changes. The animation will be updated to reflect the change. SAVING THE FILE When the animation is complete, choose File, Save Optimized As dialog box, choose Images Only as the format. This will save all the images of the animation as a single GIF format. - Animation files are saved this way : [sizze (e.g. 176, 128, 96)]-anim UPLOADING THE FILES The animation files are to the folder where the screenboards are saved. Hence, they are uploaded together to the folder where the screenboards will go. |

ANXA HEADQUARTERS : Suite 1201 South Center Tower Madrigal Business Park
Venture Street, Alabang, Muntinlupa, Philippines
Tel/Fax : (632) 8091402 E-mail : info.anxa.com