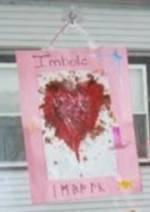
| Stained Glass Sun Catchers See picture to left, kylee made for Imbolc Materials: Wax paper, crayon shavings, old used scented candles shavings, colored string, yarn, or thread, lace, leaves, flower petals. To begin, have the child empty crayon shavings from their sharpener, or (adults only!) use a paring knife to create shavings. A cheese grater works great for large crayons. Arrange shavings, and any of the accessory items the child chooses and sandwich between two sheets of wax paper. Iron (adults, of course) the whole package on low setting, between two paper bags, just until the shavings melt. Cut the "stained glass" into shapes and hang them with string, in a sunny window. Put a construction paper frame around it, for a framed look. |
| Cardboard Candlesticks ( Great for younger kids that shouldn't have lit candles.) Turn paper tubes into candlesticks complete with shimmery flames. WHAT YOU NEED � Paper towel and tissue tubes � Glue � Acrylic paints � Gold foil wrapping paper Time needed: Under 1 Hour Set the tubes on end, then (here's the fun part) squirt blobs of white glue right from the bottle around the top of each one. Allow the glue to run down the sides to create a dripped-wax effect. Let the glue dry thorougly (it should look clear when it has.) Brush on a coat or two of paint over the dried glue, and again let the candlesticks dry completely. Cut a flame shape for each candle from a sheet of gold foil wrapping paper. Attach each flame to its candlestick by gluing or taping the lower edge to the inside of the painted tube. |
 |
 |
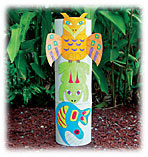
| Totem Poles Totem poles were first carved from cedar trees by the Native people of the Pacific Northwest. They are bold and colorful symbols of the identities and stories of the people who carved them. Totem poles can be compared to the Great Seals or Coats of Arms from other nations. WHAT YOU NEED 3 - 67 oz. NESQUIK canisters Masking tape 6 sheets of 8 1/2 by 11 inch white construction paper White copy paper Cellophane tape Safety scissors Crayons or colored markers HOW TO DO IT Wash and dry three empty NESQUIK canisters. Stack the three canisters and tape then together using masking tape. Overlap and tape together 2 sheets of construction paper so that it measures 20 inches long and 6 3/4 inches high. Repeat this so that you have 3 sheets. Wrap one of these sheets around each of the canisters. Tape to secure. Print the symbol templates onto white copy paper. This is the meaning of each of the symbols represented in this Totem Pole: Thunderbird -- Power, Leadership Frog -- Spring, New Life Fish -- Life, Protection Color each symbol with crayons or colored markers, and cut them out with safety scissors. Wrap one completed symbol around each canister, securing with a glue stick. See the diagram to show suggested stacking order. Place the two wings on either side of the Thunderbird figure, fold tabs back where indicated and secure with cellophane tape or craft glue. |
 |

|
 |
| More Crafts |