|
Wall Tutorial |
|
Tools: PaintShop Pro (for the purpose of this tutorial) Any images you would like to use |
| 1. Start off by opening Paintshop pro, and creating a new file 128w x 240h. |
| 2. Choose the texture you would like to use, Now copy it (ctrl + C) then paste it onto the wall file you created (ctrl + V), repeat this with all texture/s you wish to use. |
| 3. Now resize the textures so they look like they fit correctly |
| 4. Check to make sure everything is where you want it, and fix if needed using the arrow keys on the correct layers. The file should be saved as 256 colour bitmap, to do this go to Colours\increase or decrease colour depth\256 colours (8 bit). Then go to File/Save As, name it, select the HomeCrafter folder and name your wall. Save it as a .bmp file. |
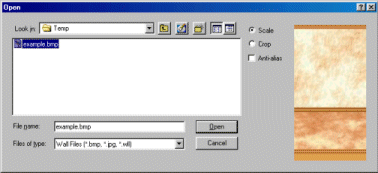
| 5. Now to Homecrafter, Open Homecrafter and click on the button with a disc and wall on. This will allow you to import your .bmp file.(pic.1) Find the file and import it. |
|
(pic.1) |
|
|
| 6. Click on the blue box at the bottom of the screen that says 'Click Here To Change'. Enter a name for your wall. Then enter a price from $1-99 and then a description. |
| 7. Click on the disk icon at the bottom left of the screen to save/export your wall. This will convert your original picture from .bmp into .wll ( the format used for the game) A dialog box appears asking you to save the file to your hard drive. If The Sims is installed, HomeCrafter saves the walls and floors to the game directory which allows you to select it in Build Mode. |
| Final note. If you want to share your work, the .wll will need to be extracted from the directory in which it was saved, Mega Sims will allow people to submit their work to the site, which will be posted up, and the creator given credit. |
|
Good Luck. And if you have any problems go to our forums and ask for help, or you can Email me @ [email protected] |
Copyright © 2001 Mega Sims