General Information on the Web: A good source of information about riding brevets and events was put together by the Seattle International Randonneuring (SIR) club. It is focused toward the new brevet rider and is a fairly comprehensive "how-to" guide on how brevets actually work.
A fun and comprehensive set of tips for PBP that has great photos and prose is at a site put together by Team Bikeaholics, a group of California riders.
Another set of tips about randonneuring was set up by John and Pamela Blayley at The Blayleys. Earlier writeups about PBP by Pamela Blayley were what interested me in randonneuring and PBP in the first place. I have never met either of them but would love to have the opportunity! Their page has a number of interesting looking writeups, ranging from ride reports to bike selection tips.
Finally, a fairly complete source of information is a new book that's been written by Ed Pavelka and Ed Burke, "The Complete Book of Long-Distance Cycling," published by Rodale, ISBN 1579541992. Amazon is carrying it as I write this for $17.95.
My own attempts at training and method have been somewhat hit-or-miss, although I'm trying to become more organized in my efforts. I'll try to go through some of my preparatory efforts, but the reader is advised to remember that I'm strictly an amateur.
Rain. PBP 2007 consisted of rain, rain, sporadic sunshine, and even more rain. I finally developed trench foot due to the many, many hours of wet feet. In the future I intend to use fenders on long brevets with likely rain.
At PBP in 2007 I used shoe covers to keep my feet warm in the rain; this resulted in my warm feet remaining wet long after the rain stopped due to continual spray from my wheels on the wet pavement. Eventually I developed severe pain in the balls of my feet, which was alleviated only by drying my feet out for several hours and massaging them. Although that worked, I would have preferred to spend those 5 hours sleeping instead of sitting by the side of the road rubbing my feet.
Although I did not have this particular problem, many riders suffered gastrointestinal issues alleged to have been caused by the manure occasionally encountered on the road. This manure (and everything else on the road) was sprayed up by their tires, coating their drinking bottles. When I finally cleaned up my bike a couple of weeks after PBP I found lots of straw and "gunk" crammed into every crevice of my bike.
If you come from a hill-challenged part of the country it would be advisable to ride every hill you can find. Don't just spin up them, either, but instead steadily power up them to develop strength. I have used fast club rides and high intensity spinning classes for training that helps, but it's hard to simulate the effects of riding up real live hills. You really have to work hard to build up the muscles necessary to ride up hills without losing large chunks of time that would be better spent sleeping.
SIR has one of the best profiles of PBP that I have seen: profile
Training. Training should consist of two basic elements: (1) stress, and (2) rest. If you have one without the other you don't get faster or stronger! Both are equally important and should be balanced. You don't get stronger by exercising--you get stronger by exercising and then resting so your body recovers and rebuilds, stronger than before. The stress part should include both high-intensity and long-slow-distance workouts. It's hard to ride a bike without climbing hills and encountering headwinds, just as it's hard to complete high-mileage rides without substantial time in the saddle, so prepare for both.
I try to apply the principles espoused in Joe Friel's "Cyclist's Training Bible" to randonneuring, combining long distance rides with shorter high-intensity workouts in a somewhat logical manner. The book is strongly oriented toward road-racing, however, so I have had to make some adaptations with regard to getting in the necessary long rides.
I'm working in higher intensity workouts to improve strength and capacity for work. This should help with endurance in the brevets by increasing my capability to do hillwork and fight headwinds, things that always seem present on rides. Intervals, relatively short stretches at high intensity, and hillwork aren't fun but seem to help.
I regularly take aerobics Spinning classes at a local gym to provide high-intensity workouts. This provides a good high-intensity workout that doesn't get rained out, frozen out, or canceled due to darkness. Parts of the spinning classes are downright goofy (our instructors like to do "jumps" that consist of moving from the saddle to standing and back on 1-beat intervals, over and over--annoying and doesn't do anything for you that I can tell) but much of it is good high intensity work.
I also ride long training rides on weekends. I try to work up to 200k distances one week in three, and reduce my training volume every third week as a recovery week. Of course, life gets in the way and holidays and business trips tend to skew my training, but I generally try to take 2 or 3 steps forward and then 1 step back so I don't get burned out.
I used to commute 10 miles per day (round trip) to work, which helped me to get in a small amount of saddle time and helped me to get outdoors even in the winter. I think this helps somewhat, especially when I am reduced to spinning classes) to stay comfortable on my bike when riding longer distances on the weekends.
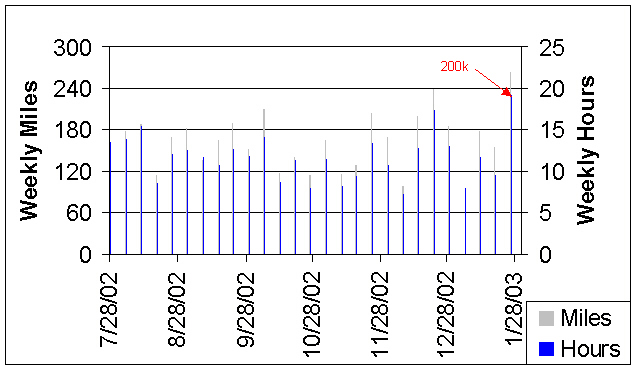
This graph from 2003 gives my mileage and training hours towards getting ready for the brevets and PBP. The hours include time spent in the gym lifting weights, and the miles include an estimate of 18 miles per hour for spinning classes.
Nutrition. Eating during rides is necessary to avoid bonking and failing to finish. You have to eat things that contain lots of calories and are easy to digest. I admit that I haven't completely solved this aspect of riding brevets, but I've had the most success while combining gels and energy drinks with some normal foods. Peanut butter and jelly sandwiches are wonderful under the right conditions, although not usually available in France!
The most important issue is that you have to prepare ahead of time: if you intend to follow a liquid-diet regimen in PBP, see if it works in the brevets. I can virtually guarantee that if you get sick of a food in a 600k ride you'll get _very_ sick of that food in a 1200k ride. Work out the kinks in the brevets--they're your preparatory steps. You'll need 8-10,000 calories a day in a 24-hour ride. If it's a multi-day ride you can't build up a caloric deficit and continue to ride.
Drinking. Drink until you pee, and then make sure your pee is clear. Tough, huh? I have bailed out of one ride when I didn't follow this strategy, and hurt severely on another when I simply couldn't drink enough. Hydrate fully the day before the ride, and drink during the ride before you're thirsty. A camelbak really helps me to drink enough water, because it keeps it nice and cool and makes it easy to reach. Others manage with just water bottles, though, so do what works for you. Of course, the Europeans managed to ride PBP while drinking wine and beer at the checkpoints so what do I know, anyway!
Lights. Headlights are tough because most of those available are set up for commuting. Brightness is great but if it craps out two or three hours into an all-night ride that isn't going to work. My lighting systems have continued to evolve as technological advances permit. On my PBP ride and brevets in 1999 I used a Cateye MicroHalogen II with an optional battery pack with 4 D-cells. That worked OK, but was heavy, wasn't very bright, and the battery pack occupied one of my bottle holders. For 2003 I used those same lights but powered them with 4 lithium AA's. They worked very well, with a white light that didn't fade as fast as when using alkaline AA's (lithium cells have a flatter discharge curve), and lasted 4 hours or so.
I have also had reasonably good luck using those same MicroHalogen lights powered by 6 AA-cells running through a Willie Hunt Lightbulb Voltage Regulator, but the setup was a bit more cumbersome with an external battery pack (although it's small). I did break a connection on this setup once (my connection broke, Willie Hunt's work was fine); make sure you have a backup light with any setup!
During the last few years (including PBP 2007) I have used a Schmidt hub generator with an E-6 lamp. This has provide good, consistent light that has always been there (except that one time when the bulb burned out....) This alternative is a little more expensive up-front but I greatly prefer it to battery-powered alternatives. One source is at Peter White Cycles. The Schmidt generator appears to be the best available, with really low drag (equivalent to a 3 ft climb every mile--negligible) while on and even lower when switched off. LED lamps have recently come out that reportedly provide better light and reliability when coupled with the Schmidt hub, and would be my first choice now.
Lighting Backups--I have always carried some sort of backup light, to deal with main lamp failures or the need for a light to deal with mechanical issues. I started out using a quarter-sized Photonlight II, which provided a minimal means of looking at my cycling computer, map, etc., while riding, and is also handy for those inevitable nighttime flats. I have since migrated to using an LED headlamps to more easily permit looking at a computer or map while riding. I use one that rotates downward, allowing me to direct the beam down at my handlebar area and avoid inadvertently blind any riding companions.
Rear lights are also required, although the choices are much easier here. Light weight, high visibility, and a choice of steady-mode are the critical aspects. The lightest weight units use AAA batteries, though, and may not have the long life and visibility of units that use two AA batteries. Almost all of the units available use LEDs for long battery life and reliability. A steady-burn mode is important--it can drive you crazy to follow someone with flashing LEDs all night (another consideration is that flashing LEDs are forbidden at PBP). LED units that hang on clothing or backpacks are not nearly as useful as those that mount on your bike. LEDs are directional and may not be bright enough to be readily visible if mounted incorrectly or hung off a backpack.
One final part of lighting is reflective gear. Reflective vests or sashes are required for all nighttime rides. Make sure yours is reflective when you lean over in a normal riding position, though, because you may not be nearly as bright as you think you are. Reflective ankle bands are one of the brightest and most noticeable pieces of gear (also lightest) and are requirements for rides in the US (see RUSA's rules).
A tantalizing bit of recent news concerns the adoption by the French of new visibility regulations. They appear to have a new standard for reflectivity that is required for all nighttime cycling. More to come, I'm sure, but it'll be interesting as PBP 2011 approaches and everyone scrambles to find something that meets the regulations!
Bicycle. The choice of a bicycle to ride in an ultra-distance event probably depends on your goals and riding style. I saw everything from the latest ultra-light carbon fiber bikes to a restored 1904 Pederson 3-speed with a wicker basket. I guess the only thing is that you should ride the brevets and many or most of your training miles on that particular bicycle to ensure that you're comfortable on it for the many hours of the ultimate event. I rode a 1990 Cannondale R400 in the 1999PBP, but have recently purchased a Waterford RS-22 for my distance riding (see Bicycle Hunt).
Make sure you know how to fix things that can go wrong! If you have integrated brakes & shifters, what will you do if they break? What about your chain? Have a chain tool and be able to use it (and if you're on a tandem, have a few spare links that fit your timing chain and perhaps spare tandem-length cables).
Aerobars are great things, but if they're not allowed on the event (PBP, for one) make sure you don't do all of your distance training while using them.
Tools and Spare Parts. If you carry all of this, make sure you have a plan for housing it on your bike (I used a Topeak seatpost rack and trunk in 1999, but have since used an SQR Tour (seatpost quick release) bag. Other riders carried much less or much more--it depends on your confidence in your equipment and your determination (or ability) to be able to fix broken bits and go on even if you have a failure.
My current SQR Tour bag has a 16 liter capacity that it manages to carry without shifting around even while standing to climb or sprint--if you need more room you're probably carrying too much. Many riders don't carry this much, but it's handy when it might be cold and wet, or hot (and you need to stash all of that gear needed for when it turns cold and wet):
Clothing. It can be quite cool in France, or rain most of the 3+ days. Although it was generally quite pleasant in 1999 and 2003 the weather was massively rainy in 2007. The temperatures have ranged from the mid 80s F to the low 40s F on those randonnees. By the ends of those ride I had more trouble staying warm and each time finished in lightweight tights. This is what I wore:
Arm warmers.
Drop Bag. I used RUSA's drop bag service (a joint effort between RUSA and Des Peres Travel). For $40-50 for each bag they used vans to carry small duffel bags to two locations along the course. You could give them one or two bags, but I used two. They stationed them at two different control points, so I had access to the two bags at 4 different times during the out-and-back event. My bags held:
I have largely made it through PBP by eating regular food at the rest stops, although drink mixes and energy packs provide a lot of my nutrition. In 1999 I carried a sports drink/supplement (Cytomax) but became nauseated by it after about a day or so. I violated one of the cardinal rules--test all equipment and food during the brevets--and tried something new in PBP, and suffered for it. I had tried it for rides up to a century in length without problem
I used Sustained Energy in '03 and Perpetuam in '07. Both have minimal taste and work for me even over long brevets. Not my favorite flavor but I can always drink them.
Water: I have used a 70 oz Camelbak bladder on all my PBP rides and almost all of my brevets. Even with the Camelbak I ran out on the first night of PBP '99--the 124 miles to the first stop was too far. I should have stopped in one of the villages to fill up or carried 2 additional bottles.
Energy packets: I have used GU, Gel Blocks, and energy bars to get me through the gaps between the controls. Tiresome but they fulfill a need for me.
Probably the easiest way to get to PBP and find a suitable hotel is through Des Peres Travel. Claus Claussen, the owner, has provided travel package/assistance for PBP since 1987. They set up around 500 Americans in 5 different hotels in St Quentin and the surrounding area in 1999. My wife and I weren't terribly thrilled with our hotel in Plaisir (the Gril) but most of the trip went fairly well. Their transfers via bus and truck helped reduce the problem of getting to St Quentin considerably, especially for non-French speaking travelers like us. The trip wasn't trouble-free, however, with a truck that was late arriving (and too small anyway) for the return trip to the airport.
Our hotel in Plaisir was about 10k from St Quentin, which means you have to ride a bus to get to the train station. No problem, except the buses stop running around 7 pm, requiring an early return or a taxi ride to get from the train station back to the hotel. The train station is pretty deserted in the evenings, and the taxi ride is started by standing at the taxi stand in the dark at the train station, usually alone. The hotel staff were friendly and worked hard at helping us. Many restaurants in Plaisir were closed (including the one in the hotel other than at breakfast) because of the August vacationing locals. The only grocery store is in St Quentin, part of an underground shopping center/mall. It's a bit hard to find at first, but go around past the back of the Campanile hotel and you'll eventually stumble across it. Very little shows above ground on the way from the train station, just some unsigned stairwells that lead into an underground parking garage. I'd recommend staying in St Quentin, but there aren't enough rooms there for everyone and the prices have escalated dramatically in recent years.
As I said, we used Des Peres Travel for our travel arrangements in 1999, including airfare, hotel, transfers, and bag drop service. Their prices were fairly reasonable, as was the service. We also enjoyed the celebration dinner after PBP. We signed up for but did not take the orientation tour in Paris. We'd already been there for several days before the tour took place and had already visited all of the places on the tour. It's not hard to navigate in Paris if you have a map of the city and a map of the metro (free at the train station). Our biggest problem in '99 was that the most direct RER train line to Paris was shut down for construction; construction was again encountered in 2003 between central Paris and St Quentin. Even with this problem you could route around that line and still use the trains to get to Paris. The metro and RER are simple to use, just read up on it a little or ask some of the other riders for advice.
In 2007 I stayed in central Paris and used the RER to go back and forth to St Quentin without any problems. This let us stay in a much more affordable hotel than the ones near the start area that jacked up their prices. The RER train ride is short and frequent, and you have much easier access to the tourist areas of Paris. Remember, though, that while the RER permits uncased bicycles the Metro system doesn't. Be prepared to carry your bike up and down the steps in the stations, of course.
© Mark D. Wooldridge, December 2008.