A Mathematical Approach to
The Construction of Multi-plate Hachi
By Matthew Minton, aka Fujiwara Takaharu
The task of patterning a three-dimensional, curved object onto 2-dimensional paper has always been challenging. The purpose of this paper is to provide a mathematical approach to pattern-making for multi-plate hachi, the bowl section of a Japanese kabuto.
Background
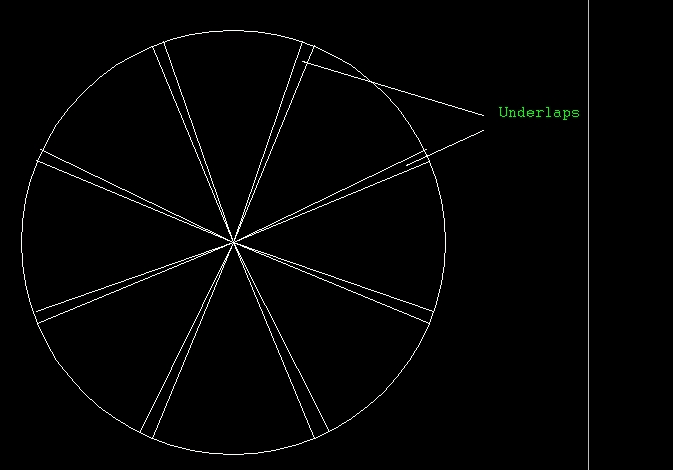
A kabuto is typically made of four parts: the hachi, or bowl, the koshimaki, or skirt plate, the mabizashi, or bill, and the shikoro, or pendant lames. In cheaper versions, the hachi consists of three plates: a wide ventral plate running front to back and two dished plates on the sides. These three plates are tied together by the koshimaki. On fancier kabuto, the hachi was make of a series of (almost) identical, wedge-shaped plates. These plates were riveted together by means of a underlap on each plate, with the exception of the center-front plate, which had no underlaps.
Fig. 1 - Sections of an 8-plate hachi
Limitations
The methods described in this paper will only be useful for patterning a hemispherical multi-plate hachi. Hemispherical models were common in period, but other varieties, such as the momonari (peach-shaped) hachi, will require the use of a kata to pattern the pieces. Throughout this paper I will use an 8-plate bowl as my reference, though the techniques described can be used to pattern any number of plates (NB: the upper practical limit for this method is about 64 plates. This will be demonstrated later).
The Method
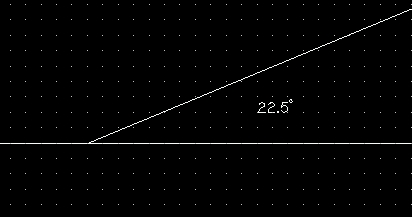
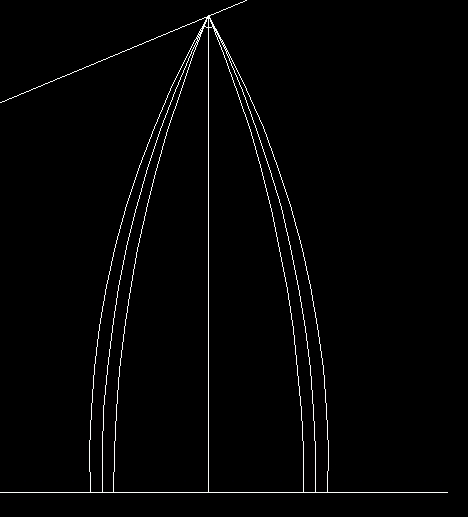
The first two piece of data you will need is the circumference of the bowl and the number of plates you wish to make the bowl out of. For convenience (and because it would fit my head), I will use a circumference of 24” and eight plates. Divide 360° by 8, which yields 45° . Divide this by half, yielding 22.5° . Why in half? When you pattern out the plate by this method, you only get the right half of the plate. Doubling the pattern over will yield the complete plate. Now, divide 24” by 8, which yields 3”. This is the base width of the exposed portion of the plate. Divide 24” by 4, which yields 6”. This is the height of the plate from the base to the apex. Now comes the fun part. Imagine a circle of radius 1 (called a unit circle in mathematics). Drawing a horizontal line through the center gives a horizon, and the intersection of the horizon and the circle on the right side is defined as 0° . Draw a second line (line B) through the center at an angle of +22.5° . This line also has a radius of 1. Draw a third line perpendicular to the horizon through the point where line B and the circle intersect. You should now have a right triangle with hypotenuse of length 1.
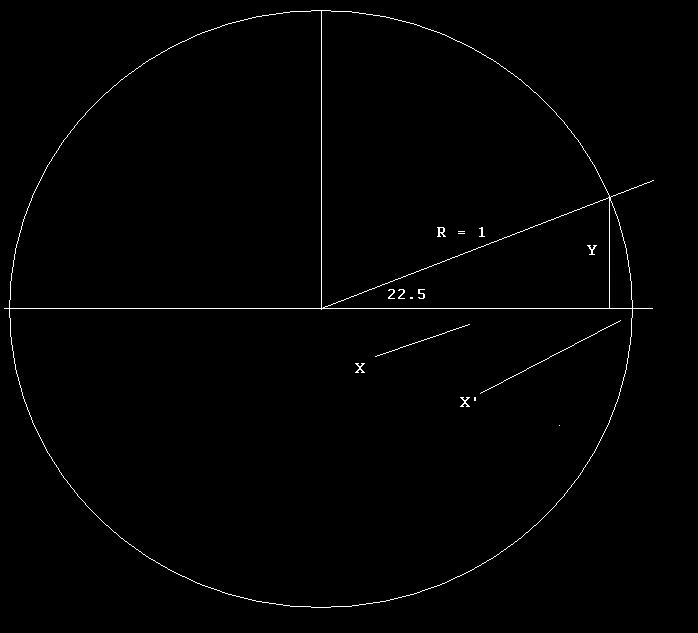
Fig. 2 - The unit circle
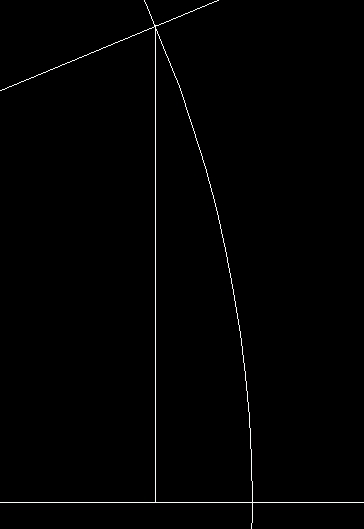
Fig. 3 - The right half of the plate
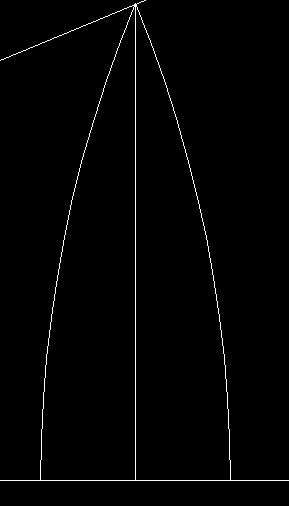
You now can see the right half of the wedge that will become our pattern for the plates. You notice I have the horizon divided into X and X’. To get the length of X, divide Y (in our case, 6") by the tangent of 22.5° This gives 14.5". Add to that X', which is half the desired plate width (1.5" in our example), giving 16". This corresponds to the radius of a circle needed to generate the proper arc. Note it is only necessary to draw enough arc to connect our 6”x3” T.
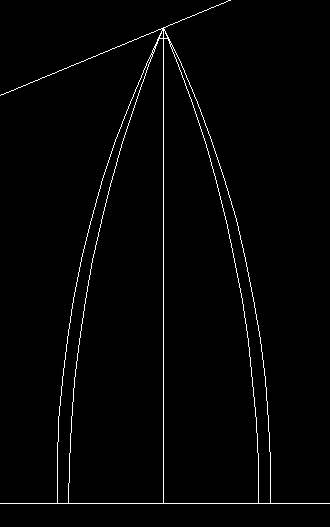
Draw the mirror image of the arc on the left side of our T to generate the finished exposed portion of our plate. Label these arcs the ‘exposed area’ lines. The rib and underlap sections are simply lines parallel to the exposed area. For the rib, start at a point 1/8” from the left edge of the base and draw a line parallel to the exposed area up to the apex. Repeat on the right side and label the ‘rib line‘. For the underlap, start at a point 1/8” from the left edge of the rib line and draw a line parallel to the rib line up to the apex. Again, repeat on the right side and label the ‘underlap‘ line. Add a rectangle ½” wide by the length of the base to the bottom of the exposed area. This will become the section the koshimaki is attached to. Your drawing should now resemble Fig. 3, what I call the universal plate. With this pattern, you can make any of the four different types of plates required for a multi-plate hachi (center front, left, right, and center back, ribbed or unribed), depending on where you cut. For the center front plate, cut along the exposed area line; for the left and right plates (3 each on an 8-plater), cut along the underlap line on the leading edge and the exposed area line on the trailing edge; for the center back plate, cut along the exposed area lines on both edges. For a ribbed bowl, cut along the rib line instead of the exposed area line for all plates.
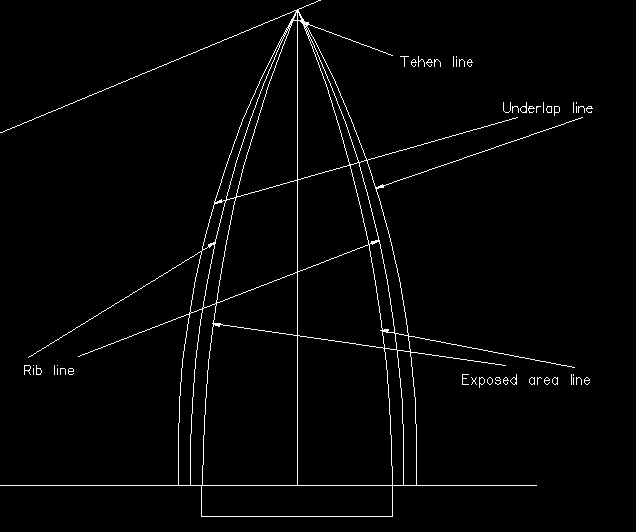
Fig. 4 - The universal plate
You will notice that I have added on my universal plate pattern a line called the ‘tehen’ line. The tehen is a round hole in the top of multi-plate hachi that is decorated with a variety of copper or brass washers held together by a copper tube running through the hole. I cut my tehen at 1/8” from the apex straight across. This gives a finished diameter of ¼”, a standard size for a copper plumbing coupling. Some finishing will be needed, as the initial shape is an octagon, not round.
Why 64 plates is the practical limit
Say you want a 64-plater (not unknown in period). Assuming the same 24” circumference, the exposed base length will only be 3/8” wide (!). To generate the proper arc, you would need a circle of radius (3/16“)+(6"/tan (1.40625° )) = 122.3”!. Not impossible, to be sure, as all this is easier done on a computer, but certainly time consuming. Additionally, you can only have a maximum underlap width of 3/16”, since the center front plate has to accept two underlaps, one from the right and one from the left.
I recommend using a CAD program to pattern out your plates if you have access to a computer. I used the freeware CAD program CadStd Lite for the graphics in this paper.
Acknowledgements and Bibliography
My thanks and gratitude to A.J. Bryant, a.k.a. Baron Effingham, a.k.a. Hiraizumi Tadanobu, for his exhaustive research and personal experience on this subject. He is a beacon unto us all.
Bryant, A.J. Nihon Katchu Seisakuben: An Online Japanese Armour Manual. 2005. http://www.sengokudaimyo.com/katchu/index.html
Back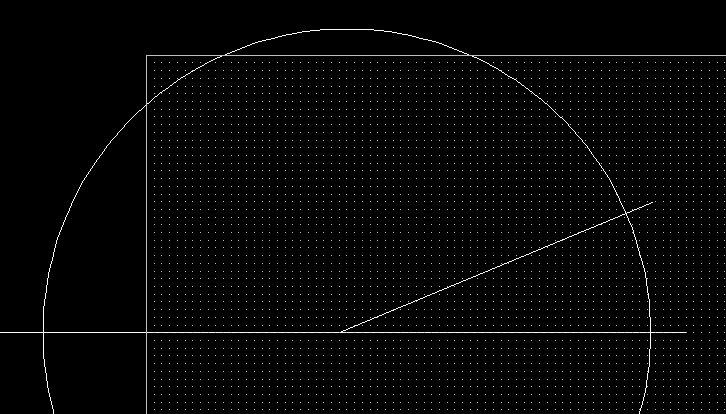