

Cool Shots
| StarCraft Battle Report #1 - Page 2 continued... | ||||||||||||||||||||||||||||||
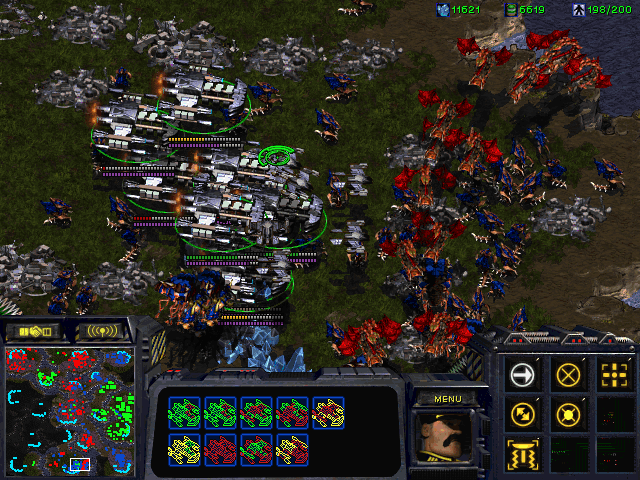
| After the near death experience and the dramatic rescue by RED KillerIceCream and BLUE Artemis allied forces, WHITE MatrixMeister constructed a Science Facility complete with Physics Lab for Yamato Cannon research. Battlecruisers and Wraiths were continally produced in a 1 to 1 ratio. Artemis realizing the versatility of Hydralisks recommenced Hydralisk production along with Mutalisks while KillerIceCream continued to amass the ever potent Mutalisk swarm. | ||||||||||||||||||||||||||||||
| The Insane AI's once again sent massive forces, both land and air units to demolish the RED and BLUE Zerg infestation in the middle but KillerIceCream's Mutalisk hoards and Artemis' combined Muta-Hydra force were able to repell the attack. MatrixMeister's veteran Battlecruiser fleet escorted by a Wraith squadron soon arrived at the hot spot as well to help quell the invaders. Insane AI innards were expelled in 360 degrees. | ||||||||||||||||||||||||||||||
| In retrospect, had the ORANGE AI protected their earlier built Carriers with Scouts the way I protected by Battlecruisers with Wraiths, things might have been different. Always remember, capital ships regardless of any number require smaller attack-defense ships to counter heavy anti-air resistance. Let this be a lesson. | ||||||||||||||||||||||||||||||
|
||||||||||||||||||||||||||||||
| RED, WHITE and BLUE forces (No. We are CANADIANS!!! Not Americans.) then proceeded to lay carnage and destruction on the remaining Insane AI's beginning with PURPLE, then ORANGE and CYAN together using a two pronged attack, and then finally BROWN. Basically, we LET LOOSE and KICKED BUTT. (Don't forget to click on pictures to see full screen) | ||||||||||||||||||||||||||||||
|
||||||||||||||||||||||||||||||
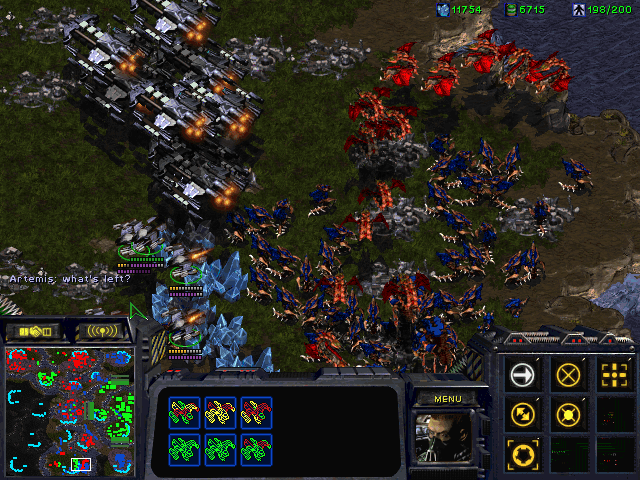
| Even with Wraith escort and the huge imposing allied forces of KillerIcecream and Artemis, MatrixMeister's Battlecruisers still sustain their fair share of bumps and bruises, but full armour upgrades and escorts prevent their fiery destruction. Here, the Allied forces stop to have their picture taken, say CHEESE. | ||||||||||||||||||||||||||||||
| Artemis threw one last question wondering where the last of the stragglers and survivors were hiding as the Allied forces successfully routed the remaining Insane AI units on a SEARCH and DESTROY mission. We took NO PRISONERS. | ||||||||||||||||||||||||||||||
|
||||||||||||||||||||||||||||||
| Lessons learned: (1) always protect your capital ships with fighters (2) always aid your allies, send over everything because if all your forces combined can't stop the attack what hope do you have of winning? (3) lockdown vs carriers would've helped (4) hydralisks are VERY versatile, that's why they form the backbone of most Zerg armies and (5) writing battlereports is pretty fun, but VERY time consuming!!! | ||||||||||||||||||||||||||||||
| This StarCraft battle took place on the early dawn of January 21, 2000. First reported on January 26, 2000, this BATTLEREPORT produced by MatrixMeister aka SkyFire aka EgolessEdd has since been re-edited and given an upgraded more sophisticated look (April 12, 2001). Hope you've enjoyed reading it as much as I have writing it. Please note that given the circumstances, you might detect a one sided biased perspective, namely mine, but that's because I was playing too while reporting... | ||||||||||||||||||||||||||||||
| Main | ||||||||||||||||||||||||||||||
|
||||||||||||||||||||||||||||||
| To Diablo2 Cool Shots |
||||||||||||||||||||||||||||||
| Back | ||||||||||||||||||||||||||||||