
Basic Map Making Tutorial (for Yuri’s Revenge)
By: JoshM6
Map editing for Yuri’s Revenge is quite simple. In this tutorial you will learn the basic’s of editing in Final Alert 2.
Materials:
NOTE’s are important and should be read.
Ok, let’s start. Open Final Alert 2. Then you see something like this:
From here I am going to break this Tutorial into sections:
- Setting Up A Map
- Sidebar Overview
Setting up A Map
At this point you want to click File->New. Then this will pop up:

Select Multiplayer map and click Next. Then a new dialog will pop up and here you want to select Create a completely new map. Then click next. The next dialog is a little trickier. Take a look:

The width tells the map editor how wide you want your map (set it to 70).
The height tells the map editor how high you want your map (set it to 70).
The theater is the type of terrain you want (SNOW, TEMPERATE, URBAN, NEW URBAN, LUNAR, DESERT), just select temperate because it isn’t too flashy.
Make the settings like the picture above.
Then your map will be loaded and an overview of the map made (Minimap). Then the space in the beginning of tutorial that was white will now be filled with what the map looks like (grass for now). You will also see little flags with numbers on them. It is important that you understand that these are locations where the Con. Yard will start (they are known as Player Locations). You must delete most of the player locations because the map is too small for eight players. Delete all but four by selecting Player Locations->Delete player location on the sidebar on the left. Delete the 4, 5, 6, and 7 flags by clicking on each of them.
Now your screen should look like this:

Now, you have to move them. Do this by selecting NONE at the top of the sidebar on the left (this unselects Delete player location). Then select one of the flags and hold the mouse to move it to a corner. It should look like this on your minimap:
NOTE: You should use the minimap to move around by clicking anywhere on it, to jump you to the spot immediately.
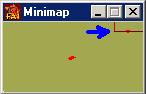
Do it to all of the locations so there are red dots in all of your corners (move all locations to the four corners). Then you have to put ORE on your map so click on Special / Overlay->Ore and Gems->Ore. From here you have to click on the Brush size on the toolbar at the top and select something bigger, like 5x5 (Brush size determines how big you paint stuff on your map, for example with ground, ore and gems, and almost everything). Then click where you want the ore! You can click as much as you want but make sure that you don’t overdo it. Just put a big patch in the middle. Like this:

Your map is set (you can add more though)! Now you can go to File->Save As, which will save your map to a .yrm extension. Then a dialog will pop up saying all the errors in your map there shouldn’t be any so click OK. Then enter the name you want (make sure you the place it is saving it in is the RA2 folder). Your dialog should look like this to make the map work with Yuri’s Revenge:
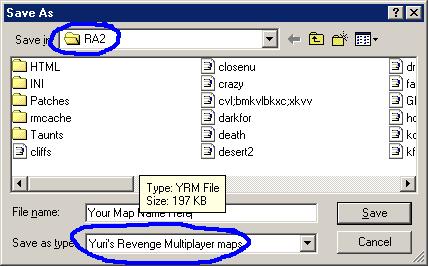
NOTE: To make sure that your map works with Yuri’s Revenge, save it as Yuri’s Revenge Multiplayer maps.
That pretty much raps it up for this section!
Sidebar Overview
In this section we will go over the Sidebar of Final Alert 2.
The Sidebar is outlined in blue and is where almost everything on your map will come from (Buildings, Trees, Ore, Infantry, Vehicles, etc.):
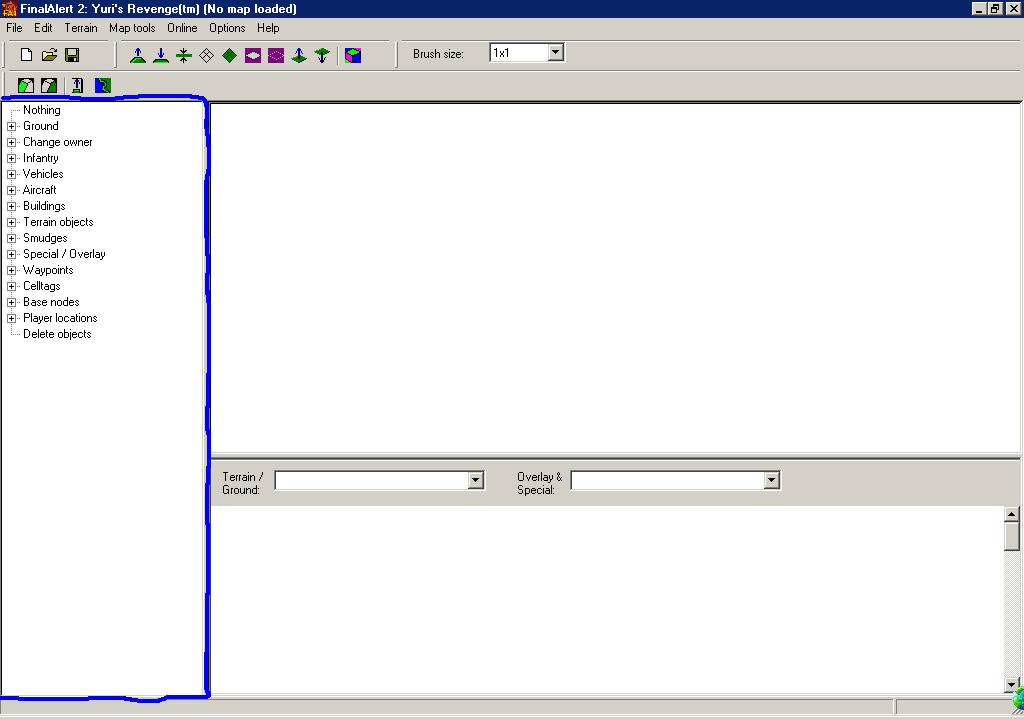
NOTE: All of these will not pop up unless you have Options->Beginner Mode set to OFF.
I will go down the list describing what every tab contains or does:
None
– Allows you to move objects, NOT overlay.Ground
- Puts different terrain (grass, dirt, cement, etc.) on the map.Additional Info.: The size is controlled by the Brush Size drop down on the toolbar.
Change Owner
– Changes the owner of an object such as a building or vehicle.Additional Info.: You should not try to place buildings, infantry, aircraft or vehicles on a map unless they are NEUTRAL (don’t even try).
Infantry
– Puts infantry on the map.Additional Info.: You can put up to three infantry on one tile at a time.
Vehicles
– Puts vehicles on the map.Additional Info.: You can only put one vehicle on a tile at once.
Aircraft
– Puts aircraft on the map.Additional Info.: Just like vehicles, only one on a tile.
Buildings
– Puts buildings in the map.Additional Info.: Remember they won’t appear on map unless they are NEUTRAL.
Terrain Objects
– Puts trees, ore drills and other terrain objects on the map.Additional Info.: Home to RANDOM TREE PLACER.
Smudges
– Puts smudges or craters and scorch marks on the terrain.Special / Overlay
– Puts ore and gems, walls, bridges (also erases overlay).Additional Info.: You can only delete objects in Special / Overlay with the ERASE OVERLAY FEATURE.
Waypoints, Cell Tags, and Base Nodes
– Has to do with Single player map making mainly.Player Locations
– Inserts a player location or a place a player starts with his Con. Yard and units.Delete Objects
– Deletes objects that are NOT overlay objects and are NOT ground.This covers most of Basic Map Making Tutorials in Final Alert 2. From here you can do a lot. But there is a lot more to learn about making maps including raising terrain, triggers, INI editing and much more. This is the only tutorial I will make for Final Alert 2 Map Making because I don’t do that anymore but there are plenty of places that can answer your questions including the links at the top of the page.