|

~*~ Little Things ~*~

Vika's original Dutch tutorials
can be viewed
here
Terms
of
Use
None
of the
images
used
in
these
tutorials,
which is offered for download in the zip files,
nor the tutorial results may
be
used
for
any
commercial
purposes
in
any form whatsoever
!!
The
copyright
remains
with
the
original
artists
and
are
protected
by
international
copyright
laws.
Artwork used in the tutorials is used for
educational purposes only.
Copyright of the tag design remains solely with
the tutorial writer.
You cannot claim the tag design or tag results as
your own or sell it as your own.
You cannot sell the images used in the tutorials
as part of a web design or web sets or anything
else.
NOTHING CAN BE SOLD!!
Kindly report any illegal sale of the tutorial
results or material to
Maggie
Magstags
Download the supplies
here
***
FILTERS NEEDED:
Graphics Plus - Cross Shadow
***
Change the foreground color to #c6c6c6,
background color to black.
1.Open a new transparent canvas, size 650-500
Fill with black.
2. Add a new raster layer.
Fill with the foreground color.
3. Layers - Load/Save Mask - Load Mask From Disk:
find the 'Birry 2023 roos'- mask:
'Invert' should not be checked, and apply.
Merge group in the Layers palette.
Change the layer opacity to 60%
in the Layers palette.
4. Add a new raster layer.
Fill with the foreground color.
5. Layers - Load/Save Mask - Load Mask From Disk:
find the 'Birry 2018 man'- mask.
Apply.
Merge the group layer in the Layers palette.
Change the layer opacity in the Layers palette to
50%.
6. Layers - Merge - Merge Visible
7.Effects - Texture Effects - Texture: Hatch Fine
Shallow:

8. Activate the Preset Shapes Tool
and find the 'Karin 05'- shape:

Lock the foreground color.
Draw the shape from the top left
to the bottom right.
9. Convert the vector layer to raster layer
in the Layers palette.
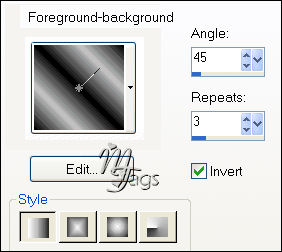
10. Unlock the foreground color.
Change the foreground color to gradient
with these settings:
11.Activate the Magic Wand
and select the shape.
Fill the selection with the gradient.
12.Effects - Filter Effects - Graphics Plus - Cross
Shadow
with these settings:

13.Selections - Select None.
14. Use the Eraser Tool to erase
the horizontal bars of the shape
as seen below:

15.Effects - Texture Effects - Blinds:

16. Effects - 3D Effects - Drop Shadow:
2 / 2 / 50 / 2 / color black.
17.Change the layer opacity in the Layers palette
to 85.
18.Open de tube (Marja 883)
Edit - Copy
Edit - Paste as a new layer onto the canvas
Move the tube to the left
as seen in the example.
19.Effects - 3D Effects - Drop Shadow:
2 / 2 / 70 / 2 / color black.
20. Activate the Selection Tool - Rectangle.
Draw a selection at the bottom
of you image as seen below:

Press delete on your keyboard.
21. Selections - Select None
22. Activate the Brush Tool and
find the 'Little Things-Vika'- brush.
Change your background color to black
and right-click with your mouse on the canvas
where you want the brush.
23. Layers - Merge - Merge Visible
24. Add a 1 pixel black border.
25. Image - Add Border: 55 pixels foreground
color.
Select the border with the Magic Wand.
Fill with the gradient.
26. Apply the same Cross Shadow - effect.
Repeat 1x.
27. Effects - Texture Effects - Texture: Hatch
Fine Shallow
with the same settings as before.
28. Selections - Select None
Selections - Select All
Selections - Modify - Contract by 55.
Selections - Float
Selections - Defloat.
29.Effects - 3D Effects - Drop Shadow:
2 / 2 / 70 / 2 / color black.
Repeat with H & V on -2.
Selections - Select none.
30.Open tube (s233t2)
Image - Mirror
Image - Greyscale
31. Edit - Copy
32. Edit - Paste as a new layer onto the canvas
Move it into position (as seen in example tag)
33. Add your name
34. Layers - Merge - Merge All
35. Image - Add Borders:
1 pixel black.
And that's it :)
********************
Vika
November 2006

Email
Maggie
at Magstags
Email
Vika
Translated 30th May 2007

Website design and management by
©Magstags
Home |
Filter links |
PSP Goodies |