|
~*~Dior~*~
22

Click on the image to view the working
script.
Jeannette's original Dutch tutorial can
be viewed
here.
***
Materials
needed:
Filters:
Eye Candy 3
Supplies:
here
The
lovely tube is from Top Design
***
Save the
brush in your PSP 9 Brush folder
(import it
into PSP 9)
Change your
foreground color to white,
your
background color on #A35360.
***
1. Open a new
canvas of 400 x 400
fill with
white.
Activate your
Brush tool, find the " bubble" brush
and apply
with the right-click of your mouse (your dark color)
2. Image --
Mirror
Resize to
550x400 pixels
3. Open the
lady tube,
resize to 400
pixels in height.
Layers --
Load/Save Mask -- Load Mask from Disk,
find the mask
20-20 and apply.
Delete the
mask layer in your Layers Palette
and reply "
yes" to the question.
4. Copy and
paste your lady tube onto the background canvas.
5. Open the
lipstick, the eye, and the mouth tubes.
Resize them
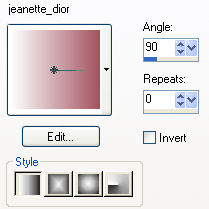
all to 100 pixels in height.
6. Change
your Color palette to gradient,
with these
settings:
7. Open a new
canvas, size 100 x 100 pixels
and fill with
the gradient.
8. Add a 2
pixel black border,
select with
your Magic Wand and fill with silver.
9. Open a new
transparent image, size 200x200 pixels.
10. Copy and
paste the square onto the transparent background.
Image --
Rotate -- Free Rotate 45%.
Duplicate
this image 1x.
11. Resize
to: width 200, height 150
(the " lock
aspect ratio" should be unchecked).
Duplicate
this image
12. Copy the
lips-tube and paste onto this square.
Adjust --
Sharpness -- Sharpen 1x.
Merge all the
layers.
13. Copy and
paste the mouth tube onto one of the other squares.
Sharpen 1x.
Merge all the
layers.
14. Now you
have one empty square left.
Resize as in
step 11, but now the
width should
be 150 and the height 200.
Copy and
paste the lipstick tube onto this square.
Merge all the
layers.
15. Copy and
paste all these small images
onto the
bigger canvas and position them neatley
below each
other.
The corners
should touch.
16. Open a
new canvas: height 400 width 3
and fill with
the gradient.
17. Effects
-- Texture Effects --Texture,
with these
settings:

18. Sharpen
1x.
Copy this bar
and paste it 3x onto the background canvas,
see my tag
example.
19. Lock the
foreground color
and change
the background to silver.
Activate your
Text tool and type your name.
I used the "
Bookman Old Style" font, size 24,
change the
text direction as seen below:

20. Effects
-- Filter Effects --Eye Candy 3 -- Drop Shadow,
with the
standard settings.
Sharpen once
and position the text neatly between the lines.
21. Change
your background back to the " rose" color,
unlock the
foreground color (set in on silver),
change the
text direction to " horizontal" again,
size 36,
stroke width on 1,
and type "
Dior" .
Repeat the
same drop shadow.
22. Add a 2
pixel black border, select,
and fill with
silver.
Deselect.
23. Add a 3
pixel border in either your background color, or the
gradient.
24. Repeat
step 22.
Your tag is
finished.
If you want
to use my script you will need
to make 1
additional background tile,
as well as a
background for the sidebars.
Enjoy !!!
Download the empty script

BACK

If you enjoy Jeanette's tutorial please be so kind and write
a message in her guestbook.
Translated on 30th August 2005

The graphic design of this page is copyrighted to Magstags.
Home |
Filter Links |
Email|Terms Of
Use
|