|

Gerda's original Dutch tutorial can be found
here
Yvonne
I dedicate this tutorial to Yvonne who tests all my
tutorials before they go online.
Yvonne is also an Elvis
fan,
and is a darling woman.
Yvonne doesn't think
it's such a big deal, but
I want to do it anyway.
hihihihi.
So this tutorial is for
you, darling Yvonne.
You need a good
knowledge of PSP for this tutorial
What do we need?
IC Software' s Filters Unlimited;
DSB Flux;
Simple filters:
download here
Supplies:
A pspimage
yvonneger ;
A corner vonger;
A Gold pattern
and the tube I received
from Yvonne -
please leave the name of
the tube intact -
it was tubed by Monique monique 42_F526,
Brush PSP grannyspread
007;
Bickam Script font.
Download the supplies here
Do you have everything saved?
Stop the music by
pressing Esc on your keyboard.
Do you have something to
eat and your answering machine switched on? :)))))
Are you ready ? lets
go and follow me !!!
Step 1
Open your Yvonneger psp image
Foreground color on #613a2a
Background color on #eec9ba
(Invert checked)
Gradient-->linear;
angle 0
repeat 0
( the dark color
must be on top)
Fill the canvas with
the color.
IC Software' s
Filter unlimited -->
buttons en frames-->
3D Glass frame 1 -->
frame size 50
contrast on 95
Step 2
New raster layer
Foreground on the
gold pattern
Selections -->
Load from Alpha
channel --> yvonneger1
Fill with your gold
pattern
Selections-->
Modify --> Contract by 1 and press delete
KEEP SELECTED !!!!!!!!
Change the settings
of the gradient to angle 45, repeat 0
Fill the selection
with the gradient
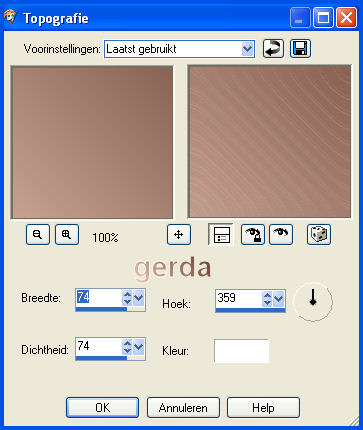
Effects -->
Artistic Effects -->Topography, with these settings:
Adjust --> Sharpness
--> Sharpen
Adjust --> Sharpness
--> Sharpen More
Deselect ( Ctrl +D )
Step 3
Duplicate this layer
Image --> Flip
Image --> Mirror
Image --> Resize 85%
" Resize all layers"
- NOT CHECKED!!
Drag this circle
somewhat to the bottom - as seen in my example on the
top of this page
Lock the bottom
layer and activate one of the other layer.
Merge these layers
visible.
Unlock the bottom
layer again
Duplicate this
circle layer
Activate the circle
layer which is below the copied layer.
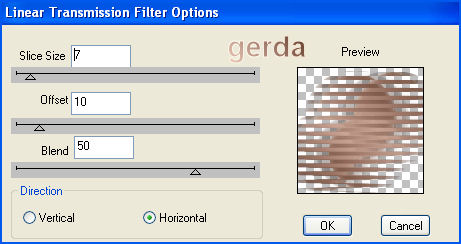
Filter DSB -->Flux
Linear Transmission -->as seen below:
Change the opacity
of this layer to 24% in your layers palette
Filter Fm Tile Tools -->Blend
Emboss
Drop Shadow 1/1/40/0
color black
Activate this circle
layer again ( it should be the top layer)
Drop Shadow
10/10/50/5 color
#613a2a
Step 5
Open the corner cornervonger.
Paste it in the top
left corner
Filter Simple -->top left mirror
Merge all layers
It should look like
this now:

Step 6
Open your tube--> tubed by monique 42_F526
Paste as new layer
onto the canvas
Drag it to the
right, just before the top left corner
Make sure it is even
with the border, as seen below:

Drop Shadow 10/10/50/5
color black
Step 7
New raster layer
Layers -->
Arrange -->Move Down
So :))) on
this layer we' re going to apply the brushes
(This layer should
be below your tube layer now)
Foreground color on
the gold pattern
Brushes -->PSP grannybreadspread 007
size 200
Stemple the flower
in the bottom circle and click once more with your left
mouse button
This way the flower
will be a bit more golden.
Yvonne is crazy
about gold. hihihihi.
Repeat it on
the same layer in the top circle,
Adjust -->
Sharpness--> Sharpen
Drop Shadow 1/1 /56/0
color #613a2a
Merge all layers
Step 8
New raster layer
Select all and fill
with the gold pattern
Selections -->
Modify -->
Contract by 2 pixels
and press delete.
Deselect.
New layer
Foreground on gold
Open your Bickham Script
Fancy 2 - font, size 36
Type the first
letter of your name and drag it below.
Why? Because the
letter should be against the frame, otherwise it will be
outside the frame if
you type it
all at once. :))))
Drop Shadow 1/1/64/0
color #613a2a
New layer. Type the
rest of your name
and drag it into
position
Repeat the drop
shadow.
Merge all layers
VISIBLE
Select All
Drop Shadow 1/1/100/0
color #613a2a
Repeat with -1/-1
Deselect and you're
finished !!! :)))
I wrote this
tutorial with love.
Hugs
Ger
This tutorial can be used freely.
All I ask of you is to link to it only
and not copy it,
since it takes a lot of time to write a
tutorial like this.
I
don't have time to respond to emails,
however, you are welcome to
ask
questions in my PSP
group
"
Ger's Psp Café "
Click here
if you're
interested.
Back to Index
Design by Gerda©
translated 3rd
July 2005
by ©magstags
Visit Gerda's Dutch
website here


This website was created in March 2005 and is owned
by
©Magstags
Home |
Filter links |
Email | Terms Of Use
|