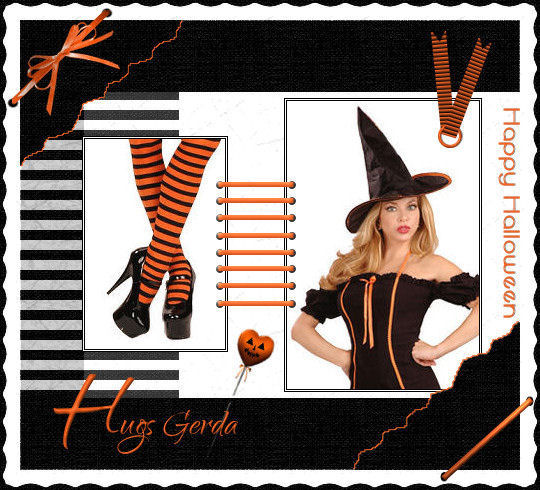
WitchCraft
Gerda's original tutorial can be
viewed
here
Translated 6th October 2006
This tutorial can be done
in either PSP 9 or 10.
An average to good knowledge of PSP
is required.
***
MATERIALS NEEDED:
|
Filters: |
Filters Unlimited
DSB Flux
Photo Aging Kit - import into Filters
Unlimited |
Supplies: |
'gerdawitchcraft'-
psp image
tube halloweenSEgerda
2 images |
Supplies:
Download here
Right-click on the downloaded zip
files
and click on 'exctract to here',
otherwise Lycos will only show and empty file.
Copy everything to your files before you start
the tutorial
and restart PSP for the filters to work.
***
Step
1
Open the 'gerdawitchcraft'- image
(It contains the selections in the Alpha channel )
Fill the image with black.
Filters Unlimited -->Paper Texture
--> Canvas Fine:156/87.
New layer.
Foreground color on white.
Load the 'gerdaS1'- selection from the Alpha channel.
Fill with white.
Deselect.
Filter DSB Flux --> Linear Transmission:
5/18/50,
horizontal is checked.
Filters Unlimited -->Paper Texture -->Japanese
Paper: 84/160.
Merge layers.
Step
2
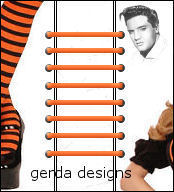
Open the 2 images.
Add borders to each picture:
1 pixel black;
1 pixel white;
1 pixel black.
Copy the pictures and paste each one onto the canvas
as new layers.
Note: the small image should be positioned right next to the
line,
as seen below:
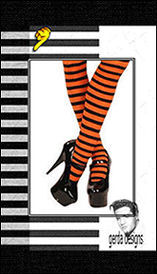
The witch will be positioned later on.
Step 3
Open the 'halloweenSE gerda'- tube.
Activate the 'gerdastiksel A'- layer in your Layers palette.
Copy and paste as a new layer onto your canvas.
Position it as seen in the tag example.
Just shift the witch-image out of the way.
Merge layers.
Step
4
Add a new layer.
Load the 'gerdaS2'- selection from the Alpha
channel.
Fill with black.
Filters Unlimited -->Paper Texture
-->Canvas Fine - 156/87.
Deselect.
Drop shadow: 1/1/100/0, color #f46020
Repeat with these settings: -1 -1 /100/0
Step 5
Add a 20 pixel border in a color not
present on your canvas.
Select and fill with white.
Filters Unlimited --> Paper Texture -->
Japanese Paper, 84/160.
Deselect.
Make sure you have imported the Photo Aging Kit - filter
into
Filters Unlimited.
Find the filter now and apply the 'photo
frame 2'- effect.
Select the outside black border with your Magic wand.
Filters Unlimited --> Paper Texture
--> Canvas Fine:156/87.
Deselect.
Step 6
Open the 'halloweenSEgerda'- tube.
Activate the 'gerdastrik'- layer on the image.
Copy and paste as a new layer onto your canvas.
Drag the bow to the top left.
Activate the 'gerdastiksel2'- tube.
Copy and paste as a new layer onto the canvas.
Drag it to the bottom right.
Activate the 'gerdalintjeA'- layer.
Copy and paste as a new layer onto your canvas.
Drag it to the top right of the canvas.
Activate the 'pin'-layer.
Copy and paste as a new layer onto the canvas.
Drag it below, erase a little bit of the center of the pin
away.
It must appear as though it was pinned through the fabric.
Step 7
New layer.
Background color on #f46020.
Open the 'Cecillia'- font, size 18.
Type "Happy Halloween".
Drop shadow: 0/1/50/0 color black.
Image
--> Rotate-->Free Rotate -
90% - to the right.
Drag the text to the right side of the canvas.
Add a new layer.
Open the
'Qwigley'- font.
Type your name, or anything you like.
Make the first letter size 100, and the rest 36.
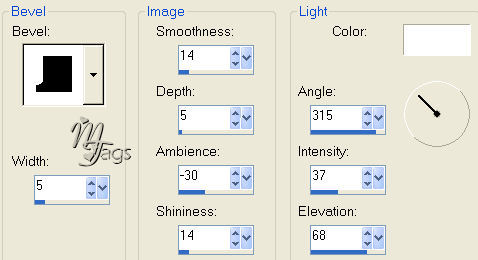
Apply an inner bevel with these settings:
Drag the name into position.
Merge all layers.
You're finished.!! :)))
Gerda's tutorial can be used freely
but cannot be linked to or copied.
Back to Index
Visit Gerda's Dutch
website here


This website was created in March 2005 and is owned
by
©Magstags
Home |
Filter links |
Email | Terms Of Use
|