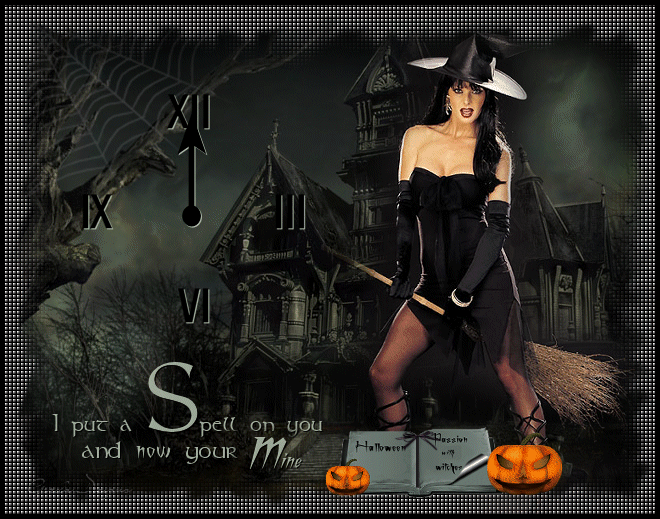
Put A Spell on You
Gerda's original Dutch tutorial can
be viewed
here
Translated 5th October 2006
This tutorial can be done
in either PSP 9 or 10.
An average to good knowledge of PSP
is required.
***
MATERIALS NEEDED:
|
Filters: |
Xenofex
|
Supplies: |
Image frame;
A
template;
2 Brushes:
3 Tubes:
2 Selections. |
Supplies:
Download here
Right-click on the downloaded zip
files
and click on 'exctract to here',
otherwise Lycos will only show and empty file.
Copy everything to your files before you start
the tutorial
and restart PSP for the filters to work.
****e
Step
1
Open
a new transparent image, size
650x500 px
and fill with black.
Open the 'templategerda44'-
image
copy and paste as a new layer onto the canvas.
Merge the layers visible.
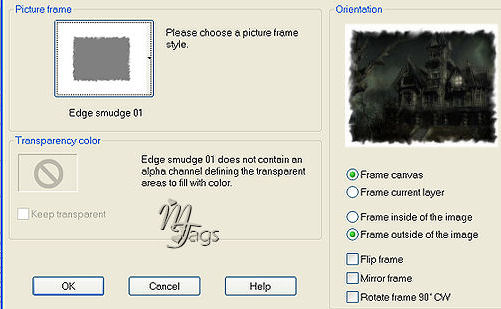
Go to Image-->
Picture Frame.
Find the 'Edge smudge 01' - frame
and apply with these settings below:
Highlight the
picture frame layer in your Layers Palette
(activate it).
Activate your Magic
Wand with 'Tolerance' on 20 and 'Feather" - settings on
2.
Click inside the white border to select it.
Go to Effects -- Texture Effects -- Blinds.
Apply with these settings:
4 / 100, color = Black
Horizontal = not checked.
Repeat, but this time 'Horizontal' should be checked.
Deselect.
Step 2
Activate your bottom
layer
Open the 'gerdaspider12'-
tube.
Copy and paste as a new layer onto the canvas.
Drag it to the top left corner as seen in the example
tag.
Merge all layers.
Change your foreground color to black.
Add a new raster layer.
Activate the Brush tool and find the
' gerdaklok16 ' - brush.
Apply it in the top left as seen in the example tag.
Apply a drop shadow to it
with these settings:
1/1/100/0, color = #b1bdab
Step 3
Open the 'gerdawitch12'-
tube.
Copy and paste as a new layer onto the canvas.
Drag her to the right, as seen in the example.
Open the 'gerdaboek12'-
image.
Copy and paste as a new layer onto the canvas.
Position the book in front of the witch.
Change your foreground color to #b1bdab.
Add a new layer.
Activate the Brush tool again.
Find the ' gerdatekst106'- brush.
Apply to the bottom left of the canvas.
Apply a drop shadow
with these settings:
1/1/100/0, color = black.
Add your watermark or name
and merged all layers.
Add a 5 pixels black border.
Step 4: The Animation.
Read the instructions very carefully
Open Animation Shop and minimize for now.
Go back to PSP.
Edit --> Copy your image in PSP.
Activate Animation Shop.
Go to Edit --> Paste As New Animation.
Back to PSP.
Selections --> Load/Save Selections --> Load Selection
From Disk:
Find the ' GerdaS94'- selection and apply.
Go to Adjust --
Brightness and Contrast -->
Apply with :
Brightness on 48 and Contrast on 21.
Selections -->Select None.
(Deselect)
Edit --> Copy.
Activate Animation Shop.
Edit --> Paste --> After Current Frame
Go back to PSP and undo all the changes to the canvas
for the selection ( the 'undo'-arrow should be clicked
3x)
( This is necessary to use the canvas
again to prepare the next animation frame)
Selections - Load/Save Selections --
Load Selection from Disk :
Find the 'GerdaS95'- selection
and apply.
Go to Adjust -- Brightness and Contrast
and apply with the same settings as before.
Edit --> Copy.
Open Animation Shop.
Edit --> Paste --> After Current Frame
(current frame should be frame 2 now)
Go back to PSP and
undo the steps again on the canvas.
(click 3x on the 'undo'- arrow)
Edit --> Copy the image again ( without new changes to
it).
Open Animation Shop
Edit --> Paste --> After Current Frame
(which should be frame 3)
You must have 4 frames in total now.
Step 5
Back in PSP.
Add a new raster layer.
Load the 'GerdaS94'- selection again.
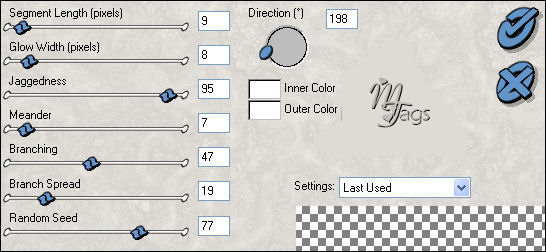
Apply this filter effect:
Xenofex -- Lightning
with these settings below:
Deselect.
Change the opacity of this layer to 22%
in your Layers Palette.
Merge all layers.
Load the 'GerdaS94'- selection again.
Adjust --> Brightness and Contrast:
Brightness = 52.
Contrast = 21.
Deselect.
Edit -->
Copy ( in PSP )
Open Animation Shop.
Edit --> Paste --> After Current Frame.
Highlight the first 4 frames.
Go to Animation --> Frame Properties:
and set the Display time to 30.
Highlight the 5th frame
and set the display time(speed) to 15.
You're finished !
Now you can run the image through the
Animation wizard to save it.
Enjoy!
This lesson can be freely used.
All I asked is that you only text - link it and
do not copy it.
Back to Index

Design by Gerda©

This website was created in March 2005 and is owned
by
©Magstags
Home |
Filter links |
Email | Terms Of Use
|