Melody
Gerda's original Dutch tutorial can be found
here
I
named this tutorial after Melody
who
loves these kind of creations
(
Ciska is her real name )
View
her PSP
website
This is
a PSP 9 tutorial
You will
find the materials needed below.
A good
knowledge of PSP is required.
FILTERS
needed:
Flaming
Pear - Flood
FM Tile
Tools -
download here
SUPPLIES
Gold
pattern
;
Psp
image melodyger;
Brush bg_ text 6,
BC-brush 16;
Font Bickham
Script ;
This
beautiful tube of
Susan
-
susan t 1319
Download supplies here
Ok, do
you have everything filed away?
Stop the
music by pressing Esc on your keyboard
Enable
your answering machine;
Find
something to eat:))
Ok are you ready ?? Lets
go and follow me :)))
Step 1
Open the melodyger
- psp image
Foreground color #fdd2b0;
Background color on white
Gradient: Style linear
Angle 45
Repeat 3
Fill the
canvas with the gradient
Step 2
New
layer
Foreground color on
#871f26
Go to
Your Brushes and find the bg_ text 6
Apply in
the center of the canvas
Go to
you Deformation Tool and pull the brush layer
out to
fill the canvas completely
Change
the opacity of this layer to 64%
Merge
layers
Filter Fm
Tile Tools--> Blend Emboss
Step 3
Open
your tube -susan t 1319
Paste it
as new layer onto the canvas
Reduce
the size of this layer to 90%
" resize all layers" NOT CHECKED
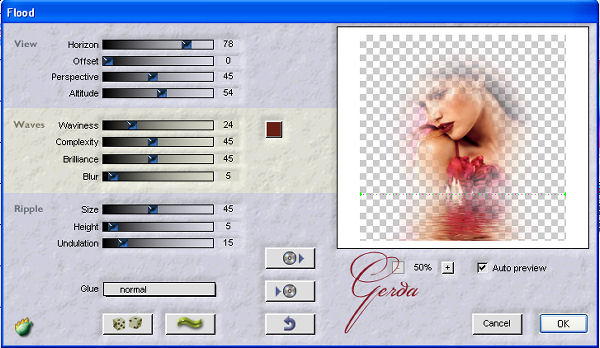
Filter Flaming
Pear --> Flood, with these settings:
Step 4
Foreground color #871f26
Add a
new layer
Go to
your brushes and find BC-brush 16
size 250 -->Step
32--> Opacity 100
Apply
the Swan to the canvas as seen in my example above
Place it
more or less on the water to show a little of the bird
Drop
Shadow 10/10/50/5 color black
Filter
flaming pear --> Flood--> horizon setting on 87
Merge
all layers
Step 5
New
layer
Fill
with the gold pattern
Select
All --> Modify --> Contract by 1 pixel and press delete
Selections
--> Modify --> Contract by 3 pixels
Fill
with the gold pattern
Selections --> Modify by 1 pixel and press delete
Deselect
Merge
All layers
Inner
Bevel soft round edge 8 ,
14/5/-30/14
Angle 315, 37/68
color white
Step 6
New
layer
Open the
Bickham Script font and add your name
at the
top of the canvas. Rotate it a bit.
Drop
Shadow 1/1/61/0 color #400000
Merge
Layers
Load the melody1ger
selection from the Alpha channel
Effects -->
Illumination Effects --> Sunburst, as seen below:
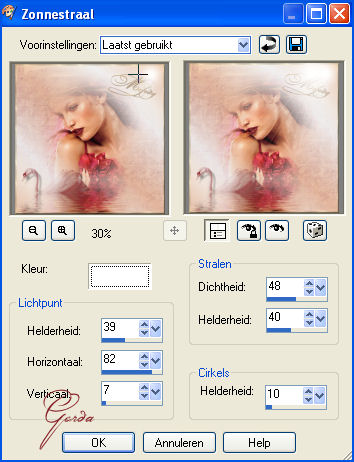
Deselect.
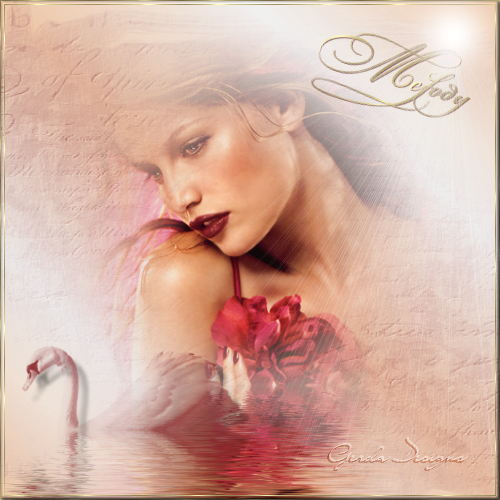
Your
Melody Tag is finished !!! :))
I wrote
this tutorial with love
Hugs
Ger
This tutorial can be used freely.
All I ask of you is to link to it only
and not copy it,
since it takes a lot of time to write a
tutorial like this.
I don't have time to respond to
emails,
however, you are welcome to
ask questions in my PSP
group
" Ger's Psp Café
"
Click here
if you're
interested.
Back to
Index
Translated 4th July 2005
by ©magstags
Visit Gerda's Dutch
website here


This website was created in March 2005 and is owned
by
©Magstags
Home |
Filter links |
Email | Terms Of Use
|
