Hypnosis
Gerda's original Dutch tutorial
can be viewed here
Translated 6th October 2006
This tutorial can be done
in either PSP 8, 9 or 10.
An average to good knowledge of PSP
is required.
***
MATERIALS NEEDED:
|
Filters: |
FM Tile Tools
Filters Unlimited
David Blends |
Supplies: |
Gold Pattern
2 Filly tubes
Preset Shape:gerdablok6.
3 Selections
1 Font |
Filters Unlimited :
download here
The David Blend
filter should be imported
into Filters Unlimited!!
download here
Supplies:
Download
here
Right-click on the downloaded zip
files
and click on 'exctract to here',
otherwise Lycos will only show and empty file.
Copy everything to your files before you start the
tutorial
and restart PSP for the filters to work.
***
Step 1
Change the foreground color to
#baa1be,
background to #64405f.
Change the foreground color to gradient
with these settings:
Style - Linear;
Angle - 45;
Repeats - 1;
Invert - unchecked.
Open a new transparent canvas, size 600 x 400px.
Fill the canvas with the gradient.
Import the David Blend filters into Filters Unlimited
now
if you haven't done it yet !!!!
Filters Unlimited -->Layout Tools -->Contrast
Checkers -->
size amount on
4
Filter-->FM Tile Tools -->Blend Emboss
Step 2
On the same layer:
Selections --> Load / Save --> Load From Disk.
Find the 'S40'- selection and apply.
Fill the selection with the gradient.
Open the ' filly 1069'- tube
Copy and Paste as a new layer onto the canvas.
Drag it to the left.
Selections --> Invert.
Press 'Delete' on your keyboard.
Deselect.
Activate your bottom layer.
Add a new raster layer.
Change your foreground color to your light color.
Selections --> Load/Save --> Load Selection From Disk.
Find the
'GerdaS42'- selection and apply.
Effects -->
Texture Effects -->Blinds.
Apply with the settings: 4/9 - all options
checked, color black.
Merge
all layers.
Step 3
Your foreground on the light color.
Add a new raster layer.
Selections --> Load / Save --> Load From Disk.
Find the ' GerdaS41'- selection and apply.
Fill with your light color.
Effects -- Texture Effects -- Blinds.
Apply with these settings:
4/9 , all options checked, color black.
Deselect.
Duplicate this layer.
Image --> Mirror.
Merge layers.
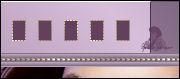
Step 4
Change your foreground color to the gold pattern.
Activate the Pen tool.
Line style - dots
Size - 2.
Draw 2 lines
as seen below.

Adjust -->Sharpness --> Sharpen.
Drop shadow:
0/1/40/0 color black
Layers -->duplicate.
Image --> Flip
Merge layers.
Add a new layer.
Fill with the gold pattern.
Selections --> Select All
Selections --> Modidy --> Contract by 1.
Press the 'Delete key' on your keyboard.
Deselect.
Step 5
Foreground color on gold.
Background color on the dark color.
Activate the Preset Shapes Tool.
Find the 'gerdablok6'- shape.
Change the linestyle to 'dots' -
'Retain Style' should be unchecked.
Draw a line in the top left
as seen below.
Duplicate this layer.
Image --> Mirror.
Image --> Flip.
Merge the layers.
Step 6
Open the'filly hypnose'- tube.
Image --> Resize 4x to 80% Bicubic.
Copy and paste onto the canvas.
Apply a drop shadow:
0/5/50/5 color black
Merge layers.
Background on gold.
Add your name.
The
'Sloop ScriptThree'- font was used
in the example tag.
Apply a drop shadow: 0/1/40/0 color black.
Add a 3 pixel border in your dark color
#64405f
Add a 1 pixel border in the gold pattern.
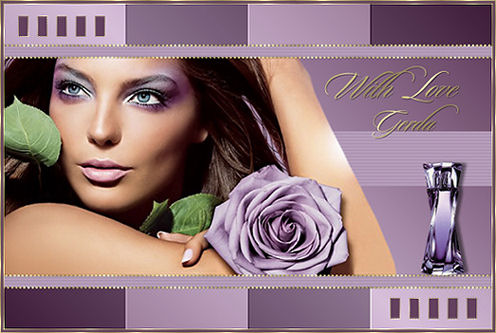
You're finished! :)
Back to Index
Visit Gerda's Dutch
website here


This website was created in March 2005 and is owned
by
©Magstags
Home |
Filter links |
Email | Terms Of Use
|